
Table of Content
- MVC Architecture
- Role of Backend
- Django
- URLs & Views
- Templates & Static Files
- Data and Models
- Forms
- Admin
- Sessions and Cookies
- Questions
- Middleware
- Comparison of Backend Frameworks
- Database Types
- Optimized All
- Lab: CRUD with Django
MVC Architecture
What is MVC?
MVC (Model-View-Controller) is a software architectural pattern that separates an application into three interconnected components. This separation helps organize code, making it easier to develop, test, and maintain applications.
MVC was originally developed for desktop applications but has become the foundation for most modern web frameworks. It promotes the principle of "separation of concerns" — each component has a specific job and should not interfere with the responsibilities of others.
Model (The Data Layer)
The Model represents the data and the business logic of the application. It is responsible for:
- Data Storage: Managing how data is stored, retrieved, and updated
- Business Rules: Enforcing the rules and logic of the application
- Data Validation: Ensuring data integrity before saving
- Database Communication: Interacting with databases to persist data
The Model is completely independent of the user interface. It doesn't know or care how data will be displayed — it only focuses on data management.
Responsibilities of Model:
- Define data structures (tables, fields, relationships)
- Validate data before saving
- Perform database queries
- Implement business logic (calculations, rules)
- Notify controllers/views when data changes
View (The Presentation Layer)
The View is responsible for displaying data to the user. It is the visual representation of the Model's data and handles:
- Data Display: Presenting information in a user-friendly format
- User Interface: Rendering HTML, CSS, and visual elements
- Templates: Using template engines to generate dynamic content
- No Business Logic: Views should only display, never process data
The View receives data from the Controller and renders it. It should be passive and not directly access the Model.
Responsibilities of View:
- Render HTML templates
- Display data from the Model
- Format data for presentation
- Handle visual layout and styling
- Generate responses (HTML, JSON, XML)
Controller (The Logic Layer)
The Controller acts as an intermediary between the Model and View. It:
- Handles User Input: Receives requests from users
- Processes Requests: Interprets what the user wants to do
- Coordinates Flow: Decides which Model to use and which View to render
- Updates Model: Instructs the Model to update data
- Selects View: Chooses the appropriate View for the response
The Controller is the "traffic cop" of the application, directing the flow of data between components.
Responsibilities of Controller:
- Receive HTTP requests
- Parse and validate user input
- Call appropriate Model methods
- Pass data to Views
- Return HTTP responses
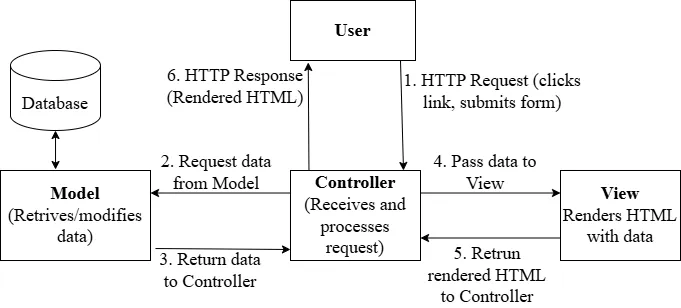
Detailed Request-Response Cycle
- User Action: User clicks a link or submits a form
- Request Sent: Browser sends HTTP request to server
- Routing: Server routes request to appropriate Controller
- Controller Processing: Controller receives request, validates input
- Model Interaction: Controller calls Model methods to get/modify data
- Data Processing: Model performs database operations, applies business rules
- Data Return: Model returns data to Controller
- View Selection: Controller selects appropriate View
- View Rendering: View receives data and generates HTML
- Response Sent: HTML sent back to user's browser
- Display: Browser renders the page for user
Benefits of MVC Architecture
| Benefit | Description |
|---|---|
| Separation of Concerns | Each component has a single responsibility, making code cleaner |
| Maintainability | Changes in one component don't affect others |
| Testability | Each component can be tested independently |
| Parallel Development | Frontend and backend developers can work simultaneously |
| Reusability | Models and Views can be reused across different parts of the application |
| Scalability | Easier to scale individual components |
| Code Organization | Clear structure makes codebase easier to navigate |
MVC in Different Frameworks
| Framework | Language | MVC Implementation |
|---|---|---|
| Django | Python | MTV (Model-Template-View) |
| Ruby on Rails | Ruby | Traditional MVC |
| ASP.NET MVC | C# | Traditional MVC |
| Spring MVC | Java | Traditional MVC |
| Laravel | PHP | Traditional MVC |
| Express.js | JavaScript | Flexible (can implement MVC) |
Role of Backend
What is Backend?
The backend (also called server-side) is the part of a web application that users don't see. It runs on the server and handles:
- Processing user requests
- Managing databases
- Running business logic
- Authenticating users
- Sending responses to the frontend
While the frontend is what users interact with (buttons, forms, colors), the backend is what makes everything actually work behind the scenes.
Frontend vs Backend
| Frontend | Backend |
|---|---|
| Runs in the user’s browser. | Runs on the web server. |
| Uses languages such as HTML, CSS, and JavaScript. | Uses languages such as Python, Java, PHP, Ruby, and Node.js. |
| Is visible to the user and allows interaction. | Is hidden from the user. |
| Focuses on building the user interface. | Handles data processing and application logic. |
| Includes elements like buttons, forms, and layouts. | Includes databases, APIs, and authentication systems. |
Core Responsibilities of Backend
1. Server Logic
The server is a computer that:
- Listens for incoming requests from clients
- Processes those requests
- Sends appropriate responses back
How servers work:
- Server runs continuously, listening on a port (e.g., port 80 or 443)
- When a request arrives, server creates a new thread/process to handle it
- Request is processed and response is generated
- Response is sent back to the client
- Connection may be kept open or closed
2. Routing
Routing is the process of determining what code should run based on the URL requested. It maps URLs to specific functions or handlers.
Why routing matters:
/home→ Show homepage/products→ Show product list/products/123→ Show product with ID 123/login→ Show login form/api/users→ Return user data as JSON
Types of routes:
- Static routes: Exact URL match (
/about,/contact) - Dynamic routes: URLs with variables (
/users/<id>,/products/<category>) - Wildcard routes: Catch-all patterns (
/blog/*)
Route parameters:
- Path parameters:
/users/123(123 is the user ID) - Query parameters:
/search?q=python&page=2
3. Business Logic
Business logic is the code that implements the rules and operations specific to your application. It's the "brain" of your application.
Examples of business logic:
- Calculating total price with discounts
- Checking if user has permission to perform an action
- Validating that email addresses are unique
- Processing payment transactions
- Generating reports from data
Business logic should:
- Be separate from presentation (Views)
- Be testable in isolation
- Be reusable across different interfaces
- Handle edge cases and errors
Example business rules:
- Users must be 18+ to register - Orders over $100 get free shipping - Passwords must be at least 8 characters - Users can only edit their own posts - Maximum 5 items per cart
4. Security Layers
Security is critical for backend applications. Multiple layers protect the application:
a) Authentication (Who are you?)
- Verifying user identity
- Login systems (username/password)
- Multi-factor authentication
- OAuth/Social login
b) Authorization (What can you do?)
- Checking user permissions
- Role-based access control (Admin, User, Guest)
- Resource ownership verification
c) Input Validation
- Sanitizing user input
- Preventing SQL injection
- Preventing XSS (Cross-Site Scripting)
- Validating data types and formats
d) Data Protection
- Encrypting sensitive data
- Hashing passwords (never store plain text!)
- HTTPS for data in transit
- Secure session management
e) CSRF Protection
- Preventing cross-site request forgery
- Using CSRF tokens in forms
f) Rate Limiting
- Preventing brute force attacks
- Limiting API requests per user
Django
Django is a high-level Python web framework that enables rapid development of secure and maintainable websites.
Django's Philosophy:
- "Batteries included": Comes with everything you need out of the box
- DRY (Don't Repeat Yourself): Encourages code reuse
- Rapid Development: Build applications quickly
- Security First: Protects against common vulnerabilities
Why Choose Django?
| Feature | Benefit |
|---|---|
| Built-in Admin Panel | Automatic admin interface for managing data |
| ORM (Object-Relational Mapping) | Work with databases using Python, not SQL |
| Security | Protection against SQL injection, XSS, CSRF |
| Scalability | Powers large sites like Instagram, Pinterest |
| Large Community | Extensive documentation and packages |
| Authentication System | Built-in user management |
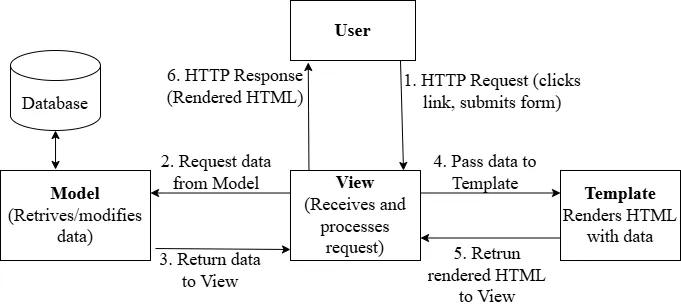
MTV Pattern (Django's Version of MVC)
Django uses MTV (Model-Template-View) pattern, which is similar to MVC but with different naming:
| MVC | Django MTV | Role |
|---|---|---|
| Model | Model | Data structure and database |
| View | Template | HTML presentation |
| Controller | View | Business logic and request handling |
- In Django, a "View" is a Python function/class that handles requests (like a Controller)
- A "Template" is the HTML file that displays data (like a View in MVC)
Installing Python & Django
Install Python
# Download Python from python.org # Verify installation python --version # or python3 --version
Create Virtual Environment
# Create project folder mkdir django_course cd django_course # Create virtual environment python -m venv venv # Activate virtual environment # Windows: venv\Scripts\activate # macOS/Linux: source venv/bin/activate
Install Django
pip install django # Verify installation django-admin --version
Creating a Django Project
# Create new Django project django-admin startproject myproject
When you create a Django project, the following structure is generated:
myproject/ # Root directory (any name) │ ├── manage.py # Command-line utility for Django │ ├── myproject/ # Project package (same name as root) │ ├── __init__.py # Makes this a Python package │ ├── settings.py # Project configuration │ ├── urls.py # Main URL routing │ ├── asgi.py # Asynchronous Server Gateway Interface (ASGI) configuration │ └── wsgi.py # Web Server Gateway Interface (WSGI) configuration │
Key Files
1. manage.py
The command-line tool for interacting with Django:
python manage.py runserver # Start development server python manage.py makemigrations # Create migration files python manage.py migrate # Apply migrations to database python manage.py createsuperuser # Create admin user
2. settings.py
Contains all project configuration:
- Database settings
- Installed apps
- Middleware
- Templates configuration
- Static files settings
- Security settings
3. urls.py
Maps URLs to views:
from django.urls import path from myapp import views urlpatterns = [ path('', views.home), path('about/', views.about), ]
4. models.py
Defines database structure:
from django.db import models class Book(models.Model): title = models.CharField(max_length=50) rating = models.IntegerField()
5. views.py
Handles request processing:
from django.shortcuts import render from .models import Book def index(request): books = Book.objects.all() return render(request, "book_outlet/index.html", { "books": books })
Installing an IDE
Recommended: Visual Studio Code Extensions
- Download from code.visualstudio.com
- Install Python extension
- Install Pylance extension
- Install autopep8 extension
- Install Django extension
- Install SQLite Viewer extension
- Configure Python interpreter to use virtual environment
// .vscode/settings.json { "python.pythonPath": "/usr/local/bin/python3", "python.languageServer": "Pylance" }
Starting a Development Server
# Navigate to project folder cd myproject # Start development server python manage.py runserver # Server runs at http://127.0.0.1:8000/ # Press Ctrl+C to stop
Custom Port:
python manage.py runserver 8080
Install djlint
- For formatting Django HTML templates
pip install djlint
- Configure djlint in vscode for local workspace
{ "emmet.includeLanguages": { "django-html": "html" }, "[html][django-html]": { "editor.defaultFormatter": "monosans.djlint" } }
Django Apps
A Django project can contain multiple apps. An app is a web application that does something specific.
Project vs App:
- Project: The entire website (configuration, settings)
- App: A specific feature/module (blog, users, products)
Example structure with multiple apps:
myproject/ ├── manage.py ├── myproject/ # Project settings ├── blog/ # Blog app ├── users/ # User management app ├── products/ # E-commerce app └── api/ # REST API app
Creating an App:
python manage.py startapp myapp
App Structure:
myapp/ ├── __init__.py ├── admin.py # Admin panel configuration ├── apps.py # App configuration ├── models.py # Database models ├── tests.py # Unit tests ├── views.py # View functions/classes └── migrations/ # Database migrations
Registering App in settings.py:
INSTALLED_APPS = [ 'django.contrib.admin', 'django.contrib.auth', # ... other apps 'myapp', # Add your app here 'blog', # Another custom app 'users', # Another custom app ]
Complete Project and App Structure
myproject/ # Root directory (any name) │ ├── manage.py # Command-line utility for Django │ ├── myproject/ # Project package (same name as root) │ ├── __init__.py # Makes this a Python package │ ├── settings.py # Project configuration │ ├── urls.py # Main URL routing │ ├── asgi.py # ASGI configuration (async) │ └── wsgi.py # WSGI configuration (deployment) │ └── myapp/ # Your application (created separately) ├── __init__.py # Makes this a Python package ├── admin.py # Admin panel configuration ├── apps.py # App configuration ├── models.py # Database models ├── views.py # View functions/classes ├── urls.py # App-specific URL routing ├── tests.py # Unit tests └── migrations/ # Database migration files └── __init__.py
Simple Complete Django Setup Steps
# 1. Install Django # pip install django # 2. Create project # django-admin startproject mysite # 3. Create app # cd mysite # python manage.py startapp blog # 4. Register app in settings.py # Add 'blog' to INSTALLED_APPS # 5. Run server # python manage.py runserver
URLs & Views
What is Routing?
Routing is the mechanism that maps URLs to specific code (views/controllers). When a user visits a URL, the routing system determines which function should handle the request.
What are URLs & Views?
URL Dispatcher
Django uses a URL dispatcher defined in urls.py files. It matches incoming URLs against patterns and calls the corresponding view.
How URL matching works:
- Request comes in with a URL (e.g.,
/articles/5/) - Django checks patterns in order from top to bottom
- First matching pattern wins
- Associated view function is called
- View returns a response
URLs: Maps web addresses (URLs) to views Views: Python function or class that receives a web request and returns a web response. Views contain the logic that processes requests.
The request object contains:
request.method- HTTP method (GET, POST, etc.)request.GET- Query parameters dictionaryrequest.POST- POST data dictionaryrequest.body- Raw request bodyrequest.headers- HTTP headersrequest.user- Currently logged-in userrequest.session- Session data
Handling Different HTTP Methods
# Simple Example from django.http import HttpResponse def article_view(request): if request.method == 'GET': return HttpResponse("Showing articles") elif request.method == 'POST': return HttpResponse("Creating article") elif request.method == 'DELETE': return HttpResponse("Deleting article")
Query Parameters
Access GET parameters from the URL:
# Simple Example # URL: /search/?q=python&page=2 def search(request): query = request.GET.get('q', '') # 'python' page = request.GET.get('page', '1') # '2' return HttpResponse(f"Searching: {query}, Page: {page}")
Creating a First View & URL
Creating fresh Project
django-admin startproject urlsviews_project cd urlsviews_project python manage.py startapp challenges
Create View (challenges/views.py)
from django.http import HttpResponse def index(request): return HttpResponse("Welcome to the Challenges App!")
Create App level URLs (challenges/urls.py)
from django.urls import path from . import views urlpatterns = [ path('', views.index, name='index'), ]
Include in Project URLs (urlsviews_project/urls.py)
from django.contrib import admin from django.urls import path, include urlpatterns = [ path('admin/', admin.site.urls), path('challenges/', include('challenges.urls')), ]
Adding More Views & URLs
# challenges/views.py def january(request): return HttpResponse("January Challenge: Exercise daily!") def february(request): return HttpResponse("February Challenge: Read a book!") # challenges/urls.py urlpatterns = [ path('', views.index, name='index'), path('january/', views.january, name='january'), path('february/', views.february, name='february'), ]
Dynamic Path Segments & Captured Values
Accessing URL Parameters
# challenges/urls.py urlpatterns = [ path('<month>/', views.monthly_challenge, name='monthly-challenge'), ] # challenges/views.py def monthly_challenge(request, month): return HttpResponse(f"Challenge for {month}")
Path Converters
Available Converters:
str- Matches any non-empty string (default)int- Matches positive integersslug- Matches slug strings (letters, numbers, hyphens, underscores)uuid- Matches UUID stringspath- Matches any string including slashes
# Examples path('<str:month>/', views.monthly_challenge), path('<int:month>/', views.monthly_challenge_by_number), path('<slug:title>/', views.post_detail),
Adding More Dynamic View Logic
from django.http import HttpResponse, HttpResponseNotFound # challenges/views.py monthly_challenges = { 'january': 'Exercise daily for 30 minutes', 'february': 'Read one book', 'march': 'Learn something new each day', 'april': 'Drink at least 2 liters of water daily', 'may': 'Wake up early every day', 'june': 'Practice a new skill for 20 minutes daily', 'july': 'Avoid junk food for the entire month', 'august': 'Write a daily journal entry', 'september': 'Learn and revise one topic each day', 'october': 'Limit social media usage to 30 minutes per day', 'november': 'Express gratitude by writing one thankful note daily', 'december': 'Reflect on the year and plan goals for next year', } def monthly_challenge(request, month): try: challenge_text = monthly_challenges[month.lower()] return HttpResponse(challenge_text) except KeyError: return HttpResponseNotFound("This month is not supported!")
Redirects
from django.http import HttpResponseRedirect from django.shortcuts import redirect # Method 1: HttpResponseRedirect def old_url(request): return HttpResponseRedirect('/challenges/january/') # Method 2: redirect shortcut (preferred) def monthly_challenge_by_number(request, month): months = list(monthly_challenges.keys()) if month > len(months): return HttpResponse("Invalid month", status=404) return redirect(f'/challenges/{months[month-1]}/')
The Reverse Function & Named URLs
Give URLs names for easy referencing:
from django.urls import reverse def monthly_challenge_by_number(request, month): months = list(monthly_challenges.keys()) redirect_month = months[month - 1] # Using reverse with named URL redirect_url = reverse('monthly-challenge', args=[redirect_month]) return redirect(redirect_url)
Returning HTML
def index(request): html_content = """ <html> <head><title>Challenges</title></head> <body> <h1>Monthly Challenges</h1> <ul> <li><a href="/challenges/january/">January</a></li> <li><a href="/challenges/february/">February</a></li> </ul> </body> </html> """ return HttpResponse(html_content)
def monthly_challenge(request, month): try: challenge_text = monthly_challenges[month.lower()] response_data = f"<h1>{challenge_text}</h1>" return HttpResponse(response_data) except KeyError: return HttpResponseNotFound("<h1>This month is not supported!</h1>")
Dynamic generation of html with list of links
def index(request): list_items = "" months = list(monthly_challenges.keys()) for month in months: capitalized_month = month.capitalize() month_path = reverse("month-challenge", args=[month]) list_items += f"<li><a href=\"{month_path}\">{capitalized_month}</a></li>" # "<li><a href="...">January</a></li><li><a href="...">February</a></li>..." response_data = f"<ul>{list_items}</ul>" return HttpResponse(response_data)
Templates & Static Files
Templating is the process of generating dynamic HTML by combining a template (HTML structure) with data. Templates separate presentation from logic.
A Django template is a text file (usually HTML) that contains static content mixed with Django Template Language (DTL) to dynamically display data sent from a view.
Django Template Language (DTL)
Django's template language allows you to:
- Insert dynamic data with
{{ variable }} - Use logic with
{% tag %}. (if/else, loop) - Apply filters with
{{ variable|filter }}. (title, upper, lower)
JSON Responses
- For APIs, return JSON instead of HTML.
- By default,
JsonResponseexpects a dictionary.
# Simple Example from django.http import JsonResponse def api_articles(request): data = { 'articles': [ {'id': 1, 'title': 'First'}, {'id': 2, 'title': 'Second'}, ], 'count': 2 } return JsonResponse(data)
Response:
// Simple Example { "articles": [ { "id": 1, "title": "First" }, { "id": 2, "title": "Second" } ], "count": 2 }
Adding & Registering Templates
Create templates folder
challenges/ └── templates/ └── challenges/ └── challenge.html
Register app in settings.py
INSTALLED_APPS = [ # ... 'challenges', ]
Challenge Template
Add content in challenges/templates/challenges/challenge.html
<!DOCTYPE html> <html lang="en"> <head> <meta charset="UTF-8" /> <meta name="viewport" content="width=device-width, initial-scale=1.0" /> <title>Document</title> </head> <body> <h1>This Month's Challenge</h1> <h2>Challenge text</h2> </body> </html>
Rendering Templates
Using render_to_string
# challenges/views.py from django.http import HttpResponse, HttpResponseNotFound, HttpResponseRedirect from django.urls import reverse from django.template.loader import render_to_string def monthly_challenge(request, month): try: challenge_text = monthly_challenges[month.lower()] response_data = render_to_string("challenges/challenge.html") return HttpResponse(response_data) # return HttpResponse(response_data, status=200) # Setting Status Codes except: return HttpResponseNotFound("<h1>This month is not supported!</h1>")
Using render
# challenges/views.py from django.shortcuts import render from django.http import HttpResponse, HttpResponseNotFound, HttpResponseRedirect from django.urls import reverse def monthly_challenge(request, month): try: challenge_text = monthly_challenges[month.lower()] return render(request, "challenges/challenge.html") except: return HttpResponseNotFound("<h1>This month is not supported!</h1>")
Template Language & Template Variable Interpolation
Output data using double curly braces:
<!-- challenges/templates/challenges/challenge.html --> <h1>This Month's Challenge</h1> <h2>{{ text }}</h2>
# challenges/views.py def monthly_challenge(request, month): try: challenge_text = monthly_challenges[month.lower()] return render(request, "challenges/challenge.html", { "text": challenge_text }) except: return HttpResponseNotFound("<h1>This month is not supported!</h1>")
Adding month name too
<head> <title>{{ month_name }} Challenge</title> </head> <body> <h1>{{ month_name }} Challenge</h1> <h2>{{ text }}</h2> </body>
def monthly_challenge(request, month): try: challenge_text = monthly_challenges[month.lower()] return render(request, "challenges/challenge.html", { "text": challenge_text, "month_name": month.capitalize() }) except: return HttpResponseNotFound("<h1>This month is not supported!</h1>")
Filters
- Transform data using
|filter:
Common Filters:
<!-- eg --> {{ name|upper }} <!-- JOHN --> {{ name|lower }} <!-- john --> {{ name|title }} <!-- John Doe --> {{ text|truncatewords:20 }} <!-- First 20 words... --> {{ date|date:"Y-m-d" }} <!-- 2026-01-17 --> {{ price|floatformat:2 }} <!-- 19.99 --> {{ list|length }} <!-- 5 --> {{ value|default:"N/A" }} <!-- Shows "N/A" if empty --> {{ html_content|safe }} <!-- Renders HTML (careful!) -->
<head> <title>{{ month_name|title }} Challenge</title> </head> <body> <h1>{{ month_name|title }} Challenge</h1> <h2>{{ text }}</h2> </body>
Tags & the "for" Tag
First, update index view with template
Create challenges/templates/challenges/index.html template
<!DOCTYPE html> <html lang="en"> <head> <meta charset="UTF-8" /> <meta name="viewport" content="width=device-width, initial-scale=1.0" /> <title>All Challenges</title> </head> <body> <ul> <li><a href="/challenges/january">January</a></li> <li><a href="/challenges/february">February</a></li> <li><a href="/challenges/march">March</a></li> <li><a href="/challenges/april">April</a></li> <li><a href="/challenges/may">May</a></li> <li><a href="/challenges/june">June</a></li> <li><a href="/challenges/july">July</a></li> <li><a href="/challenges/august">August</a></li> <li><a href="/challenges/september">September</a></li> <li><a href="/challenges/october">October</a></li> <li><a href="/challenges/november">November</a></li> <li><a href="/challenges/december">December</a></li> </ul> </body> </html>
# challenges/views.py def index(request): months = list(monthly_challenges.keys()) return render(request, "challenges/index.html", { "months": months })
<!-- challenges/templates/challenges/index.html --> <ul> {% for month in months %} <li> <a href="/challenges/{{month}}"> {{ forloop.counter }} - {{ month|title }} </a> </li> {% endfor %} </ul>
The URL Tag for Dynamic URLs
<!-- challenges/templates/challenges/index.html --> <ul> {% for month in months %} <li> <a href="{% url 'monthly-challenge' month %}"> {{ forloop.counter }} - {{ month|title }} </a> </li> {% endfor %} </ul>
The "if" Tag for Conditional Content
Update monthly challenge dictionary
# challenges/views.py monthly_challenges = { 'january': 'Exercise daily for 30 minutes', # ... 'december': None }
<!-- challenges/templates/challenges/challenge.html --> <h1>{{ month_name|title }} Challenge</h1> {% if text is not None %} <h2>{{ text }}</h2> {% else %} <p>There is no challenge for this month yet!</p> {% endif %}
Template Inheritance
Update settings.py to add global templates folder location
TEMPLATES = [ { 'BACKEND': 'django.template.backends.django.DjangoTemplates', 'DIRS': [ BASE_DIR / "templates" ], 'APP_DIRS': True, # ... } ]
Create templates/base.html (Parent Template):
- Create a base template and extend it:
<!DOCTYPE html> <html lang="en"> <head> <meta charset="UTF-8" /> <meta name="viewport" content="width=device-width, initial-scale=1.0" /> <title>{% block page_title %}My Challenges{% endblock %}</title> </head> <body> {% block content %}{% endblock %} </body> </html>
Child Template:
<!-- challenges\templates\challenges\index.html --> <!-- pre tag is not required, just for proper blog format --> <pre> {% extends "base.html" %} {% block page_title %} All Challenges {% endblock %} {% block content %} <ul> {% for month in months %} <li><a href="{% url 'monthly-challenge' month %}">{{ month|title }}</a></li> {% endfor %} </ul> {% endblock %} </pre>
<!-- challenges\templates\challenges\challenge.html --> <pre> {% extends "base.html" %} {% block page_title %} {{ month_name|title }} Challenge {% endblock %} {% block content %} <h1>{{ month_name|title }} Challenge</h1> {% if text is not None %} <h2>{{ text }}</h2> {% else %} <p>There is no challenge for this month yet!</p> {% endif %} {% endblock %} </pre>
Including Partial Template Snippets
- Reuse template fragments:
Create challenges\templates\challenges\includes\header.html
<header> <nav> <a href="{% url "index" %}">All Challenges</a> </nav> </header>
Add include header to both index and challenge template
<pre> {% block content %} {% include "challenges/includes/header.html" %} <!-- ... --> {% endblock %} </pre>
Optional: Passing extra variables to includes:
- They already have access to variables that parent has access to.
- You can pass extra data using:
with
<pre> {% block content %} {% include "challenges/includes/header.html" with data1="something" data2="anything" %} <!-- ... --> {% endblock %} </pre>
404 Templates
Create templates/404.html:
<pre> {% extends "base.html" %} {% block page_title %} Something went wrong - we could not find that page! {%endblock%} {% block content %} <h1>We could not find that page!</h1> <p>Sorry, but we could not find a matching page!</p> {% endblock %} </pre>
from django.http import Http404 def monthly_challenge(request, month): try: challenge_text = monthly_challenges[month.lower()] return render(request, "challenges/challenge.html", { "text": challenge_text, "month_name": month }) except: raise Http404()
Note: Set DEBUG = False and ALLOWED_HOSTS = ['*'] in settings.py to see custom 404 pages.
Adding Static Files
Create static folder
challenges/ └── static/ └── challenges/ ├── css/ │ └── challenges.css └── images/ └── logo.png
Load in template
/* challenges\static\challenges\css\challenges.css */ ul { list-style: none; }
<!-- templates\base.html --> <head> {% block css_files %}{% endblock %} </head>
<!-- challenges\templates\challenges\index.html --> <pre> {% load static %} {% block css_files %} <link rel="stylesheet" href="{% static 'challenges/css/challenges.css' %}"> {% endblock %} </pre>
Adding Global Static Files
settings.py:
STATIC_URL = '/static/' STATICFILES_DIRS = [ BASE_DIR / 'static', # Global static files ]
Create static\styles.css
@import url("https://fonts.googleapis.com/css2?family=Roboto+Condensed:wght@400;700&display=swap"); html { font-family: "Roboto Condensed", sans-serif; } body { margin: 0; background-color: #1a1a1a; }
<!-- templates\base.html --> <pre> {% load static %} <head> <link rel="stylesheet" href="{% static "styles.css" %}"> {% block css_files %}{% endblock %} </head> </pre>
More CSS
Create challenges\static\challenges\includes\header.css
header { width: 100%; height: 5rem; background-color: #353535; } header nav { width: 100%; height: 100%; display: flex; justify-content: center; align-items: center; } header nav a { color: white; font-size: 2rem; font-weight: bold; text-decoration: none; } header nav a:hover, header nav a:active { color: #cf54a6; }
Create challenges\static\challenges\css\challenge.css
h1, h2 { text-align: center; color: white; } h1 { font-size: 1.5rem; margin: 2rem 0 1rem 0; font-weight: normal; color: #cf54a6; } h2 { font-size: 3rem; font-weight: bold; } .fallback { text-align: center; color: white; }
Update challenges\static\challenges\css\challenges.css
ul { list-style: none; margin: 2rem auto; width: 90%; max-width: 20rem; box-shadow: 0 2px 8px rgba(0, 0, 0, 0.26); padding: 1rem; border-radius: 12px; display: flex; flex-direction: column; flex-wrap: wrap; height: 30rem; background-color: #eeeeee; } li { margin: 1rem 0; text-align: center; font-size: 1.5rem; border-bottom: 1px solid #ccc; padding-bottom: 1rem; } li:last-of-type, li:nth-of-type(6) { border-bottom: none; } li a { text-decoration: none; color: #383838; } li a:hover, li a:active { color: #7e0154; }
Update challenges\templates\challenges\challenge.html
<pre> {% extends "base.html" %} {% load static %} {% block css_files %} <link rel="stylesheet" href="{% static "challenges/challenge.css" %}"> <link rel="stylesheet" href="{% static "challenges/includes/header.css" %}"> {% endblock %} </pre>
Update challenges\templates\challenges\index.html
<pre> {% extends "base.html" %} {% load static %} {% block css_files %} <link rel="stylesheet" href="{% static "challenges/challenges.css" %}"> <link rel="stylesheet" href="{% static "challenges/includes/header.css" %}"> {% endblock %} </pre>
Data and Models
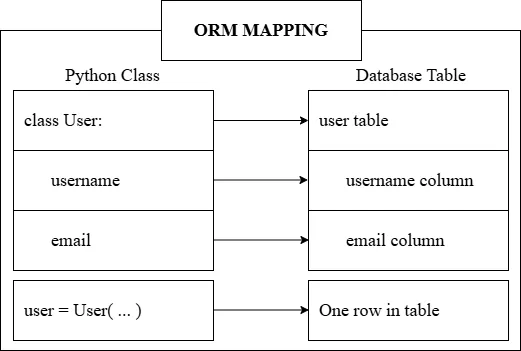
What is ORM?
ORM (Object-Relational Mapping) is a technique that lets you work with databases using your programming language's objects instead of writing SQL queries.
Benefits of ORM:
- Write Python (or other language) instead of SQL
- Database-agnostic code
- Automatic SQL injection protection
- Easier to maintain and read
- Object-oriented database access
How ORM Works:
Supported Databases:
- SQLite (default, file-based)
- PostgreSQL (recommended for production)
- MySQL
- Oracle
Create fresh project
# Create fresh project for this module django-admin startproject book_store cd book_store python manage.py startapp book_outlet
Register in settings.py:
INSTALLED_APPS = [ # ... 'book_outlet', ]
Django ORM
Django includes a powerful built-in ORM. You define models as Python classes, and Django handles the database operations.
Defining Models
Models are defined in models.py:
from django.db import models class Book(models.Model): title = models.CharField(max_length=50) rating = models.IntegerField()
Equivalent to sql below after we migrate
CREATE TABLE books ( id INTEGER PRIMARY KEY AUTOINCREMENT, title TEXT NOT NULL, rating INTEGER NOT NULL )
Create file db.sqlite3 if not present already.
Common Field Types
| Field Type | Description | Example |
|---|---|---|
CharField | Short text (requires max_length) | name = CharField(max_length=100) |
TextField | Long text | bio = TextField() |
IntegerField | Integer numbers | age = IntegerField() |
FloatField | Decimal numbers | price = FloatField() |
BooleanField | True/False | active = BooleanField(default=True) |
DateField | Date only | birth_date = DateField() |
DateTimeField | Date and time | created_at = DateTimeField() |
EmailField | Email validation | email = EmailField() |
URLField | URL validation | website = URLField() |
ForeignKey | Many-to-one relationship | author = ForeignKey(Author) |
ManyToManyField | Many-to-many relationship | tags = ManyToManyField(Tag) |
Field Options
| Option | Description |
|---|---|
max_length | Maximum length for CharField |
default | Default value for the field |
null=True | Allow NULL in database |
blank=True | Allow empty in forms |
unique=True | Enforce unique values |
choices | Limit to specific choices |
auto_now_add | Set to current time on creation |
auto_now | Update to current time on every save |
Migrations
After defining/changing models, you need to create and apply migrations:
# Create migration files based on model changes python manage.py makemigrations # Apply migrations to database python manage.py migrate
What migrations do:
- Detect changes in your models
- Generate SQL to update the database
- Keep track of database schema versions
- Allow reverting changes
Open Django Shell
python3 manage.py shell
Create Book
from book_outlet.models import Book harry_potter = Book(title="Harry Potter 1 – The Philosopher's Stone", rating=5) harry_potter.save()
Equivalent to:
INSERT INTO books ( title, rating ) VALUES ('Lord of the Rings', 5)
lord_of_the_rings = Book(title="Lord of the Rings", rating=4) lord_of_the_rings.save()
Read Book
Book.objects.all() # <QuerySet [<Book: Book object (1)>, <Book: Book object (2)>]>
Equivalent to:
SELECT * FROM books;
Add more attributes and str method
from django.core import validators from django.db import models from django.core.validators import MinValueValidator, MaxValueValidator class Book(models.Model): title = models.CharField(max_length=50) rating = models.IntegerField( validators=[MinValueValidator(1), MaxValueValidator(5)]) author = models.CharField(null=True, max_length=100) is_bestselling = models.BooleanField(default=False) def __str__(self): return f"{self.title} ({self.rating})"
Migrate
python manage.py makemigrations python manage.py migrate # Open Django Shell python3 manage.py shell # To exit from shell exit()
Read and Update
from book_outlet.models import Book Book.objects.all()[1] # <Book: Lord of the Rings (4)> Book.objects.all()[1].author Book.objects.all()[1].is_bestselling # False Book.objects.all()[1].rating # 4 harry_potter = Book.objects.all()[0] harry_potter.title # "Harry Potter 1 – The Philosopher's Stone" lotr = Book.objects.all()[1] lotr.title # 'Lord of the Rings' harry_potter.author = "J.K. Rowling" harry_potter.is_bestselling = True harry_potter.save() Book.objects.all()[0].author # 'J.K. Rowling' lotr.author = "J.R.R. Tolkien" lotr.is_bestselling = True lotr.save() Book.objects.all()[1].author # 'J.R.R. Tolkien' Book.objects.all()[1].is_bestselling # True
Delete
harry_potter = Book.objects.all()[0] harry_potter.delete() # (1, {'book_outlet.Book': 1}) Book.objects.all() # <QuerySet [<Book: Lord of the Rings (4)>]>
create method
Book.objects.create(title="Harry Potter 1", rating=5, author="J.K. Rowling", is_bestselling=True) # <Book: Harry Potter 1 (5)> Book.objects.all() # <QuerySet [<Book: Lord of the Rings (4)>, <Book: Harry Potter 1 (5)>]> Book.objects.create(title="My Story", rating=2, author="Max", is_bestselling=False) # <Book: My Story (2)> Book.objects.create(title="Some random book", rating=1, author="Random Dude", is_bestselling=False) # <Book: Some random book (1)> Book.objects.all() # <QuerySet [<Book: Lord of the Rings (4)>, <Book: Harry Potter 1 (5)>, <Book: My Story (2)>, <Book: Some random book (1)>]>
get method
Book.objects.get(title="My Story") # <Book: My Story (2)> Book.objects.get(rating=5) # <Book: Harry Potter 1 (5)> Book.objects.all() # <QuerySet [<Book: Lord of the Rings (4)>, <Book: Harry Potter 1 (5)>, <Book: My Story (2)>, <Book: Some random book (1)>]> Book.objects.get(is_bestselling=True) # Traceback (most recent call last): # ... # django.core.exceptions.MultipleObjectsReturned: get() returned more than one Book -- it returned 2!
filter method
Book.objects.filter(is_bestselling=True) # <QuerySet [<Book: Lord of the Rings (4)>, <Book: Harry Potter 1 (5)>]> Book.objects.filter(is_bestselling=False) # <QuerySet [<Book: My Story (2)>, <Book: Some random book (1)>]> Book.objects.filter(is_bestselling=False, rating=2) # <QuerySet [<Book: My Story (2)>]> Book.objects.filter(rating<3) # Traceback (most recent call last): # ... # NameError: name 'rating' is not defined Book.objects.filter(rating__lt=3) # <QuerySet [<Book: My Story (2)>, <Book: Some random book (1)>]> Book.objects.filter(rating__lt=3, title__contains="Story") # <QuerySet [<Book: My Story (2)>]>
case-insensitive lookups and "OR" queries using Q objects
Book.objects.filter(rating__lt=3, title__contains="story") # <QuerySet []>, but works for sqlite Book.objects.filter(rating__lt=3, title__icontains="story") # <QuerySet [<Book: My Story (2)>]> from django.db.models import Q Book.objects.filter(Q(rating__lt=3) | Q(is_bestselling=True)) # <QuerySet [<Book: Lord of the Rings (4)>, <Book: Harry Potter 1 (5)>, <Book: My Story (2)>, <Book: Some random book (1)>]> Book.objects.filter(Q(rating__lt=3) | Q(is_bestselling=True), Q(author="J.K. Rowling")) # <QuerySet [<Book: Harry Potter 1 (5)>]> Book.objects.filter(Q(rating__lt=3) | Q(is_bestselling=True), author="J.K. Rowling") # <QuerySet [<Book: Harry Potter 1 (5)>]> Book.objects.filter(author="J.K. Rowling", Q(rating__lt=3) | Q(is_bestselling=True)) # File "<console>", line 1 # Book.objects.filter(author="J.K. Rowling", Q(rating__lt=3) | Q(is_bestselling=True)) # ^ # SyntaxError: positional argument follows keyword argument
Query Optimizations
bestsellers = Book.objects.filter(is_bestselling=True) amazing_bestsellers = bestsellers.filter(rating__gt=4) print(bestsellers) # <QuerySet [<Book: Lord of the Rings (4)>, <Book: Harry Potter 1 (5)>]> print(amazing_bestsellers) # <QuerySet [<Book: Harry Potter 1 (5)>]> print(bestsellers) # <QuerySet [<Book: Lord of the Rings (4)>, <Book: Harry Potter 1 (5)>]> print(Book.objects.filter(rating__gt=3)) # <QuerySet [<Book: Lord of the Rings (4)>, <Book: Harry Potter 1 (5)>]> print(Book.objects.filter(rating__gt=3)) # <QuerySet [<Book: Lord of the Rings (4)>, <Book: Harry Potter 1 (5)>]> good_books = Book.objects.filter(rating__gt=3) print(good_books) # <QuerySet [<Book: Lord of the Rings (4)>, <Book: Harry Potter 1 (5)>]> print(good_books) # <QuerySet [<Book: Lord of the Rings (4)>, <Book: Harry Potter 1 (5)>]>
Ordering and Aggregation
# Ordering Book.objects.order_by('title') # Ascending Book.objects.order_by('-title') # Descending # Aggregation from django.db.models import Count, Avg Book.objects.aggregate(Avg('rating')) Book.objects.aggregate(total=Count('id'))
QuerySet Methods
| Method | Description |
|---|---|
all() | Get all records |
get() | Get single record (raises error if not found) |
filter() | Get records matching conditions |
exclude() | Get records NOT matching conditions |
order_by() | Sort records |
first() | Get first record |
last() | Get last record |
count() | Count records |
exists() | Check if records exist |
values() | Return dictionaries instead of objects |
distinct() | Remove duplicates |
Lookup Expressions (Filters)
| Lookup | Description | Example |
|---|---|---|
exact | Exact match | filter(name__exact='John') |
iexact | Case-insensitive exact | filter(name__iexact='john') |
contains | Contains substring | filter(title__contains='Python') |
icontains | Case-insensitive contains | filter(title__icontains='python') |
startswith | Starts with | filter(name__startswith='J') |
endswith | Ends with | filter(email__endswith='.com') |
gt | Greater than | filter(age__gt=18) |
gte | Greater than or equal | filter(age__gte=18) |
lt | Less than | filter(price__lt=100) |
lte | Less than or equal | filter(price__lte=100) |
in | In a list | filter(id__in=[1, 2, 3]) |
isnull | Is NULL | filter(bio__isnull=True) |
Official Django Documentation for:
Model Fields Validators QuerySet Field Lookups
Implementing Models in Django
Create book_outlet\templates\book_outlet\base.html
<!DOCTYPE html> <html lang="en"> <head> <meta charset="UTF-8" /> <meta name="viewport" content="width=device-width, initial-scale=1.0" /> <title>{% block title %}{% endblock title %}</title> </head> <body> {% block content %} {% endblock content %} </body> </html>
Create book_outlet\templates\book_outlet\index.html
<pre> {% extends "book_outlet/base.html" %} {% block title %} All Books {% endblock title %} {% block content %} <ul> <li>Book 1...</li> </ul> {% endblock content %} </pre>
Register url
from django.contrib import admin from django.urls import path, include urlpatterns = [ path('admin/', admin.site.urls), path("", include("book_outlet.urls")) ]
from django.urls import path from . import views urlpatterns = [ path("", views.index) ]
Create view
from django.shortcuts import render def index(request): return render(request, "book_outlet/index.html")
Update view
from django.shortcuts import render from .models import Book def index(request): books = Book.objects.all() return render(request, "book_outlet/index.html", { "books": books })
Update book_outlet\templates\book_outlet\index.html
<pre> {% extends "book_outlet/base.html" %} {% block title %} All Books {% endblock title %} {% block content %} <ul> {% for book in books %} <li>{{ book.title }} (Rating: {{ book.rating }})</li> {% endfor %} </ul> {% endblock content %} </pre>
Create book_outlet\templates\book_outlet\book_detail.html
<pre> {% extends "book_outlet/base.html" %} {% block title %} {{ title }} {% endblock %} {% block content %} <h1>{{ title }}</h1> <h2>{{ author }}</h2> <p>The book has a rating of {{ rating }} {% if is_bestseller %} and is a bestseller. {% else %} but isn't a bestseller. {% endif %} </p> {% endblock %} </pre>
Add Book detail url
from django.urls import path from . import views urlpatterns = [ path("", views.index), path("<int:id>", views.book_detail, name="book-detail") ]
Add Book detail view
from django.shortcuts import get_object_or_404, render from django.http import Http404 def book_detail(request, id): # try: # book = Book.objects.get(pk=id) # except: # raise Http404() book = get_object_or_404(Book, pk=id) return render(request, "book_outlet/book_detail.html", { "title": book.title, "author": book.author, "rating": book.rating, "is_bestseller": book.is_bestselling })
Update index page
Also an example of accessing nested data in template:
<pre> {% extends "book_outlet/base.html" %} {% block title %} All Books {% endblock %} {% block content %} <ul> {% for book in books %} <li> <a href="{% url 'book-detail' book.id %}"> {{ book.title }} </a> (Rating: {{ book.rating }}) </li> {% endfor %} </ul> {% endblock %} </pre>
Admin
Create Superuser
python manage.py createsuperuser
Visit admin panel
python manage.py runserver
Open your browser and navigate to http://127.0.0.1:8000/admin to see your Admin Panel.
Register model for admin site
from django.contrib import admin from .models import Book admin.site.register(Book)
- Refresh admin panel
Configure Admin Panel
class BookAdmin(admin.ModelAdmin): list_filter = ("author", "rating",) list_display = ("title", "author",) search_fields = ['title',] admin.site.register(Book, BookAdmin)
Forms
What are HTML Forms?
HTML forms are the primary way users submit data to a web server. Forms allow users to:
- Enter text (usernames, passwords, comments)
- Select options (dropdowns, checkboxes, radio buttons)
- Upload files
- Submit data for processing
HTTP Methods for Forms
| Method | Usage | Data Location |
|---|---|---|
| GET | Retrieving data, search forms | URL query string (?name=value) |
| POST | Submitting data, creating resources | Request body (hidden from URL) |
When to use each:
- GET: Search forms, filters, bookmarkable pages
- POST: Login forms, registration, file uploads, sensitive data
Basic HTML Form
<form method="POST" action="/submit/"> {% csrf_token %} <label for="username">Username:</label> <input type="text" id="username" name="username" /> <label for="email">Email:</label> <input type="email" id="email" name="email" /> <button type="submit">Submit</button> </form>
Key attributes:
method: HTTP method (GET or POST)action: URL where form data is sentname: Field name used to access data on server
Processing Form Data in Django
Accessing POST Data
from django.http import HttpResponse from django.shortcuts import render def register(request): if request.method == 'POST': # Access form data using field names username = request.POST.get('username') email = request.POST.get('email') # Process the data (save to database, etc.) return HttpResponse(f"Welcome, {username}!") # Show empty form for GET request return render(request, 'register.html')
Accessing GET Data
def search(request): # Access query parameters query = request.GET.get('q', '') # Default to empty string page = request.GET.get('page', '1') # Perform search with query return HttpResponse(f"Searching for: {query}")
Form Data Methods
| Method | Description |
|---|---|
request.POST.get('field') | Get single value, returns None if missing |
request.POST.get('field', 'default') | Get value with default |
request.POST['field'] | Get value, raises error if missing |
request.POST.getlist('field') | Get multiple values (checkboxes) |
What is CSRF?
CSRF (Cross-Site Request Forgery) is a security attack where a malicious website tricks a user's browser into making unwanted requests to another site where the user is authenticated.
Example attack scenario:
- User logs into their bank website
- User visits a malicious website (in another tab)
- Malicious site contains hidden form that submits to bank
- Bank thinks the request is legitimate (user is logged in)
- Money is transferred without user's knowledge
How CSRF Protection Works
Django generates a unique CSRF token for each user session. This token must be included in every POST form. When the form is submitted, Django verifies the token matches.
For AJAX requests, include the token in headers.
CSRF PROTECTION FLOW
- User requests a page with a form
- Django generates unique CSRF token
- Token is embedded in the form (hidden field)
- User submits form with token
- Django validates token matches session
- If valid → Process request If invalid → Reject request (403 Forbidden)
Using CSRF Token in Django
In templates, add the token inside your form:
<form method="POST" action="/submit/"> {% csrf_token %} <input type="text" name="username" /> <button type="submit">Submit</button> </form>
The {% csrf_token %} tag generates a hidden input field:
<input type="hidden" name="csrfmiddlewaretoken" value="abc123xyz..." />
Django Forms (Forms API)
Django forms provide a powerful way to handle user input, validate data, and render HTML forms. Forms in Django help you avoid writing repetitive HTML form code and provide built-in validation mechanisms.
Why Use Django Forms?
| Benefit | Description |
|---|---|
| Automatic Rendering | Forms can render themselves as HTML |
| Validation | Built-in and custom validation support |
| Security | CSRF protection, XSS prevention |
| Data Binding | Easy binding of form data to Python objects |
| Error Handling | Automatic error message handling |
Types of Forms
forms.Form: Standard form. You define fields manually. Used for non-model data (e.g., contact form, search).forms.ModelForm: Connected to a database model. Automatically generates fields based on the model.
# forms.py from django import forms class ContactForm(forms.Form): name = forms.CharField(max_length=100) email = forms.EmailField() # views.py def contact(request): if request.method == 'POST': form = ContactForm(request.POST) if form.is_valid(): # Access cleaned data name = form.cleaned_data['name'] email = form.cleaned_data['email'] # Process form... return HttpResponse("Thank you!") else: form = ContactForm() return render(request, 'contact.html', {'form': form})
Template:
<form method="POST" action="{% url 'contact' %}"> {% csrf_token %} <!-- Option 1: Render paragraph for each field --> {{ form.as_p }} <!-- Option 2: Render table rows --> {{ form.as_table }} <!-- Option 3: Render list items --> {{ form.as_ul }} <!-- Option 4: Manual Rendering (Best Control) --> <div class="form-group"> <label for="{{ form.name.id_for_label }}">Name:</label> {{ form.name }} {{ form.name.errors }} </div> <button type="submit">Send</button> </form>
Common Form Fields
| Field Type | Description | HTML Element |
|---|---|---|
CharField | Text input | <input type="text"> |
EmailField | Email input with validation | <input type="email"> |
IntegerField | Integer input | <input type="number"> |
FloatField | Decimal number input | <input type="number"> |
DateField | Date input | <input type="date"> |
DateTimeField | Date and time input | <input type="datetime-local"> |
BooleanField | Checkbox | <input type="checkbox"> |
ChoiceField | Dropdown select | <select> |
MultipleChoiceField | Multiple selection | <select multiple> |
FileField | File upload | <input type="file"> |
ImageField | Image upload with validation | <input type="file"> |
Form Field Arguments
Common arguments that can be passed to form fields:
from django import forms class ExampleForm(forms.Form): # required - is the field mandatory? (default True) name = forms.CharField(required=True) # max_length - maximum character length username = forms.CharField(max_length=50) # min_length - minimum character length password = forms.CharField(min_length=8) # initial - default value country = forms.CharField(initial='Nepal') # help_text - helper text for the field email = forms.EmailField(help_text='Enter a valid email address') # label - custom label for the field dob = forms.DateField(label='Date of Birth') # error_messages - custom error messages phone = forms.CharField( error_messages={ 'required': 'Phone number is required', 'max_length': 'Phone number too long' } ) # disabled - make field read-only id_number = forms.CharField(disabled=True)
Validation
Validation happens when you call form.is_valid().
A. Built-in Validation:
required=True(default)max_length,min_length- Email format, URL format, etc.
B. Custom Field Validation (clean_<fieldname>):
def clean_email(self): email = self.cleaned_data['email'] if not email.endswith('@example.com'): raise forms.ValidationError("Only example.com emails are allowed!") return email
C. Custom Cross-Field Validation (clean):
def clean(self): cleaned_data = super().clean() password = cleaned_data.get("password") confirm_password = cleaned_data.get("confirm_password") if password != confirm_password: raise forms.ValidationError("Passwords do not match")
<!-- Display non-field errors --> {% if form.non_field_errors %} <div class="errors"> {% for error in form.non_field_errors %} <p>{{ error }}</p> {% endfor %} </div> {% endif %}
Widgets
Widgets control how the HTML is rendered (e.g., <input> vs <textarea>).
name = forms.CharField( widget=forms.TextInput(attrs={'class': 'form-control', 'placeholder': 'Enter Name'}) ) password = forms.CharField( widget=forms.PasswordInput() # Renders as type="password" ) birth_date = forms.DateField( widget=forms.DateInput(attrs={'type': 'date'}) # HTML5 Date Picker )
Complete Form Validation
Create a form to input Name, gender, hobbies, appointment date & time, country, resume, Email, password and confirm Password. Write server side code to perform form validation. All fields are required. Appointment date cannot be in past. Resume should be either pdf, ms-word or image. File size should be less than 2MB. Email should be valid. Phone number should be valid ( 9********* or 01******* ). Password must be at least 8 character long with at least one lowercase, uppercase, number and symbol. Password and confirm password should match.
Prerequisites
- Python 3.x installed
- pip (Python package installer)
Create Project
cd Desktop mkdir django-form-validation cd django-form-validation
Create Virtual Environment
python -m venv venv
Activate Virtual Environment
# Windows venv\Scripts\activate # Linux/Mac source venv/bin/activate
Install Django
pip install django
Create Django Project
django-admin startproject config .
Create Django App
python manage.py startapp registration
Project Structure
django-form-validation/ ├── config/ │ ├── __init__.py │ ├── asgi.py │ ├── settings.py │ ├── urls.py │ └── wsgi.py ├── registration/ │ ├── migrations/ │ ├── static/ │ │ └── registration/ │ │ └── css/ │ │ └── styles.css │ ├── templates/ │ │ └── registration/ │ │ ├── form.html │ │ └── success.html │ ├── __init__.py │ ├── admin.py │ ├── apps.py │ ├── forms.py │ ├── models.py │ ├── urls.py │ └── views.py ├── media/ │ └── resumes/ ├── manage.py └── venv/
Register App in Settings
Update config/settings.py
INSTALLED_APPS = [ 'django.contrib.admin', 'django.contrib.auth', 'django.contrib.contenttypes', 'django.contrib.sessions', 'django.contrib.messages', 'django.contrib.staticfiles', 'registration', # Add this line ]
Add Media Settings (at the bottom of config/settings.py)
import os MEDIA_URL = '/media/' MEDIA_ROOT = os.path.join(BASE_DIR, 'media')
Create Model
Update registration/models.py
from django.db import models class Registration(models.Model): GENDER_CHOICES = [ ('M', 'Male'), ('F', 'Female'), ('O', 'Other'), ] HOBBY_CHOICES = [ ('football', 'Football'), ('tableTennis', 'Table Tennis'), ('basketball', 'Basketball'), ] COUNTRY_CHOICES = [ ('', '-- Select --'), ('Nepal', 'Nepal'), ('India', 'India'), ('USA', 'USA'), ] name = models.CharField(max_length=100) gender = models.CharField(max_length=1, choices=GENDER_CHOICES) hobbies = models.JSONField(default=list) # Store multiple hobbies as JSON appointment = models.DateTimeField() country = models.CharField(max_length=50, choices=COUNTRY_CHOICES) email = models.EmailField(unique=True) phone = models.CharField(max_length=15) resume = models.FileField(upload_to='resumes/') password = models.CharField(max_length=128) created_at = models.DateTimeField(auto_now_add=True) def __str__(self): return self.name class Meta: ordering = ['-created_at']
Create and Run Migrations
python manage.py makemigrations python manage.py migrate
Create Django Form with Validation
Create registration/forms.py
from django import forms from django.core.validators import RegexValidator from django.utils import timezone from .models import Registration import re class RegistrationForm(forms.Form): """Registration form with comprehensive validation""" GENDER_CHOICES = [ ('M', 'Male'), ('F', 'Female'), ('O', 'Other'), ] HOBBY_CHOICES = [ ('football', 'Football'), ('tableTennis', 'Table Tennis'), ('basketball', 'Basketball'), ] COUNTRY_CHOICES = [ ('', '-- Select --'), ('Nepal', 'Nepal'), ('India', 'India'), ('USA', 'USA'), ] # Name field name = forms.CharField( max_length=100, # error_messages={'required': 'Name is required'} ) # Gender field (Radio buttons) gender = forms.ChoiceField( choices=GENDER_CHOICES, widget=forms.RadioSelect, error_messages={'required': 'Please select gender'} ) # Hobbies field (Checkboxes) hobbies = forms.MultipleChoiceField( choices=HOBBY_CHOICES, widget=forms.CheckboxSelectMultiple, error_messages={'required': 'Please select at least one hobby'} ) # Appointment field (DateTime) appointment = forms.DateTimeField( widget=forms.DateTimeInput(attrs={ 'type': 'datetime-local', }), error_messages={'required': 'Please select appointment'} ) # Country field (Select) country = forms.ChoiceField( choices=COUNTRY_CHOICES, error_messages={'required': 'Please select country'} ) # Email field email = forms.EmailField( error_messages={ 'required': 'Email is required', 'invalid': 'Please enter a valid email' } ) # Phone field phone = forms.CharField( max_length=15, widget=forms.NumberInput, error_messages={'required': 'Phone Number is required'} ) # Resume field (File upload) resume = forms.FileField( widget=forms.FileInput(attrs={ 'accept': '.pdf,.jpg,.jpeg,.png,.doc,.docx', }), error_messages={'required': 'Please upload resume'} ) # Password field password = forms.CharField( widget=forms.PasswordInput, error_messages={'required': 'Password is required'} ) # Confirm Password field confirm_password = forms.CharField( widget=forms.PasswordInput, error_messages={'required': 'Confirm Password is required'} ) def clean_appointment(self): """Validate appointment is not in the past""" appointment = self.cleaned_data.get('appointment') now = timezone.now() if appointment < now: raise forms.ValidationError( 'Appointment date & time cannot be in the past' ) return appointment def clean_phone(self): """Validate phone number format (Nepal format)""" phone = self.cleaned_data.get('phone') # Nepal phone: starts with 9 and 10 digits OR starts with 01 and 8 digits phone_regex = r'^(?:9\d{9}|01\d{7})$' if not re.match(phone_regex, phone): raise forms.ValidationError( 'Please enter a valid phone number' ) return phone def clean_resume(self): """Validate resume file type and size""" resume = self.cleaned_data.get('resume') # Check file extension allowed_extensions = ['pdf', 'jpg', 'jpeg', 'png', 'doc', 'docx'] extension = resume.name.split('.')[-1].lower() if extension not in allowed_extensions: raise forms.ValidationError('Unsupported file format') # Check file size (max 2MB) max_size = 2 * 1024 * 1024 # 2MB in bytes if resume.size > max_size: raise forms.ValidationError( 'File size should be less than 2MB' ) return resume def clean_password(self): """Validate password strength""" password = self.cleaned_data.get('password') # At least 8 chars, 1 uppercase, 1 lowercase, 1 digit, 1 symbol password_regex = r'^(?=.*[a-z])(?=.*[A-Z])(?=.*\d)(?=.*[^a-zA-Z\d\s]).{8,}$' if not re.match(password_regex, password): raise forms.ValidationError( 'Password must be at least 8 characters long and include ' 'one uppercase letter, one lowercase letter, one number, ' 'and one symbol' ) return password def clean(self): """Validate confirm password matches password""" cleaned_data = super().clean() password = cleaned_data.get('password') confirm_password = cleaned_data.get('confirm_password') if password != confirm_password: self.add_error( 'confirm_password', 'Confirm Password did not match Password' ) return cleaned_data
Create Views
Update registration/views.py
from django.shortcuts import render, redirect from django.contrib import messages from django.contrib.auth.hashers import make_password from .forms import RegistrationForm from .models import Registration def registration_form(request): """Handle registration form display and submission""" if request.method == 'POST': form = RegistrationForm(request.POST, request.FILES) if form.is_valid(): # Get cleaned data data = form.cleaned_data # Create registration instance registration = Registration( name=data['name'], gender=data['gender'], hobbies=data['hobbies'], appointment=data['appointment'], country=data['country'], email=data['email'], phone=data['phone'], resume=data['resume'], password=make_password(data['password']), # Hash password ) registration.save() messages.success(request, 'Form submitted successfully!') return redirect('registration:form') else: form = RegistrationForm() return render(request, 'registration/form.html', {'form': form})
Create App URLs
Create registration/urls.py
from django.urls import path from . import views app_name = 'registration' urlpatterns = [ path('', views.registration_form, name='form'), ]
Configure Project URLs
Update config/urls.py
from django.contrib import admin from django.urls import path, include from django.conf import settings from django.conf.urls.static import static urlpatterns = [ path('admin/', admin.site.urls), path('registration/', include('registration.urls')), ] # Serve media files during development if settings.DEBUG: urlpatterns += static(settings.MEDIA_URL, document_root=settings.MEDIA_ROOT)
Create Templates
Create registration/templates/registration/form.html
This template includes both client-side JavaScript validation (using alert()) and server-side Django validation (inline errors).
<pre> <!DOCTYPE html> <html lang="en"> <head> <meta charset="UTF-8" /> <meta name="viewport" content="width=device-width, initial-scale=1.0" /> <title>Form Validation (Django)</title> <style> .errorlist { color: red; } .alert { padding: 1rem; border-radius: 4px; margin-bottom: 1rem; text-align: center; } .alert-success { background: #d1fae5; color: #065f46; } .alert-error { background: #fee2e2; color: #991b1b; } </style> </head> <body> <div class="container"> <h1>Registration Form</h1> {% if messages %} {% for message in messages %}<div class="alert alert-{{ message.tags }}">{{ message }}</div>{% endfor %} {% endif %} <form id="registrationForm" method="POST" action="{% url 'registration:form' %}" enctype="multipart/form-data" onsubmit="return handleSubmit();"> {% csrf_token %} {{ form.as_p }} <button type="submit" class="btn">Submit</button> </form> </div> <script> function handleSubmit() { const form = document.getElementById("registrationForm"); const formData = new FormData(form); const name = formData.get('name'); if (!name) { alert("Name is required") return false; } return true; } </script> </body> </html> </pre>
Run the Project
python manage.py runserver
Open your browser and navigate to http://127.0.0.1:8000/ to see your Registration Form in action.
Sessions and Cookies
Cookies
Cookies are small pieces of data stored by the browser and sent with every HTTP request to the same domain.
Cookie Characteristics:
- Stored on client (browser)
- Automatically sent with requests
- Can be read by JavaScript (unless HttpOnly)
- Have expiration dates
- Limited to ~4KB per cookie
Cookie Attributes
| Attribute | Description |
|---|---|
name=value | The actual data |
Expires | When the cookie expires |
Max-Age | Cookie lifetime in seconds |
Domain | Which domain can access |
Path | Which paths can access |
Secure | Only send over HTTPS |
HttpOnly | JavaScript cannot access |
SameSite | CSRF protection (Strict/Lax/None) |
Setting Cookies in Django:
# views.py from django.http import HttpResponse def set_cookie(request): response = HttpResponse("Cookie Set!") # Set a cookie (expires in 30 days) response.set_cookie('user', 'John Doe', max_age=86400 * 30) # 30 days # Set multiple cookies response.set_cookie('theme', 'dark', max_age=86400 * 30) response.set_cookie('language', 'en', max_age=86400 * 30) # Secure cookie (HTTPS only, HttpOnly, SameSite) # response.set_cookie( # 'username', # username, # max_age=86400 * 30, # secure=True, # Only send over HTTPS # httponly=True, # JavaScript cannot access # samesite='Strict' # CSRF protection # ) return response
Accessing Cookies:
# views.py from django.http import HttpResponse def get_cookie(request): # Get single cookie user = request.COOKIES.get('user') if user: return HttpResponse(f"Welcome {user}") else: return HttpResponse("Cookie not set.") def show_all_cookies(request): # Display all cookies output = "" for key, value in request.COOKIES.items(): output += f"{key}: {value}<br>" return HttpResponse(output)
Deleting Cookies:
# views.py from django.http import HttpResponse def delete_cookie(request): response = HttpResponse("Cookie Deleted!") # Delete cookie response.delete_cookie('user') return response
Django Sessions
Sessions allow the server to remember information about a user across multiple requests. Since HTTP is stateless (each request is independent), sessions provide a way to maintain state.
Common session uses:
- Keep users logged in
- Store shopping cart contents
- Remember user preferences
- Track form progress (multi-step wizards)
How Sessions Work
SESSION WORKFLOW
- User makes first request to server
- Server creates unique Session ID
- Session ID sent to browser in cookie
- Browser stores cookie
- Every future request includes Session ID cookie
- Server uses Session ID to retrieve user's data
Django sessions are enabled by default.
Session Settings (settings.py):
# Already included by default in INSTALLED_APPS: # 'django.contrib.sessions', # Already included in MIDDLEWARE: # 'django.contrib.sessions.middleware.SessionMiddleware', # Optional session settings: SESSION_COOKIE_AGE = 86400 * 30 # 30 days (default: 2 weeks) SESSION_EXPIRE_AT_BROWSER_CLOSE = False # Keep session after browser closes
Create, Retrieve, Clear Session
# Store data in session request.session['username'] = username # Retrieve data from session username = request.session.get('username', 'Guest') # Clear session data request.session.flush() # Removes all session data
Session Methods
| Method | Description |
|---|---|
request.session['key'] = value | Set session value |
request.session.get('key') | Get session value |
request.session.get('key', default) | Get with default |
del request.session['key'] | Delete specific key |
request.session.flush() | Clear all session data |
request.session.set_expiry(seconds) | Set expiration time |
Sessions vs Cookies
| Aspect | Cookies | Sessions |
|---|---|---|
| Storage | Browser (client) | Server |
| Size Limit | ~4KB | No limit |
| Security | Visible to user | Hidden from user |
| Data Access | JavaScript can access | Server only |
| Use Case | Preferences, tokens | User data, cart |
Authentication vs Authorization
These two concepts are often confused but serve different purposes:
| Concept | Question | Purpose |
|---|---|---|
| Authentication | "Who are you?" | Verify identity |
| Authorization | "What can you do?" | Check permissions |
Authentication Flow
AUTHENTICATION FLOW
- User submits credentials (username/password)
- Server verifies credentials against database
- If valid → Create session/token
If invalid → Return error - Send session ID or token to client
- Client stores and sends with future requests
- Server verifies session/token for each request
Questions
Write a view that accepts username and password as arguments and check with student table, if credential match, redirect to dashboard page otherwise display 'Invalid username/password'.
Step 1: Create Student Model
# models.py from django.db import models class Student(models.Model): username = models.CharField(max_length=100, unique=True) password = models.CharField(max_length=100) name = models.CharField(max_length=200) email = models.EmailField() def __str__(self): return self.username
Step 2: Run Migrations
python manage.py makemigrations python manage.py migrate
Step 3: Create Login View
-
Solution using Session
-
Solution with Hashed Password
# views.py from django.shortcuts import render, redirect from django.contrib.auth.hashers import check_password from .models import Student def student_login(request): if request.method == 'POST': username = request.POST.get('username') password = request.POST.get('password') try: student = Student.objects.get(username=username) # Check hashed password if check_password(password, student.password): request.session['student_id'] = student.id request.session['student_name'] = student.name return redirect('dashboard') else: return render(request, 'myauthapp/login.html', { 'error': 'Invalid username/password' }) except Student.DoesNotExist: return render(request, 'myauthapp/login.html', { 'error': 'Invalid username/password' }) return render(request, 'myauthapp/login.html') def dashboard(request): # Check if student is logged in if 'student_id' not in request.session: return redirect('login') student_name = request.session.get('student_name') return render(request, 'myauthapp/dashboard.html', {'name': student_name}) def logout(request): # Clear session request.session.flush() return redirect('login')
Step 4: Create Login Template
<!-- templates/myauthapp/login.html --> <!DOCTYPE html> <html> <head> <title>Student Login</title> </head> <body> <h1>Student Login</h1> {% if error %} <p style="color: red;">{{ error }}</p> {% endif %} <form method="POST"> {% csrf_token %} <label>Username:</label> <input type="text" name="username" required /><br /><br /> <label>Password:</label> <input type="password" name="password" required /><br /><br /> <button type="submit">Login</button> </form> </body> </html>
Step 5: Create Dashboard Template
<!-- templates/myauthapp/dashboard.html --> <!DOCTYPE html> <html> <head> <title>Dashboard</title> </head> <body> <h1>Welcome {{ name }}</h1> <p>You have successfully logged in.</p> <a href="{% url 'logout' %}">Logout</a> </body> </html>
Step 6: Configure URLs
# app level urls.py from django.urls import path from . import views urlpatterns = [ path('login/', views.student_login, name='login'), path('dashboard/', views.dashboard, name='dashboard'), path('logout/', views.logout, name='logout'), ] # project level urls.py from django.contrib import admin from django.urls import path, include urlpatterns = [ path('admin/', admin.site.urls), path('auth/', include('myauthapp.urls')) ]
Testing Login
- Create test user first.
python manage.py shell
from django.contrib.auth.hashers import make_password from testapp.models import Student # adjust app name if different Student.objects.create( username="b2rsp", password=make_password("password123"), name="Bidur", email="[email protected]" )
- Visit
http://127.0.0.1:8000/login/to test login
Step 7: Create Registration View (Optional)
# views.py from django.contrib.auth.hashers import check_password, make_password def student_register(request): if request.method == 'POST': username = request.POST.get('username') password = request.POST.get('password') confirm_password = request.POST.get('confirm_password') name = request.POST.get('name') email = request.POST.get('email') # Validation if not username or not password or not confirm_password or not name or not email: return render(request, 'myauthapp/register.html', { 'error': 'All fields are required' }) if password != confirm_password: return render(request, 'myauthapp/register.html', { 'error': 'Passwords do not match' }) # Check if username already exists if Student.objects.filter(username=username).exists(): return render(request, 'myauthapp/register.html', { 'error': 'Username already exists' }) # Check if email already exists if Student.objects.filter(email=email).exists(): return render(request, 'myauthapp/register.html', { 'error': 'Email already registered' }) # Create new student with hashed password Student.objects.create( username=username, password=make_password(password), name=name, email=email ) return render(request, 'myauthapp/register.html', { 'success': 'Account created successfully! You can now login.' }) return render(request, 'myauthapp/register.html')
Step 8: Create Registration Template
<!-- templates/myauthapp/register.html --> <pre> <!DOCTYPE html> <html> <head> <title>Student Registration</title> </head> <body> <h1>Create Account</h1> {% if error %}<p style="color: red;">{{ error }}</p>{% endif %} {% if success %} <p style="color: green;">{{ success }}</p> <a href="{% url 'login' %}">Go to Login</a> {% else %} <form method="POST"> {% csrf_token %} <label>Username:</label> <input type="text" name="username" required /> <br /> <br /> <label>Full Name:</label> <input type="text" name="name" required /> <br /> <br /> <label>Email:</label> <input type="email" name="email" required /> <br /> <br /> <label>Password:</label> <input type="password" name="password" required /> <br /> <br /> <label>Confirm Password:</label> <input type="password" name="confirm_password" required /> <br /> <br /> <button type="submit">Register</button> </form> <p> Already have an account? <a href="{% url 'login' %}">Login here</a> </p> {% endif %} </body> </html> </pre>
Step 9: Update Login Template with Registration Link
<!-- Update templates/myauthapp/login.html --> <!-- add before </body> --> <p>Don't have an account? <a href="{% url 'register' %}">Register here</a></p>
Step 10: Update URLs
# app level urls.py urlpatterns = [ path('register/', views.student_register, name='register'), ]
Testing Registration
- Visit
http://127.0.0.1:8000/auth/register/to create a new account - Fill in the registration form
- After successful registration, click the login link
- Login with your newly created credentials
Write server side script to create and validate form with following rule and store given data into 'patients' table with details (name, patient_id, mobile, gender, address, dob, doctor name):
- Name, Mobile, Doctor Name, Gender, DOB: Required
- Mobile: 10 digit start with 98, 97 or 96
- DOB: YYYY-MM-DD format
Step 1: Create Patient Model
# models.py from django.db import models class Patient(models.Model): GENDER_CHOICES = [ ('M', 'Male'), ('F', 'Female'), ('O', 'Other'), ] name = models.CharField(max_length=200) patient_id = models.CharField(max_length=50, unique=True) mobile = models.CharField(max_length=10) gender = models.CharField(max_length=1, choices=GENDER_CHOICES) address = models.TextField(blank=True, null=True) dob = models.DateField() doctor_name = models.CharField(max_length=200) created_at = models.DateTimeField(auto_now_add=True) def __str__(self): return f"{self.name} ({self.patient_id})"
Step 2: Run Migrations
python manage.py makemigrations python manage.py migrate
Step 3: Create Django Form with Validation
# forms.py from django import forms import re class PatientForm(forms.Form): GENDER_CHOICES = [ ('', '-- Select Gender --'), ('M', 'Male'), ('F', 'Female'), ('O', 'Other'), ] name = forms.CharField( max_length=200, error_messages={'required': 'Name is required'} ) patient_id = forms.CharField( max_length=50, required=False ) mobile = forms.CharField( max_length=10, error_messages={'required': 'Mobile is required'} ) gender = forms.ChoiceField( choices=GENDER_CHOICES, error_messages={'required': 'Gender is required'} ) address = forms.CharField( widget=forms.Textarea, required=False ) dob = forms.CharField( error_messages={'required': 'Date of Birth is required'} ) doctor_name = forms.CharField( max_length=200, error_messages={'required': 'Doctor Name is required'} ) def clean_mobile(self): mobile = self.cleaned_data['mobile'] mobile_regex = r'^(98|97|96)\d{8}$' if not re.match(mobile_regex, mobile): raise forms.ValidationError( 'Mobile must be 10 digits and start with 98, 97 or 96' ) return mobile def clean_dob(self): dob = self.cleaned_data['dob'] # Regex for YYYY-MM-DD dob_regex = r'^\d{4}-(0[1-9]|1[0-2])-(0[1-9]|[12]\d|3[01])$' if not re.match(dob_regex, dob): raise forms.ValidationError( 'Date of Birth must be in YYYY-MM-DD format' ) from datetime import datetime try: dob_date = datetime.strptime(dob, '%Y-%m-%d').date() except ValueError: raise forms.ValidationError('Invalid calendar date') return dob_date
Step 4: Create View
# views.py from django.shortcuts import render, redirect from django.contrib import messages from .forms import PatientForm from .models import Patient import uuid def patient_registration(request): if request.method == 'POST': form = PatientForm(request.POST) if form.is_valid(): # Generate patient_id if not provided patient_id = form.cleaned_data.get('patient_id') if not patient_id: patient_id = 'PAT-' + str(uuid.uuid4())[:8].upper() # Create patient record patient = Patient( name=form.cleaned_data['name'], patient_id=patient_id, mobile=form.cleaned_data['mobile'], gender=form.cleaned_data['gender'], address=form.cleaned_data.get('address', ''), dob=form.cleaned_data['dob'], doctor_name=form.cleaned_data['doctor_name'], ) patient.save() messages.success(request, 'Patient registered successfully!') return redirect('patient_list') else: form = PatientForm() return render(request, 'patient/patient_form.html', {'form': form}) def patient_list(request): patients = Patient.objects.all() return render(request, 'patient/patient_list.html', {'patients': patients})
Step 5: Create Patient Form Template
<!-- templates/patient/patient_form.html --> <pre> <!DOCTYPE html> <html> <head> <title>Patient Registration</title> <style> .errorlist { color: red; } input, select, textarea { padding: 8px; width: 300px; } </style> </head> <body> <h1>Patient Registration Form</h1> <form method="post"> {% csrf_token %} {{ form.as_p }} <button type="submit">Submit</button> </form> </body> </html> </pre>
Extra: Create Patient List Template
<!-- templates/patient/patient_list.html --> <pre> <!DOCTYPE html> <html> <head> <title>Patient List</title> <style> table { margin-top: 20px; border-collapse: collapse; } th, td { border: 1px solid black; padding: 10px; } </style> </head> <body> <h1>Registered Patients</h1> <a href="{% url 'patient_register' %}">+ Add New Patient</a> <table> <tr> <th>Patient ID</th> <th>Name</th> <th>Mobile</th> <th>Gender</th> <th>DOB</th> <th>Doctor</th> </tr> {% for patient in patients %} <tr> <td>{{ patient.patient_id }}</td> <td>{{ patient.name }}</td> <td>{{ patient.mobile }}</td> <td>{{ patient.get_gender_display }}</td> <td>{{ patient.dob }}</td> <td>{{ patient.doctor_name }}</td> </tr> {% empty %} <tr> <td colspan="6">No patients registered yet.</td> </tr> {% endfor %} </table> </body> </html> </pre>
Step 6: Configure URLs
# urls.py from django.urls import path from . import views urlpatterns = [ path('register/', views.patient_registration, name='patient_register'), path('', views.patient_list, name='patient_list'), ]
from django.contrib import admin from django.urls import path, include urlpatterns = [ path('admin/', admin.site.urls), path('patient/', include('patient.urls')) ]
Design following forms in HTML and write corresponding server side code to store the user's values after satisfying following validation rules:
- Length of Full name up to 40 characters
- Email address must be valid email address
- Username must start with string and followed by number
- Password length must be more than 8 characters
Step 1: Create User Model
# models.py from django.db import models class User(models.Model): full_name = models.CharField(max_length=40) email = models.EmailField(unique=True) username = models.CharField(max_length=100, unique=True) password = models.CharField(max_length=128) created_at = models.DateTimeField(auto_now_add=True) def __str__(self): return self.username
Step 2: Run Migrations
python manage.py makemigrations python manage.py migrate
Step 3: Create Django Form with Validation
# forms.py from django import forms import re class UserRegistrationForm(forms.Form): full_name = forms.CharField( max_length=40, error_messages={ 'required': 'Full name is required', 'max_length': 'Full name must be up to 40 characters' } ) email = forms.EmailField( error_messages={ 'required': 'Email is required', 'invalid': 'Please enter a valid email address' } ) username = forms.CharField( max_length=100, error_messages={'required': 'Username is required'} ) password = forms.CharField( widget=forms.PasswordInput, error_messages={'required': 'Password is required'} ) def clean_username(self): """Validate username: must start with string and followed by number""" username = self.cleaned_data.get('username') # Pattern: starts with letters, followed by at least one number username_regex = r'^[a-zA-Z]+\d+$' if not re.match(username_regex, username): raise forms.ValidationError( 'Username must start with letters and end with numbers' ) return username def clean_password(self): """Validate password length more than 8 characters""" password = self.cleaned_data.get('password') if len(password) < 8: raise forms.ValidationError( 'Password must be more than 8 characters' ) return password
Step 4: Create View
# views.py from django.shortcuts import render, redirect from django.contrib import messages from django.contrib.auth.hashers import make_password from .forms import UserRegistrationForm from .models import User def user_registration(request): if request.method == 'POST': form = UserRegistrationForm(request.POST) if form.is_valid(): # Check if email already exists email = form.cleaned_data['email'] if User.objects.filter(email=email).exists(): form.add_error('email', 'Email already registered') return render(request, 'user/user_form.html', {'form': form}) # Check if username already exists username = form.cleaned_data['username'] if User.objects.filter(username=username).exists(): form.add_error('username', 'Username already taken') return render(request, 'user/user_form.html', {'form': form}) # Create user record user = User( full_name=form.cleaned_data['full_name'], email=email, username=username, password=make_password(form.cleaned_data['password']), ) user.save() messages.success(request, 'User registered successfully!') return redirect('user_list') else: form = UserRegistrationForm() return render(request, 'user/user_form.html', {'form': form}) def user_list(request): users = User.objects.all() return render(request, 'user/user_list.html', {'users': users})
Step 5: Create Registration Form Template (HTML)
<!-- templates/user/user_form.html --> <pre> <!DOCTYPE html> <html> <head> <title>User Registration</title> <style> .errorlist { color: red; } input, select, textarea { padding: 8px; width: 300px; } </style> </head> <body> <h1>User Registration Form</h1> <form method="post"> {% csrf_token %} {{ form.as_p }} <button type="submit">Submit</button> </form> </body> </html> </pre>
Step 6: (Optional) Create User List Template
<!-- templates/user/user_list.html --> <pre> <!DOCTYPE html> <html> <head> <title>User List</title> <style> table { margin-top: 20px; border-collapse: collapse; } th, td { border: 1px solid black; padding: 10px; } </style> </head> <body> <h1>Registered Users</h1> <a href="{% url 'user_register' %}">+ Add New User</a> <table> <tr> <th>ID</th> <th>Full Name</th> <th>Email</th> <th>Username</th> <th>Created At</th> </tr> {% for user in users %} <tr> <td>{{ user.id }}</td> <td>{{ user.full_name }}</td> <td>{{ user.email }}</td> <td>{{ user.username }}</td> <td>{{ user.created_at }}</td> </tr> {% empty %} <tr> <td colspan="5">No users registered yet.</td> </tr> {% endfor %} </table> </body> </html> </pre>
Step 7: Configure URLs
# urls.py from django.urls import path from . import views urlpatterns = [ path('register/', views.user_registration, name='user_register'), path('', views.user_list, name='user_list'), ]
# project level urls.py from django.contrib import admin from django.urls import path, include urlpatterns = [ path('admin/', admin.site.urls), path('user/', include('user.urls')), ]
Write a Django view to upload a file and validate:
- File extension (only allow image files: jpg, jpeg, png, gif)
- File size (must be less than 2MB)
Step 1: Create Model
# models.py from django.db import models class UploadedFile(models.Model): file = models.FileField(upload_to='uploads/') uploaded_at = models.DateTimeField(auto_now_add=True) def __str__(self): return self.file.name
Step 2: Create Form with Validation
# forms.py from django import forms class FileUploadForm(forms.Form): file = forms.FileField( error_messages={'required': 'Please select a file to upload!'} ) def clean_file(self): file = self.cleaned_data.get('file') # Validate file extension allowed_extensions = ['jpg', 'jpeg', 'png', 'gif'] file_extension = file.name.split('.')[-1].lower() if file_extension not in allowed_extensions: raise forms.ValidationError( f'Invalid file type. Allowed: {", ".join(allowed_extensions)}' ) # Validate file size (max 2MB) max_size = 2 * 1024 * 1024 # 2MB in bytes if file.size > max_size: raise forms.ValidationError( 'File size must be less than 2MB' ) return file
Step 3: Create View
# views.py from django.shortcuts import render, redirect from django.contrib import messages from .forms import FileUploadForm from .models import UploadedFile def upload_file(request): if request.method == 'POST': form = FileUploadForm(request.POST, request.FILES) if form.is_valid(): # Save file to database uploaded_file = UploadedFile( file=form.cleaned_data['file'] ) uploaded_file.save() messages.success(request, 'File uploaded successfully!') return redirect('upload_success') else: form = FileUploadForm() return render(request, 'fileupload/upload.html', {'form': form}) def upload_success(request): files = UploadedFile.objects.all().order_by('-uploaded_at') return render(request, 'fileupload/success.html', {'files': files})
Step 4: Create Upload Template
<!-- templates/fileupload/upload.html --> <pre> <!DOCTYPE html> <html> <head> <title>File Upload</title> <style> .errorlist { color: red; } </style> </head> <body> <h1>Upload File</h1> <form method="post"> {% csrf_token %} {{ form.as_p }} <p style="color: gray; font-size: 0.9em;">Allowed: JPG, JPEG, PNG, GIF (Max 2MB)</p> <button type="submit">Upload</button> </form> </body> </html> </pre>
Step 5: Create Success Template
<!-- templates/fileupload/success.html --> <pre> <!DOCTYPE html> <html> <head> <title>Upload Success</title> </head> <body> <h2>Uploaded Files</h2> <a href="{% url 'upload_file' %}">Upload Another</a> <ul> {% for file in files %} <li> <a href="{{ file.file.url }}" target="_blank">{{ file.file.name }}</a> ({{ file.uploaded_at }}) </li> {% empty %} <li>No files uploaded yet.</li> {% endfor %} </ul> </body> </html> </pre>
Step 6: Configure URLs
# urls.py from django.urls import path from . import views urlpatterns = [ path('', views.upload_file, name='upload_file'), path('success/', views.upload_success, name='upload_success'), ]
# project level urls.py from django.contrib import admin from django.urls import path, include from django.conf import settings from django.conf.urls.static import static urlpatterns = [ path('admin/', admin.site.urls), path('upload/', include('fileupload.urls')), ] if settings.DEBUG: urlpatterns += static(settings.MEDIA_URL, document_root=settings.MEDIA_ROOT)
Step 7: Configure Media Settings
# settings.py import os MEDIA_URL = '/media/' MEDIA_ROOT = os.path.join(BASE_DIR, 'media')
Design following form in HTML and write corresponding server-side script to upload and submit user's data into database in consideration of following validation rules.
- Form fields: TU Registration Number, Email Address, Upload your Project File
Validation rules:
- Registration number, email and upload file are mandatory field
- Email address should be a proper email format
- Upload file format must include pdf, doc, docx, ppt, pptx, jpeg file format
- File size must be less than 5MB
Step 1: Create Project Submission Model
# models.py from django.db import models class ProjectSubmission(models.Model): tu_registration_number = models.CharField(max_length=50, unique=True) email = models.EmailField() project_file = models.FileField(upload_to='projects/') uploaded_at = models.DateTimeField(auto_now_add=True) def __str__(self): return f"{self.tu_registration_number} - {self.email}"
Step 2: Configure Media Settings
# settings.py (add at bottom) import os MEDIA_URL = '/media/' MEDIA_ROOT = os.path.join(BASE_DIR, 'media')
Step 3: Run Migrations
python manage.py makemigrations python manage.py migrate
Step 4: Create Django Form with Validation
# forms.py from django import forms class ProjectSubmissionForm(forms.Form): tu_registration_number = forms.CharField( max_length=50, error_messages={'required': 'TU Registration Number is required'} ) email = forms.EmailField( error_messages={ 'required': 'Email Address is required', 'invalid': 'Please enter a valid email address' } ) project_file = forms.FileField( error_messages={'required': 'Project File is required'} ) def clean_project_file(self): """Validate file type and size""" project_file = self.cleaned_data.get('project_file') # Allowed file extensions allowed_extensions = ['pdf', 'doc', 'docx', 'ppt', 'pptx', 'jpeg', 'jpg'] file_extension = project_file.name.split('.')[-1].lower() if file_extension not in allowed_extensions: raise forms.ValidationError( 'File format must be pdf, doc, docx, ppt, pptx, or jpeg' ) # Check file size (max 5MB) max_size = 5 * 1024 * 1024 # 5MB in bytes if project_file.size > max_size: raise forms.ValidationError( 'File size must be less than 5MB' ) return project_file
Step 5: Create View
# views.py from django.shortcuts import render, redirect from django.contrib import messages from .forms import ProjectSubmissionForm from .models import ProjectSubmission def project_upload(request): if request.method == 'POST': form = ProjectSubmissionForm(request.POST, request.FILES) if form.is_valid(): # Check if registration number already exists reg_number = form.cleaned_data['tu_registration_number'] if ProjectSubmission.objects.filter(tu_registration_number=reg_number).exists(): form.add_error('tu_registration_number', 'This registration number already submitted') return render(request, 'projectsubmission/project_form.html', {'form': form}) # Create project submission record submission = ProjectSubmission( tu_registration_number=reg_number, email=form.cleaned_data['email'], project_file=form.cleaned_data['project_file'], ) submission.save() messages.success(request, 'Project submitted successfully!') return redirect('submission_list') else: form = ProjectSubmissionForm() return render(request, 'projectsubmission/project_form.html', {'form': form}) def submission_list(request): submissions = ProjectSubmission.objects.all() return render(request, 'projectsubmission/submission_list.html', {'submissions': submissions})
Step 6: Create Project Upload Form Template (HTML)
<!-- templates/projectsubmission/project_form.html --> <pre> <!DOCTYPE html> <html> <head> <title>Project Submission</title> <style> .errorlist { color: red; } input { padding: 8px; width: 300px; } </style> </head> <body> <h1>Project File Submission</h1> <form method="POST" enctype="multipart/form-data"> {% csrf_token %} {{ form.as_p }} <button type="submit">Submit Project</button> </form> </body> </html> </pre>
Step 7: Create Submission List Template
<!-- templates/projectsubmission/submission_list.html --> <pre> <!DOCTYPE html> <html> <head> <title>Submissions List</title> </head> <body> <h1>Project Submissions</h1> <a href="{% url 'project_upload' %}">+ Submit New Project</a> <table border="1" cellpadding="10" style="margin-top: 20px;"> <tr> <th>Registration No.</th> <th>Email</th> <th>Project File</th> <th>Uploaded At</th> </tr> {% for submission in submissions %} <tr> <td>{{ submission.tu_registration_number }}</td> <td>{{ submission.email }}</td> <td> <a href="{{ submission.project_file.url }}" target="_blank">View File</a> </td> <td>{{ submission.uploaded_at }}</td> </tr> {% empty %} <tr> <td colspan="4">No submissions yet.</td> </tr> {% endfor %} </table> </body> </html> </pre>
Step 8: Configure URLs
# urls.py from django.urls import path from . import views urlpatterns = [ path('', views.submission_list, name='submission_list'), path('submit/', views.project_upload, name='project_upload'), ]
# project level urls.py from django.contrib import admin from django.urls import path, include from django.conf import settings from django.conf.urls.static import static urlpatterns = [ path('admin/', admin.site.urls), path('projectsubmission/', include('project.urls')), ] if settings.DEBUG: urlpatterns += static(settings.MEDIA_URL, document_root=settings.MEDIA_ROOT)
Write code for CRUD operations in Django.
Step 1: Create Django Project and App
# Create project django-admin startproject crud . # Create app python manage.py startapp notes
Step 2: Register App in Settings
# crud/settings.py INSTALLED_APPS = [ 'django.contrib.admin', 'django.contrib.auth', 'django.contrib.contenttypes', 'django.contrib.sessions', 'django.contrib.messages', 'django.contrib.staticfiles', 'notes', # Add this ]
Step 3: Create Note Model
# notes/models.py from django.db import models class Note(models.Model): title = models.CharField(max_length=100) description = models.TextField() created_at = models.DateTimeField(auto_now_add=True) def __str__(self): return self.title class Meta: ordering = ['-id'] # Latest first
Equivalent SQL:
CREATE TABLE `notes` ( `id` INT AUTO_INCREMENT PRIMARY KEY, `title` varchar(100) NOT NULL, `description` text NOT NULL, `created_at` datetime NOT NULL );
Step 4: Run Migrations
python manage.py makemigrations python manage.py migrate
Step 5: Create Views (CRUD Operations)
# notes/views.py from django.shortcuts import render, redirect, get_object_or_404 from django.contrib import messages from .models import Note # READ - Display all notes def index(request): notes = Note.objects.all() # Already ordered by -id in model Meta return render(request, 'notes/index.html', {'notes': notes}) # CREATE - Add new note def add_note(request): if request.method == 'POST': title = request.POST.get('title', '').strip() description = request.POST.get('description', '').strip() # Validation errors = [] if not title: errors.append('Title field is empty.') if not description: errors.append('Description field is empty.') if errors: return render(request, 'notes/add.html', {'errors': errors}) # Create note Note.objects.create(title=title, description=description) messages.success(request, 'Data added successfully!') return redirect('notes:index') return render(request, 'notes/add.html') # UPDATE - Edit note def edit_note(request, note_id): note = get_object_or_404(Note, id=note_id) if request.method == 'POST': title = request.POST.get('title', '').strip() description = request.POST.get('description', '').strip() # Validation errors = [] if not title: errors.append('Title field is empty.') if not description: errors.append('Description field is empty.') if errors: return render(request, 'notes/edit.html', { 'note': note, 'errors': errors }) # Update note note.title = title note.description = description note.save() messages.success(request, 'Data updated successfully!') return redirect('notes:index') return render(request, 'notes/edit.html', {'note': note}) # DELETE - Delete def delete_note(request, note_id): note = get_object_or_404(Note, id=note_id) note.delete() messages.success(request, 'Note deleted successfully!') return redirect('notes:index')
Step 6: Create Templates
Create notes/templates/notes/index.html
<pre> <!DOCTYPE html> <html> <head> <title>Homepage</title> <style> table, th, td { border: 1px solid black; border-collapse: collapse; } th, td { padding: 10px; } .success { color: green; } </style> </head> <body> <h2>Homepage</h2> <p> <a href="{% url 'notes:add' %}">Add New Data</a> </p> {% if messages %} {% for message in messages %}<p class="success">{{ message }}</p>{% endfor %} {% endif %} <table width="80%"> <tr> <th>Title</th> <th>Description</th> <th>Action</th> </tr> {% for note in notes %} <tr> <td>{{ note.title }}</td> <td>{{ note.description }}</td> <td> <a href="{% url 'notes:edit' note.id %}">Edit</a> | <a href="{% url 'notes:delete' note.id %}" onclick="return confirm('Are you sure to delete?');">Delete</a> </td> </tr> {% empty %} <tr> <td colspan="3">No results Found</td> </tr> {% endfor %} </table> </body> </html> </pre>
Create notes/templates/notes/add.html
<pre> <!DOCTYPE html> <html> <head> <title>Add Notes</title> <style> .error { color: red; } </style> </head> <body> <h2>Add Notes</h2> <p> <a href="{% url 'notes:index' %}">Home</a> </p> {% if errors %} {% for error in errors %}<p class="error">{{ error }}</p>{% endfor %} {% endif %} <form action="{% url 'notes:add' %}" method="post"> {% csrf_token %} <label for="title">Title:</label> <input type="text" name="title" id="title" /> <br /> <br /> <label for="description">Description:</label> <textarea name="description" id="description"></textarea> <br /> <br /> <input type="submit" value="Submit" /> </form> </body> </html> </pre>
Create notes/templates/notes/edit.html
<pre> <!DOCTYPE html> <html> <head> <title>Edit Note</title> <style> .error { color: red; } </style> </head> <body> <h2>Edit Note</h2> <p> <a href="{% url 'notes:index' %}">Home</a> </p> {% if errors %} {% for error in errors %}<p class="error">{{ error }}</p>{% endfor %} {% endif %} <form method="post"> {% csrf_token %} <label>Title:</label> <input type="text" name="title" value="{{ note.title }}" /> <br /> <br /> <label>Description:</label> <textarea name="description">{{ note.description }}</textarea> <br /> <br /> <input type="submit" value="Update" /> </form> </body> </html> </pre>
Step 7: Configure URLs
Create notes/urls.py
from django.urls import path from . import views app_name = 'notes' urlpatterns = [ path('', views.index, name='index'), path('add/', views.add_note, name='add'), path('edit/<int:note_id>/', views.edit_note, name='edit'), path('delete/<int:note_id>/', views.delete_note, name='delete'), ]
Update crud/urls.py
from django.contrib import admin from django.urls import path, include urlpatterns = [ path('admin/', admin.site.urls), path('notes/', include('notes.urls')), ]
Step 8: Run the Server
python manage.py runserver
Visit http://127.0.0.1:8000/ to see the Note Taking App.
Middleware
Middleware is software that sits between the request and response, processing each one. It's like a series of filters that every request/response passes through.
Middleware processes requests/responses as they flow through Django. Each middleware can:
- Inspect/modify incoming requests
- Inspect/modify outgoing responses
- Short-circuit the request (return early without calling view)
- Add headers, log information, handle errors
Middleware Use Cases
| Use Case | Description |
|---|---|
| Authentication | Check if user is logged in |
| Logging | Log all requests for debugging |
| Security | Add security headers |
| CORS | Handle cross-origin requests |
| Compression | Compress responses |
| Caching | Cache responses |
| Session Management | Handle user sessions |
| Error Handling | catches exceptions and provides custom error responses |
Django Built-in Middleware
Django comes with several middleware enabled by default in settings.py:
MIDDLEWARE = [ 'django.middleware.security.SecurityMiddleware', # Security headers (forces https (http to https)) 'django.contrib.sessions.middleware.SessionMiddleware', # Sessions ( read session id from cookies) 'django.middleware.common.CommonMiddleware', # Common utilities (url normalization like adding slash) 'django.middleware.csrf.CsrfViewMiddleware', # CSRF protection (validate csrf token) 'django.contrib.auth.middleware.AuthenticationMiddleware', # Auth (attaches request.user, resolving from session) 'django.contrib.messages.middleware.MessageMiddleware', # Messages (attaches messages) 'django.middleware.clickjacking.XFrameOptionsMiddleware', # Clickjacking Protection ]
Creating custom middleware
Logging Middleware
Logging helps track application behavior, debug issues, and monitor performance.
your_project/ ├── middleware.py
Create middleware
import time def request_timing_middleware(get_response): """ Function-based middleware to log request processing time """ def middleware(request): start_time = time.time() response = get_response(request) duration = time.time() - start_time print(f"{request.path} took {duration:.2f} seconds. Completed with status {response.status_code}.") return response return middleware
Register:
MIDDLEWARE = [ 'django.middleware.security.SecurityMiddleware', 'django.contrib.sessions.middleware.SessionMiddleware', 'django.middleware.common.CommonMiddleware', # register your middleware 'your_project.middleware.request_timing_middleware', 'django.middleware.csrf.CsrfViewMiddleware', 'django.contrib.auth.middleware.AuthenticationMiddleware', 'django.contrib.messages.middleware.MessageMiddleware', ]
Output
/login/ took 0.08 seconds /dashboard/ took 0.34 seconds
Error Handling Middleware
Update myproject/middleware.py
from django.http import JsonResponse # ... def error_handling_middleware(get_response): def middleware(request): return get_response(request) def process_exception(request, exception): print(f"Error {request.method} on {request.path}") if isinstance(exception, PermissionError): return JsonResponse({"error": "Forbidden", "detail": str(exception)}, status=403) if isinstance(exception, FileNotFoundError): return JsonResponse({"error": "Not Found", "detail": str(exception)}, status=404) if isinstance(exception, ValueError): return JsonResponse({"error": "Bad Request", "detail": str(exception)}, status=400) return JsonResponse({"error": "Internal Server Error", "detail": "An unexpected error occurred."}, status=500) middleware.process_exception = process_exception return middleware
Add views to trigger errors
from django.http import HttpResponse def trigger_value_error(request): raise ValueError("Invalid input: age cannot be negative") def trigger_permission_error(request): raise PermissionError("You do not have access to this resource") def trigger_generic_error(request): raise RuntimeError("Something went catastrophically wrong") def safe_view(request): return HttpResponse("Everything is fine")
Update app level urls.py
from django.urls import path from . import views urlpatterns = [ path('value-error/', views.trigger_value_error, name='value_error'), path('permission-error/', views.trigger_permission_error, name='permission_error'), path('generic-error/', views.trigger_generic_error, name='generic_error'), path('safe/', views.safe_view, name='safe'), ]
Update settings.py
MIDDLEWARE = [ 'django.middleware.security.SecurityMiddleware', 'myproject.middleware.error_handling_middleware', # Add this above sessions 'django.contrib.sessions.middleware.SessionMiddleware', 'django.middleware.common.CommonMiddleware', 'myproject.middleware.request_timing_middleware', 'django.middleware.csrf.CsrfViewMiddleware', 'django.contrib.auth.middleware.AuthenticationMiddleware', 'django.contrib.messages.middleware.MessageMiddleware', 'django.middleware.clickjacking.XFrameOptionsMiddleware', ]
Comparison of Backend Frameworks
What is a Web Framework?
A web framework is a software framework designed to support web application development. It provides:
- Pre-built components for common tasks
- Structure and conventions for organizing code
- Tools for handling HTTP requests/responses
- Database integration
- Security features
- Development utilities
Using a framework saves time, enforces best practices, and reduces the chance of security vulnerabilities.
Types of Web Frameworks
| Type | Description | Examples |
|---|---|---|
| Full-Stack | Everything included (ORM, templates, admin) | Django, Rails, Laravel |
| Micro | Minimal core, add what you need | Flask, Express.js |
| API-First | Optimized for building APIs | FastAPI, .NET Web API |
Django (Python)
Type: Full-stack framework
Philosophy: "Batteries included" — comes with everything you need
Key Features:
- Built-in admin panel
- ORM (Object-Relational Mapping)
- Authentication system
- Form handling
- Template engine
- Security features (CSRF, XSS protection)
- URL routing
- Middleware support
Best For:
- Content management systems
- E-commerce sites
- Social networks
- Data-driven applications
Pros:
| Advantage | Description |
|---|---|
| Complete package | Everything included out of the box |
| Admin panel | Automatic admin interface |
| Security | Built-in protection against common attacks |
| Scalability | Powers Instagram, Pinterest |
| Documentation | Excellent official documentation |
| Community | Large, active community |
Cons:
| Disadvantage | Description |
|---|---|
| Monolithic | Can be overkill for small projects |
| Learning curve | Many concepts to learn |
| Less flexible | Encourages "Django way" |
Flask (Python)
Type: Micro framework
Philosophy: "Micro" — minimal core, maximum flexibility
Key Features:
- Lightweight and simple
- Jinja2 templating
- Werkzeug WSGI toolkit
- No ORM (use SQLAlchemy or others)
- No form validation (use WTForms)
- Extensible with plugins
Best For:
- Small to medium applications
- APIs and microservices
- Prototypes and MVPs
- Learning web development
Pros:
| Advantage | Description |
|---|---|
| Simple | Easy to learn and use |
| Flexible | Choose your own components |
| Lightweight | Small footprint |
| Explicit | No "magic" — clear code |
Cons:
| Disadvantage | Description |
|---|---|
| Manual setup | Must add extensions for features |
| No standard | Different projects structured differently |
| Less built-in | No admin, forms, or ORM |
FastAPI (Python)
Type: API-first micro framework
Philosophy: Fast, modern, automatic documentation
Key Features:
- Async support (asyncio)
- Automatic API documentation (Swagger/OpenAPI)
- Type hints for validation
- High performance
- Dependency injection
- OAuth2 support
Best For:
- REST APIs
- Microservices
- High-performance applications
- Machine learning APIs
Pros:
| Advantage | Description |
|---|---|
| Speed | One of the fastest Python frameworks |
| Modern | Async/await, type hints |
| Auto docs | Swagger UI generated automatically |
| Validation | Automatic request validation |
Cons:
| Disadvantage | Description |
|---|---|
| API-focused | Not ideal for traditional web apps |
| Newer | Smaller community than Django/Flask |
| Async complexity | Async can be harder to debug |
ASP.NET Core MVC (C#/.NET)
Type: Full-stack framework
Philosophy: Enterprise-grade, cross-platform
Key Features:
- Built on .NET Core (cross-platform)
- MVC architecture
- Entity Framework ORM
- Razor templating
- Dependency injection
- Strong typing
- Identity for authentication
Best For:
- Enterprise applications
- Windows environments
- Large-scale systems
- Microsoft ecosystem projects
Pros:
| Advantage | Description |
|---|---|
| Performance | Very fast, compiled language |
| Enterprise | Designed for large organizations |
| Tooling | Excellent Visual Studio integration |
| Type safety | Catches errors at compile time |
Cons:
| Disadvantage | Description |
|---|---|
| Complexity | Steeper learning curve |
| Verbose | More code than dynamic languages |
| Licensing | Some tools require licenses |
Ruby on Rails (Ruby)
Type: Full-stack framework
Philosophy: "Convention over configuration"
Key Features:
- MVC architecture
- Active Record ORM
- Scaffold generation
- Migrations for database
- Asset pipeline
- Action Cable (WebSockets)
- Strong conventions
Best For:
- Startups and MVPs
- Rapid prototyping
- E-commerce platforms
- Content-heavy sites
Pros:
| Advantage | Description |
|---|---|
| Rapid development | Build features quickly |
| Conventions | Less configuration needed |
| Elegant | Clean, readable Ruby code |
| Mature | 20+ years of development |
Cons:
| Disadvantage | Description |
|---|---|
| Performance | Slower than compiled languages |
| Hosting | Fewer hosting options |
| Ruby learning | Must learn Ruby language |
Spring Boot (Java)
Type: Full-stack framework
Philosophy: Enterprise Java made easier
Key Features:
- Standalone applications
- Embedded servers
- Auto-configuration
- Spring ecosystem integration
- Dependency injection
- Spring Security
- Spring Data JPA
Best For:
- Enterprise applications
- Microservices
- Large-scale systems
- Java ecosystem projects
Pros:
| Advantage | Description |
|---|---|
| Ecosystem | Huge Spring ecosystem |
| Enterprise | Industry standard for large systems |
| Performance | JVM optimization |
| Community | Massive community support |
Cons:
| Disadvantage | Description |
|---|---|
| Verbose | Lots of boilerplate code |
| Complexity | Many concepts to learn |
| Memory | JVM memory overhead |
Node.js with Express.js (JavaScript)
Type: Micro framework
Philosophy: Minimalist, unopinionated
Key Features:
- JavaScript on server
- Non-blocking I/O
- Huge npm ecosystem
- Middleware-based
- Template engine support
- WebSocket support
Best For:
- Real-time applications
- APIs and microservices
- Single-page apps (with React/Vue)
- JavaScript full-stack development
Pros:
| Advantage | Description |
|---|---|
| Same language | JavaScript frontend and backend |
| npm ecosystem | Millions of packages |
| Real-time | Excellent for sockets/streaming |
| Fast | V8 engine, non-blocking |
Cons:
| Disadvantage | Description |
|---|---|
| Callback hell | Async code can get messy |
| No structure | Must organize yourself |
| Single-threaded | CPU-intensive tasks block |
Framework Comparison Table
| Feature | Django | Flask | FastAPI | ASP.NET | Rails | Spring Boot | Express |
|---|---|---|---|---|---|---|---|
| Language | Python | Python | Python | C# | Ruby | Java | JavaScript |
| Type | Full | Micro | API | Full | Full | Full | Micro |
| ORM | Built-in | Extension | Extension | EF Core | AR | JPA | Extension |
| Admin | Built-in | No | No | No | No | No | No |
| Learning | Medium | Easy | Easy | Hard | Medium | Hard | Easy |
| Performance | Good | Good | Excellent | Excellent | Fair | Excellent | Good |
| Async | Limited | Limited | Native | Native | No | Yes | Native |
| Used By | Netflix | Microsoft | Stack Overflow | GitHub | Alibaba | Netflix |
Choosing the Right Framework
Choose Django if:
- You want everything included
- You need an admin panel
- You're building a content-heavy site
- You prefer Python
Choose Flask if:
- You want full control
- You're building a small app or API
- You want to learn web fundamentals
- You prefer minimalism
Choose FastAPI if:
- You're building a REST API
- You need high performance
- You want automatic documentation
- You like type hints
Choose ASP.NET if:
- You're in a Microsoft environment
- You need enterprise features
- You prefer C# and strong typing
- You need high performance
Choose Ruby on Rails if:
- You want rapid development
- You prefer convention over configuration
- You're building an MVP
- You like Ruby
Choose Spring Boot if:
- You're building enterprise Java apps
- You need the Spring ecosystem
- You're working with microservices
- Your team knows Java
Choose Express.js if:
- You want JavaScript everywhere
- You're building real-time apps
- You're working with React/Vue
- You want flexibility
Summary: Framework Comparison
| Consideration | Recommendation |
|---|---|
| Beginner | Flask, Express |
| Rapid Development | Django, Rails |
| APIs | FastAPI, Express |
| Enterprise | Spring Boot, ASP.NET |
| Full-Stack | Django, Rails, ASP.NET |
| Microservices | FastAPI, Express, Spring Boot |
| Real-Time | Express (Socket.io), Django Channels |
Database Types
What is a Database?
A database is an organized collection of structured data stored electronically. Databases allow applications to:
- Store data permanently
- Retrieve data efficiently
- Update and delete data
- Maintain data integrity
- Handle concurrent access
Types of Databases
1. Relational Databases (SQL)
Relational databases store data in tables with rows and columns. Tables can be related to each other through keys.
Characteristics:
- Data stored in structured tables
- Predefined schema (structure)
- Uses SQL (Structured Query Language)
- ACID compliant (Atomicity, Consistency, Isolation, Durability)
- Strong data integrity
- Relationships between tables
Popular Relational Databases:
| Database | Description |
|---|---|
| PostgreSQL | Advanced, open-source, feature-rich |
| MySQL | Popular, fast, widely used |
| SQLite | Lightweight, file-based, embedded |
| Oracle | Enterprise, commercial |
| SQL Server | Microsoft, enterprise |
Example Table Structure:
┌─────────────────────────────────────────────────────┐ │ users TABLE │ ├─────┬──────────┬─────────────────────┬──────────────┤ │ id │ username │ email │ created_at │ ├─────┼──────────┼─────────────────────┼──────────────┤ │ 1 │ john │ [email protected] │ 2026-01-15 │ │ 2 │ jane │ [email protected] │ 2026-01-16 │ │ 3 │ bob │ [email protected] │ 2026-01-17 │ └─────┴──────────┴─────────────────────┴──────────────┘
2. NoSQL Databases
NoSQL databases store data in flexible formats other than traditional tables. They are designed for scalability and handling unstructured data.
Types of NoSQL Databases:
| Type | Description | Examples |
|---|---|---|
| Document | Stores JSON-like documents | MongoDB, CouchDB |
| Key-Value | Simple key-value pairs | Redis, DynamoDB |
| Column-Family | Columns grouped into families | Cassandra, HBase |
| Graph | Nodes and relationships | Neo4j, ArangoDB |
Characteristics:
- Flexible schema (schema-less)
- Horizontal scaling
- High performance for specific use cases
- Good for unstructured/semi-structured data
- Eventually consistent (often)
Example Document (MongoDB):
{ "_id": "507f1f77bcf86cd799439011", "username": "john", "email": "[email protected]", "profile": { "bio": "Software developer", "avatar": "avatar.jpg" }, "tags": ["developer", "python", "django"] }
Relational vs NoSQL Comparison
| Aspect | Relational (SQL) | NoSQL |
|---|---|---|
| Schema | Fixed, predefined | Flexible, dynamic |
| Scaling | Vertical (bigger server) | Horizontal (more servers) |
| Relationships | Strong (foreign keys) | Weak or embedded |
| Query Language | SQL | Varies (MongoDB uses JSON) |
| Transactions | ACID compliant | Often eventually consistent |
| Best For | Structured data, relationships | Flexibility, large scale |
| Examples | Banking, ERP, CRM | Social media, IoT, logs |
Choose Relational Database When:
- Data has clear relationships
- Data integrity is critical
- You need complex queries and joins
- Transactions are important
- Schema is well-defined
Choose NoSQL When:
- Schema is evolving/unknown
- You need horizontal scaling
- Handling large volumes of data
- Data is semi-structured or unstructured
- Speed is more important than consistency
What is CRUD?
CRUD represents the four basic operations for persistent storage:
| Operation | Description | SQL Command | HTTP Method |
|---|---|---|---|
| Create | Add new data | INSERT | POST |
| Read | Retrieve data | SELECT | GET |
| Update | Modify existing data | UPDATE | PUT/PATCH |
| Delete | Remove data | DELETE | DELETE |
CRUD with Raw SQL
-- CREATE: Insert a new record INSERT INTO users (username, email) VALUES ('john', '[email protected]'); -- READ: Select records SELECT * FROM users; -- All users SELECT * FROM users WHERE id = 1; -- Specific user SELECT username, email FROM users; -- Specific columns -- UPDATE: Modify a record UPDATE users SET email = '[email protected]' WHERE id = 1; -- DELETE: Remove a record DELETE FROM users WHERE id = 1;
Optimized All
CRUD Application
Install Python
# Download Python from python.org # Verify installation python --version # or python3 --version
Create Virtual Environment
# Create project folder mkdir crud cd crud # Create virtual environment python -m venv venv # Activate virtual environment # Windows: Command Prompt venv\Scripts\activate # macOS/Linux: source venv/bin/activate
Install Django
pip install django # Verify installation django-admin --version
Create Django Project and App
# Create project django-admin startproject crud . # Create app python manage.py startapp notes
Recommended: Visual Studio Code Extensions
- Download vscode from code.visualstudio.com
- Install Python extension
- Install Pylance extension
- Install autopep8 extension
- Install Django extension
- Install SQLite Viewer extension
- Configure Python interpreter to use virtual environment
Install djlint
- For formatting Django-HTML templates
pip install djlint
- Enable emmet abbreviations for django-html
- Configure djlint in vscode for local workspace
- Configure Python interpreter to use virtual environment
// .vscode/settings.json { "emmet.includeLanguages": { "django-html": "html" }, "[html][django-html]": { "editor.defaultFormatter": "monosans.djlint" }, "djlint.showInstallError": false, "python.languageServer": "Pylance" }
Register App in Settings
# crud/settings.py INSTALLED_APPS = [ 'django.contrib.admin', 'django.contrib.auth', 'django.contrib.contenttypes', 'django.contrib.sessions', 'django.contrib.messages', 'django.contrib.staticfiles', 'notes', # Add this ]
Create Note Model
# notes/models.py from django.db import models class Note(models.Model): title = models.CharField(max_length=100) description = models.TextField() def __str__(self): return self.title
Equivalent SQL:
CREATE TABLE `notes` ( `id` INT AUTO_INCREMENT PRIMARY KEY, `title` varchar(100) NOT NULL, `description` text NOT NULL );
Run Migrations
python manage.py makemigrations python manage.py migrate
Create Sample Notes Using Shell
python manage.py shell
# Inside the shell from notes.models import Note # Create sample notes Note.objects.create(title="First Note", description="This is my first note with enough characters") Note.objects.create(title="Django Tutorial", description="Learning Django CRUD operations with forms and validation") Note.objects.create(title="Shopping List", description="Buy groceries: milk, eggs, bread, and vegetables") # Display all notes Note.objects.all() # Exit shell exit()
Create Form with Validation
# notes/forms.py from django import forms from .models import Note class NoteForm(forms.Form): title = forms.CharField( max_length=100, widget=forms.TextInput(attrs={'id': 'title'}), error_messages={'required': 'Title is required'} ) description = forms.CharField( # required=False, widget=forms.Textarea(attrs={'id': 'description'}), error_messages={'required': 'Description is required'} ) def clean_description(self): description = self.cleaned_data.get('description', '') if len(description) < 10: raise forms.ValidationError('Description must be at least 10 characters long.') return description def create(self, validated_data): return Note.objects.create(**validated_data) def update(self, instance, validated_data): instance.title = validated_data.get('title', instance.title) instance.description = validated_data.get('description', instance.description) instance.save() return instance
Create Views (CRUD Operations)
# notes/views.py from django.shortcuts import render, redirect, get_object_or_404 from django.contrib import messages from .models import Note from .forms import NoteForm # READ - Display all notes def index(request): notes = Note.objects.all().order_by('-id') # Latest first return render(request, 'notes/index.html', {'notes': notes}) # CREATE - Add new note def add_note(request): if request.method == 'POST': form = NoteForm(request.POST) if form.is_valid(): form.create(form.cleaned_data) messages.success(request, 'Data added successfully!') return redirect('notes:index') else: form = NoteForm() return render(request, 'notes/add.html', {'form': form}) # UPDATE - Edit note def edit_note(request, note_id): note = get_object_or_404(Note, id=note_id) if request.method == 'POST': form = NoteForm(request.POST) if form.is_valid(): form.update(note, form.cleaned_data) messages.success(request, 'Data updated successfully!') return redirect('notes:index') else: form = NoteForm(initial={ 'title': note.title, 'description': note.description }) return render(request, 'notes/edit.html', {'form': form}) # DELETE - Delete def delete_note(request, note_id): note = get_object_or_404(Note, id=note_id) note.delete() messages.success(request, 'Note deleted successfully!') return redirect('notes:index')
Create CSS File
Create notes/static/notes/css/style.css
table { border-collapse: collapse; } th, td { border: 1px solid black; padding: 10px; } .success { color: green; } .error { color: red; } .errorlist { color: red; list-style: none; padding: 0; }
Configure Static Files in Settings
Update crud/settings.py
# At the bottom of the file, after STATIC_URL STATIC_URL = 'static/' # Add this line STATICFILES_DIRS = [ BASE_DIR / 'notes' / 'static', ]
Navigation Partial
Create notes/templates/notes/partials/navigation.html
<pre> <nav> <p> <a href="{% url 'notes:index' %}">Home</a> | <a href="{% url 'notes:add' %}">Add New Data</a> </p> </nav> </pre>
Create Base Template
Create notes/templates/notes/base.html
<pre> {% load static %} <!DOCTYPE html> <html> <head> <title> {% block title %} Notes App {% endblock title %} </title> <link rel="stylesheet" href="{% static 'notes/css/style.css' %}" /> </head> <body> {% include 'notes/partials/navigation.html' %} {% if messages %} {% for message in messages %}<p class="{{ message.tags }}">{{ message }}</p>{% endfor %} {% endif %} {% block content %} {% endblock content %} </body> </html> </pre>
Index Template
Create notes/templates/notes/index.html
<pre> {% extends 'notes/base.html' %} {% block title %} Homepage {% endblock title %} {% block content %} <h2>Homepage</h2> <table width="80%"> <tr> <th>Title</th> <th>Description</th> <th>Action</th> </tr> {% for note in notes %} <tr> <td>{{ note.title }}</td> <td>{{ note.description }}</td> <td> <a href="{% url 'notes:edit' note.id %}">Edit</a> | <a href="{% url 'notes:delete' note.id %}" onclick="return confirm('Are you sure to delete?');">Delete</a> </td> </tr> {% empty %} <tr> <td colspan="3">No results Found</td> </tr> {% endfor %} </table> {% endblock content %} </pre>
Create notes/templates/notes/add.html
<pre> {% extends 'notes/base.html' %} {% block title %} Add Notes {% endblock title %} {% block content %} <h2>Add Notes</h2> <form action="{% url 'notes:add' %}" method="post"> {% csrf_token %} {{ form.as_p }} <input name="submit" type="submit" value="Submit" /> </form> {% endblock content %} </pre>
Create notes/templates/notes/edit.html
<pre> {% extends 'notes/base.html' %} {% block title %} Edit Note {% endblock title %} {% block content %} <h2>Edit Note</h2> <form method="post"> {% csrf_token %} {{ form.as_p }} <input name="submit" type="submit" value="Update" /> </form> {% endblock content %} </pre>
Configure URLs
Create notes/urls.py
from django.urls import path from . import views app_name = 'notes' urlpatterns = [ path('', views.index, name='index'), path('add/', views.add_note, name='add'), path('edit/<int:note_id>/', views.edit_note, name='edit'), path('delete/<int:note_id>/', views.delete_note, name='delete'), ]
Update crud/urls.py
from django.contrib import admin from django.urls import path, include urlpatterns = [ path('admin/', admin.site.urls), path('notes/', include('notes.urls')), ]
Run the Server
python manage.py runserver
Visit http://127.0.0.1:8000/notes/ to see the Note Taking App.
Create Superuser
python manage.py createsuperuser
Visit admin panel
python manage.py runserver
Open your browser and navigate to http://127.0.0.1:8000/admin to see your Admin Panel.
Register model for admin site
# models.py from django.contrib import admin from .models import Note admin.site.register(Note)
- Refresh admin panel
Logging Middleware
Logging helps track application behavior, debug issues, and monitor performance.
crud/ ├── middleware.py ├── settings.py
Create middleware
import time def request_timing_middleware(get_response): """ Function-based middleware to log request processing time """ def middleware(request): start_time = time.time() response = get_response(request) duration = time.time() - start_time print(f"{request.path} took {duration:.2f} seconds. Completed with status {response.status_code}.") return response return middleware
Register:
MIDDLEWARE = [ 'django.middleware.security.SecurityMiddleware', 'django.contrib.sessions.middleware.SessionMiddleware', 'django.middleware.common.CommonMiddleware', # register your middleware 'crud.middleware.request_timing_middleware', 'django.middleware.csrf.CsrfViewMiddleware', 'django.contrib.auth.middleware.AuthenticationMiddleware', 'django.contrib.messages.middleware.MessageMiddleware', ]
Output
/login/ took 0.08 seconds. Completed with status 200. /dashboard/ took 0.34 seconds. Completed with status 200.
Automated Testing
Create notes/utils.py
def add(a, b): return a + b
Update notes/tests.py
from django.test import TestCase from .utils import add class AddFunctionTestCase(TestCase): def test_add(self): self.assertEqual(add(2, 3), 5)
Run Tests
py manage.py test
Output
Ran 1 test in 0.001s OK
Test for UI content
Update notes/tests.py
from django.test import TestCase from django.urls import reverse from .utils import add class AddFunctionTestCase(TestCase): def test_add(self): self.assertEqual(add(2, 3), 5) class HomePageTestCase(TestCase): def test_home_page_contains_homepage_text(self): response = self.client.get(reverse('notes:index')) self.assertEqual(response.status_code, 200) self.assertContains(response, 'Homepage') class NotesTestCase(TestCase): def test_notes_can_be_created(self): # Act response = self.client.post(reverse('notes:add'), { 'title': 'Django Course1', 'description': 'Complete course with urls, templates, models, etc' }) # Assert # Redirect after successful creation self.assertEqual(response.status_code, 302) # Follow redirect and check the note appears response = self.client.get(response.url) self.assertContains(response, 'Django Course') def test_error_occurs_if_description_is_less_than_10_chars_long(self): # Act response = self.client.post(reverse('notes:add'), { 'title': 'Django Course', 'description': 'dj' }) # Assert # Should return to form with errors self.assertEqual(response.status_code, 200) self.assertContains( response, 'Description must be at least 10 characters long')
Run Tests
py manage.py test
Output
Ran 4 tests in 0.062s OK
Create GitHub Actions Workflow for tests
Inside your project, create this folder structure:
.github/workflows/django.yml
Add This Code to django.yml
name: Django Tests on: push: branches: ["main"] jobs: test: runs-on: ubuntu-latest steps: - name: Checkout code uses: actions/checkout@v4 - name: Set up Python uses: actions/setup-python@v5 with: python-version: "3.14" - name: Install dependencies run: | python -m pip install --upgrade pip pip install -r requirements.txt - name: Run tests run: | python manage.py test
Make Sure You Have requirements.txt
pip freeze > requirements.txt
Push to GitHub
git add . git commit -m "Add GitHub Actions for testing" git push origin main
Now every time you push to main:
- GitHub creates a virtual machine
- Installs Python
- Installs dependencies
- Runs
python manage.py test - Shows pass/fail result
Where to See Results
- Go to your GitHub repo
- Click Actions tab
- You’ll see the test run
Deploy on Render
Update settings.py
import os # ... DEBUG = 'RENDER' not in os.environ ALLOWED_HOSTS = [] RENDER_EXTERNAL_HOSTNAME = os.environ.get('RENDER_EXTERNAL_HOSTNAME') if RENDER_EXTERNAL_HOSTNAME: ALLOWED_HOSTS.append(RENDER_EXTERNAL_HOSTNAME)
Set up static file serving
pip install "whitenoise[brotli]"
- WhiteNoise is used to serve static files in production, without needing Nginx, Apache.
[brotli]installs extra compression support.
Update settings.py
MIDDLEWARE = [ 'django.middleware.security.SecurityMiddleware', 'whitenoise.middleware.WhiteNoiseMiddleware', ... ] # ... STATIC_URL = '/static/' if not DEBUG: STATIC_ROOT = os.path.join(BASE_DIR, 'staticfiles') STATICFILES_STORAGE = 'whitenoise.storage.CompressedManifestStaticFilesStorage'
Create a build script
set -o errexit pip install -r requirements.txt python manage.py collectstatic --no-input python manage.py migrate
set -o errexitmeans: Exit immediately if any command fails--no-inputmeans: Run without asking for user confirmation.
Install Gunicorn and Uvicorn
pip install gunicorn uvicorn pip freeze > requirements.txt
Try running your project locally
uvicorn crud.asgi:application
Define your Django web service
- Create
render.yaml
services: - type: web plan: free name: crud runtime: python buildCommand: "./build.sh" startCommand: "python -m gunicorn crud.asgi:application -k uvicorn.workers.UvicornWorker"
Deploy from Render dashboard
- In the Render Dashboard, go to the Blueprints page and click New Blueprint Instance.
- Select the repository that contains your blueprint and click Connect.
- Give your blueprint project a name and click Deploy.
- That's it! Your project will be live at its
.onrender.comURL as soon as the build finishes.
UI testing with selenium
Install selenium and pytest
pip install selenium pytest
Create uitest.py
import time from selenium import webdriver from selenium.webdriver.common.by import By def test_notes_can_be_created(): # Arrange driver = webdriver.Chrome() driver.get('http://127.0.0.1:8000/notes/add/') # Act driver.find_element(By.NAME, 'title').send_keys('Django Course') driver.find_element(By.NAME, 'description').send_keys( 'Complete course with urls, templates, models, etc') driver.find_element(By.NAME, 'submit').click() time.sleep(2) # Bad but easy # Assert title = driver.find_element(By.TAG_NAME, 'td').text assert 'Django Course' in title driver.quit() def test_error_occurs_if_description_is_less_than_10_chars_long(): # Arrange driver = webdriver.Chrome() driver.get('http://127.0.0.1:8000/notes/add/') # Act driver.find_element(By.NAME, 'title').send_keys('Django Course') driver.find_element(By.NAME, 'description').send_keys('dj') driver.find_element(By.NAME, 'submit').click() time.sleep(2) # Bad but easy # Assert error = driver.find_element(By.TAG_NAME, 'li').text assert 'Description must be at least 10 characters long' in error driver.quit()
Run Test
pytest uitest.py
Easy Test Example without django project
<!DOCTYPE html> <html lang="en"> <head> <meta charset="UTF-8" /> <meta name="viewport" content="width=device-width, initial-scale=1.0" /> <title>Document</title> </head> <body> <form action="#" onsubmit="handleSubmit(event)"> Username: <input type="text" name="username" required /><br /><br /> Password: <input type="password" name="password" required /><br /><br /> <button type="submit" id="login-button">Submit</button> </form> <script> function handleSubmit(event) { event.preventDefault(); document.body.innerHTML += "<h3 id='welcome'>Welcome, testuser</h3>"; } </script> </body> </html>
from selenium import webdriver from selenium.webdriver.common.by import By def test_user_can_login(): # Arrange driver = webdriver.Chrome() driver.get('http://127.0.0.1:5500/login.html') # Act driver.find_element(By.NAME, 'username').send_keys('testuser') driver.find_element(By.NAME, 'password').send_keys('testpass123') driver.find_element(By.ID, 'login-button').click() # Assert welcome_message = driver.find_element(By.ID, 'welcome').text assert 'Welcome, testuser' in welcome_message driver.quit()
Cross-Site Scripting (XSS)
Cross-Site Scripting (XSS) is a security vulnerability that allows attackers to inject malicious scripts into web pages viewed by other users. When a user visits an infected page, the malicious script executes in their browser with the same privileges as legitimate scripts from the trusted website.
Demo
Update notes/index.html
<td>{{ note.description|safe }}</td>
- In description input, give following:
<script> alert( `You are hacked. Stealing your cookies. Your cookie data is: ${document.cookie}`, ); </script>
SQL Injection
SQL Injection is a code injection technique that exploits vulnerabilities in applications that construct SQL queries using user input. It allows attackers to interfere with the queries that an application makes to its database.
Update notes/views.py
from django.db import connection def add_note_sql_injection(request): if request.method == 'POST': form = NoteForm(request.POST) if form.is_valid(): title = form.cleaned_data['title'] desc = form.cleaned_data['description'] sql = f""" INSERT INTO notes_note (title, description) VALUES ('{title}', '{desc}'); """ with connection.cursor() as cursor: cursor.executescript(sql) messages.success(request, 'Data added successfully!') return redirect('notes:index') else: form = NoteForm() return render(request, 'notes/add.html', {'form': form})
Update notes/urls.py
path('add/', views.add_note_sql_injection, name='add'),
Give following input in description:
'); delete from notes_note; --
This will run as:
INSERT INTO notes_note (title, description) VALUES ('My Test Note', ''); DELETE FROM notes_note; -- ');
This will delete all data of the table.
Another input example:
'); DROP TABLE notes_note; --
This will run as:
INSERT INTO notes_note (title, description) VALUES ('My Test Note', ''); DROP TABLE notes_note; -- ');
This will delete the table itself.
Cross-Site Request Forgery (CSRF)
Cross-Site Request Forgery (CSRF), also known as "session riding" or "one-click attack," is an attack that forces authenticated users to submit unwanted requests to a web application. CSRF exploits the trust that a website has in a user's browser.
But we can also do simple demo without authentication
Create csrf.html
<!DOCTYPE html> <html> <head> <title>Win Iphone</title> </head> <body> <h1>Win Iphone</h1> <form id="evilForm" action="http://127.0.0.1:8000/notes/add/" method="POST" style="display:none" > <input type="text" name="title" value="I was hacked!" /> <input type="text" name="description" value="Attacker added this note using CSRF!" /> </form> <script> // Auto-submit when page loads (invisible to user) window.onload = function () { document.getElementById("evilForm").submit(); }; </script> </body> </html>
- Open this form with live server. It will open on
http://127.0.0.1:5500/csrf.html - This will be blocked due to reason:
Forbidden (403). CSRF verification failed. Request aborted.
- Now remove
{% csrf_token %}fromnotes/add.html - Also update
notes/views.pyas:
from django.views.decorators.csrf import csrf_exempt @csrf_exempt def add_note_sql_injection(request): # ...
- Now, this all add the data with title: I was hacked!
If you want to run demo with authenticated user:
- Create super user with
python manage.py createsuperuser - Go to
http://127.0.0.1:8000/adminand follow login process - Close
http://127.0.0.1:8000 - Update
notes/views.pywith code block below and openhttp://127.0.0.1:5500/csrf.htmlwith live server
from django.contrib.auth.decorators import login_required @login_required @csrf_exempt def add_note_sql_injection(request): # ...
- Now this will try to open login page when not authenticated and get 404 not found error. However, when logged in, data will be added since user is already authenticated in the browser and cookies with session id is automatically sent.
Lab: CRUD with Django
Grocery Bud
Build a Grocery list app using Django.
Prerequisites
- Python 3.x installed
- pip (Python package installer)
Create Project
cd Desktop mkdir grocery-bud-django cd grocery-bud-django
Create Virtual Environment
python -m venv venv
Activate Virtual Environment
# Windows venv\Scripts\activate # Linux/Mac source venv/bin/activate
Install Django
pip install django
Create Django Project
django-admin startproject djangocrud .
Create Django App
python manage.py startapp grocery
Project Structure
grocery-bud-django/ ├── djangocrud/ │ ├── __init__.py │ ├── asgi.py │ ├── settings.py │ ├── urls.py │ └── wsgi.py ├── grocery/ │ ├── migrations/ │ ├── static/ │ │ └── grocery/ │ │ └── css/ │ │ ├── global.css │ │ ├── single-item.css │ │ ├── items.css │ │ └── form.css │ ├── templates/ │ │ └── grocery/ │ │ └── index.html │ ├── __init__.py │ ├── admin.py │ ├── apps.py │ ├── models.py │ ├── urls.py │ └── views.py ├── manage.py └── venv/
Install djlint
- For formatting HTML templates
pip install djlint
- Configure djlint in vscode for local workspace
{ "emmet.includeLanguages": { "django-html": "html" }, "[html][django-html]": { "editor.defaultFormatter": "monosans.djlint" } }
Register App in Settings
Update djangocrud/settings.py
INSTALLED_APPS = [ 'django.contrib.admin', 'django.contrib.auth', 'django.contrib.contenttypes', 'django.contrib.sessions', 'django.contrib.messages', 'django.contrib.staticfiles', 'grocery', # Add this line ]
Setup Global Styles
Create grocery/static/grocery/css/global.css
*, ::after, ::before { margin: 0; padding: 0; box-sizing: border-box; } body { background: #eee; font-family: Helvetica, sans-serif; font-weight: 400; line-height: 1.2; color: #222; } .section-center { margin: 0 auto; margin-top: 8rem; max-width: 30rem; background: #fff; border-radius: 0.25rem; padding: 2rem; position: relative; }
Create Test UI
Create SingleItem Component Styles
Create grocery/static/grocery/css/single-item.css
.single-item { display: grid; grid-template-columns: auto 1fr auto auto; column-gap: 1rem; align-items: center; } .single-item p { text-transform: capitalize; } .single-item input[type="checkbox"] { cursor: pointer; width: 1rem; height: 1rem; } .single-item .btn { cursor: pointer; color: #fff; background: #06b6d4; border: transparent; border-radius: 0.25rem; padding: 0.375rem 0.75rem; font-size: 1rem; text-decoration: none; display: inline-flex; align-items: center; justify-content: center; } .single-item .btn:hover { background: #0e7490; } .single-item .remove-btn { background: #222; } .single-item .remove-btn:hover { background: #900e0e; }
Create Items Component Styles
Create grocery/static/grocery/css/items.css
.items { margin-top: 2rem; display: grid; row-gap: 1rem; }
Create grocery/templates/grocery/index.html
{% load static %} <!DOCTYPE html> <html lang="en"> <head> <meta charset="UTF-8" /> <meta name="viewport" content="width=device-width, initial-scale=1.0" /> <title>Grocery Bud - Django</title> <link rel="stylesheet" href="https://cdnjs.cloudflare.com/ajax/libs/font-awesome/6.0.0/css/all.min.css" /> <link rel="stylesheet" href="{% static 'grocery/css/global.css' %}" /> <link rel="stylesheet" href="{% static 'grocery/css/global.css' %}" /> <link rel="stylesheet" href="{% static 'grocery/css/single-item.css' %}" /> <link rel="stylesheet" href="{% static 'grocery/css/items.css' %}" /> </head> <body> <section class="section-center"> <div class="items"> <div class="single-item"> <input type="checkbox" checked /> <p style="text-decoration: line-through">milk</p> <a href="#" class="btn icon-btn edit-btn"> <i class="fa-regular fa-pen-to-square"></i> </a> <button class="btn icon-btn remove-btn" type="submit"> <i class="fa-regular fa-trash-can"></i> </button> </div> <div class="single-item"> <input type="checkbox" checked /> <p style="text-decoration: line-through">bread</p> <a href="#" class="btn icon-btn edit-btn"> <i class="fa-regular fa-pen-to-square"></i> </a> <button class="btn icon-btn remove-btn" type="submit"> <i class="fa-regular fa-trash-can"></i> </button> </div> <div class="single-item"> <input type="checkbox" /> <p style="text-decoration: none">eggs</p> <a href="#" class="btn icon-btn edit-btn"> <i class="fa-regular fa-pen-to-square"></i> </a> <button class="btn icon-btn remove-btn" type="submit"> <i class="fa-regular fa-trash-can"></i> </button> </div> <div class="single-item"> <input type="checkbox" /> <p style="text-decoration: none">butter</p> <a href="#" class="btn icon-btn edit-btn"> <i class="fa-regular fa-pen-to-square"></i> </a> <button class="btn icon-btn remove-btn" type="submit"> <i class="fa-regular fa-trash-can"></i> </button> </div> </div> </section> </body> </html>
Create Basic View and URL
Update grocery/views.py
from django.shortcuts import render def index(request): """Display all grocery items""" return render(request, 'grocery/index.html')
Create grocery/urls.py
from django.urls import path from . import views app_name = 'grocery' urlpatterns = [ path('', views.index, name='index'), ]
Update djangocrud/urls.py
from django.contrib import admin from django.urls import path, include urlpatterns = [ path('admin/', admin.site.urls), path('', include('grocery.urls')), ]
Run the Server
python manage.py runserver
Output
At this stage, you should see a list of grocery items displayed with proper spacing.
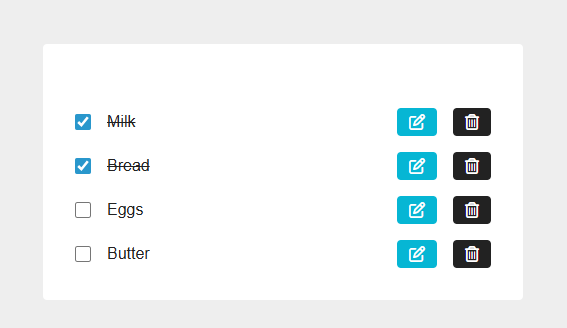
Create Model
Update grocery/models.py
from django.db import models class GroceryItem(models.Model): name = models.CharField(max_length=200) completed = models.BooleanField(default=False) created_at = models.DateTimeField(auto_now_add=True) def __str__(self): return self.name class Meta: ordering = ['-created_at']
Create and Run Migrations
python manage.py makemigrations python manage.py migrate
Display Items from Database
Update grocery/views.py
from django.shortcuts import render from .models import GroceryItem def index(request): """Display all grocery items""" items = GroceryItem.objects.all() context = { 'items': items, } return render(request, 'grocery/index.html', context)
Update grocery/templates/grocery/index.html
Replace the static items div with dynamic template:
{% load static %} <!DOCTYPE html> <html lang="en"> <head> <meta charset="UTF-8" /> <meta name="viewport" content="width=device-width, initial-scale=1.0" /> <title>Grocery Bud - Django</title> <link rel="stylesheet" href="https://cdnjs.cloudflare.com/ajax/libs/font-awesome/6.0.0/css/all.min.css" /> <link rel="stylesheet" href="{% static 'grocery/css/global.css' %}" /> <link rel="stylesheet" href="{% static 'grocery/css/single-item.css' %}" /> <link rel="stylesheet" href="{% static 'grocery/css/items.css' %}" /> </head> <body> <section class="section-center"> <!-- Items List --> <div class="items"> {% for item in items %} <div class="single-item"> <input type="checkbox" {% if item.completed %}checked{% endif %} /> <p style="text-decoration: {% if item.completed %}line-through{% else %}none{% endif %}" > {{ item.name }} </p> <a href="#" class="btn icon-btn edit-btn"> <i class="fa-regular fa-pen-to-square"></i> </a> <button class="btn icon-btn remove-btn" type="submit"> <i class="fa-regular fa-trash-can"></i> </button> </div> {% empty %} <p style="text-align: center; color: #888;"> No items yet. Add one above! </p> {% endfor %} </div> </section> </body> </html>
Output
At this stage, you should see "No items yet. Add one above!" message.

Create Dummy Data
Open Django shell to create test items:
python manage.py shell
Run the following commands in the shell:
from grocery.models import GroceryItem GroceryItem.objects.create(name="milk", completed=True) GroceryItem.objects.create(name="bread", completed=True) GroceryItem.objects.create(name="eggs", completed=False) GroceryItem.objects.create(name="butter", completed=False) exit()
Output
Now refresh the browser, you should see a list of grocery items displayed with proper spacing.
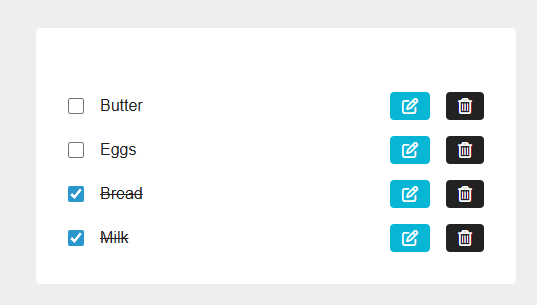
ADD Edit Completed Feature
Update grocery/views.py
from django.shortcuts import render, redirect, get_object_or_404 from .models import GroceryItem def index(request): """Display all grocery items""" items = GroceryItem.objects.all() context = { 'items': items, } return render(request, 'grocery/index.html', context) def toggle_completed(request, item_id): """Toggle the completed status of a grocery item""" if request.method == 'POST': item = get_object_or_404(GroceryItem, id=item_id) item.completed = not item.completed item.save() return redirect('grocery:index')
Update grocery/urls.py
from django.urls import path from . import views app_name = 'grocery' urlpatterns = [ path('', views.index, name='index'), path('toggle/<int:item_id>/', views.toggle_completed, name='toggle'), ]
Update grocery/templates/grocery/index.html
Update the checkbox to use a form:
<!-- Items List --> <pre> <div class="items"> {% for item in items %} <div class="single-item"> <form method="POST" action="{% url 'grocery:toggle' item.id %}"> {% csrf_token %} <input type="checkbox" {% if item.completed %}checked{% endif %} onchange="this.form.submit()" /> </form> <p style="text-decoration: {% if item.completed %}line-through{% else %}none{% endif %}">{{ item.name }}</p> <a href="#" class="btn icon-btn edit-btn"> <i class="fa-regular fa-pen-to-square"></i> </a> <button class="btn icon-btn remove-btn" type="submit"> <i class="fa-regular fa-trash-can"></i> </button> </div> {% empty %} <p style="text-align: center; color: #888;">No items yet. Add one above!</p> {% endfor %} </div> </pre>
Output
Now you can check/uncheck items to mark them as completed.
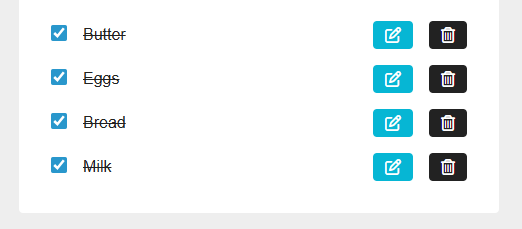
ADD Delete Feature
Update grocery/views.py
# .... def delete_item(request, item_id): """Delete a grocery item""" if request.method == 'POST': item = get_object_or_404(GroceryItem, id=item_id) item.delete() return redirect('grocery:index')
Update grocery/urls.py
from django.urls import path from . import views app_name = 'grocery' urlpatterns = [ path('', views.index, name='index'), path('toggle/<int:item_id>/', views.toggle_completed, name='toggle'), path('delete/<int:item_id>/', views.delete_item, name='delete'), ]
Update grocery/templates/grocery/index.html
Replace the delete button with a form:
<form method="POST" action="{% url 'grocery:delete' item.id %}" style="display: inline" > {% csrf_token %} <button type="submit" class="btn icon-btn remove-btn"> <i class="fa-regular fa-trash-can"></i> </button> </form>
Output
Now you can delete items from the list.
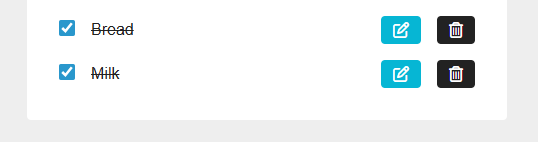
Create Form Component to Add New Grocery Item
Create Test Form UI
Test Update grocery/templates/grocery/index.html
Add form before items list:
<section class="section-center"> <!-- Form --> <form> <h2>grocery bud</h2> <div class="form-control"> <input type="text" class="form-input" placeholder="e.g. eggs" /> <button type="submit" class="btn">add item</button> </div> </form> <!-- Items List --> <div class="items"> <!-- ... existing items code ... --> </div> </section>
Create grocery/static/grocery/css/form.css
form h2 { text-align: center; margin-bottom: 1.5rem; text-transform: capitalize; font-weight: normal; } .form-control { display: grid; grid-template-columns: 1fr 100px; } .form-input { width: 100%; padding: 0.375rem 0.75rem; border-radius: 0; border-top-left-radius: 0.25rem; border-bottom-left-radius: 0.25rem; border: 1px solid #ddd; } .form-input::placeholder { color: #aaa; } .form-control .btn { cursor: pointer; color: #fff; background: #06b6d4; border: transparent; border-radius: 0; border-top-right-radius: 0.25rem; border-bottom-right-radius: 0.25rem; padding: 0.375rem 0.75rem; text-transform: capitalize; } .form-control .btn:hover { background: #0e7490; }
Update grocery/templates/grocery/index.html (Add form CSS link)
<link rel="stylesheet" href="{% static 'grocery/css/form.css' %}" />
Add View for Creating Items
Update grocery/views.py
# .... def add_item(request): """Add a new grocery item""" if request.method == 'POST': name = request.POST.get('name', '').strip() if name: GroceryItem.objects.create(name=name) return redirect('grocery:index')
Update grocery/urls.py
urlpatterns = [ path('add/', views.add_item, name='add'), ]
Update grocery/templates/grocery/index.html
Update the form to post to add URL:
<!-- Form --> <form method="POST" action="{% url 'grocery:add' %}"> {% csrf_token %} <h2>grocery bud</h2> <div class="form-control"> <input type="text" name="name" class="form-input" placeholder="e.g. eggs" /> <button type="submit" class="btn">add item</button> </div> </form>
Output
Now you can add new grocery items to the list.
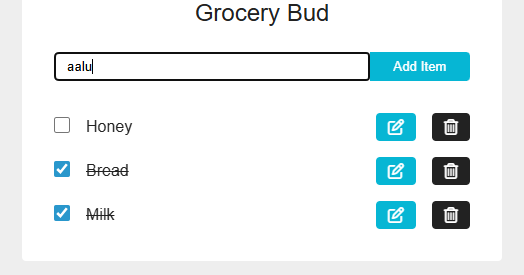
ADD Edit Grocery Name Feature
Update grocery/views.py
def index(request): """Display all grocery items and handle edit mode""" items = GroceryItem.objects.all() edit_id = request.GET.get('edit') edit_item = None if edit_id: edit_item = get_object_or_404(GroceryItem, id=edit_id) context = { 'items': items, 'edit_item': edit_item, } return render(request, 'grocery/index.html', context) def edit_item(request, item_id): """Redirect to index with edit parameter""" return redirect(f"/?edit={item_id}") def update_item(request, item_id): """Update an existing grocery item name""" if request.method == 'POST': item = get_object_or_404(GroceryItem, id=item_id) name = request.POST.get('name', '').strip() if name: item.name = name item.save() return redirect('grocery:index')
Update grocery/urls.py
urlpatterns = [ path('edit/<int:item_id>/', views.edit_item, name='edit'), path('update/<int:item_id>/', views.update_item, name='update'), ]
Update grocery/templates/grocery/index.html
Update form to handle both add and edit, and add edit button link:
<pre> <!-- Add / Edit Form --> <form method="POST" action="{% if edit_item %}{% url 'grocery:update' edit_item.id %}{% else %}{% url 'grocery:add' %}{% endif %}"> {% csrf_token %} <h2>grocery bud</h2> <div class="form-control"> <input type="text" name="name" class="form-input" placeholder="e.g. eggs" value="{{ edit_item.name|default:'' }}" {% if edit_item %}autofocus{% endif %} /> <button type="submit" class="btn"> {% if edit_item %} edit item {% else %} add item {% endif %} </button> </div> </form> <!-- Edit Icon Button --> <a href="{% url 'grocery:edit' item.id %}" class="btn icon-btn edit-btn"> <i class="fa-regular fa-pen-to-square"></i> </a> </pre>
Output
Now you can edit grocery item names by clicking the edit button.
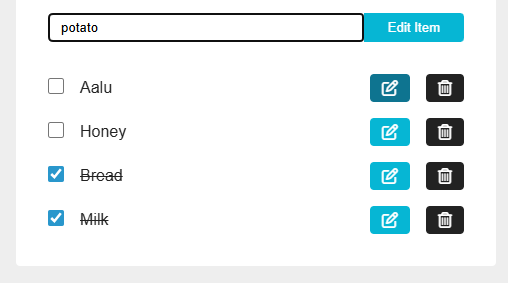
Add Messages for Notifications
Update grocery/static/grocery/css/global.css
Add alert styles:
/* .... existing styles .... */ .alert { padding: 0.75rem 1rem; margin-bottom: 1rem; border-radius: 0.25rem; text-align: center; } .alert-success { background: #d1fae5; color: #065f46; } .alert-error { background: #fee2e2; color: #991b1b; }
Update grocery/views.py
Add messages to all actions:
from django.contrib import messages def add_item(request): """Add a new grocery item""" if request.method == 'POST': name = request.POST.get('name', '').strip() if not name: messages.error(request, 'Please provide a value') return redirect('grocery:index') GroceryItem.objects.create(name=name) messages.success(request, 'Item Added Successfully!') return redirect('grocery:index') def update_item(request, item_id): """Update an existing grocery item name""" if request.method == 'POST': item = get_object_or_404(GroceryItem, id=item_id) name = request.POST.get('name', '').strip() if not name: messages.error(request, 'Please provide a value') return redirect('grocery:index') item.name = name item.save() messages.success(request, 'Item Updated Successfully!') return redirect('grocery:index') def delete_item(request, item_id): """Delete a grocery item""" if request.method == 'POST': item = get_object_or_404(GroceryItem, id=item_id) item.delete() messages.success(request, 'Item Deleted Successfully!') return redirect('grocery:index')
Update grocery/templates/grocery/index.html
Add messages display after section-center opening:
<section class="section-center"> <!-- Messages --> <pre> {% if messages %} {% for message in messages %} <div class="alert alert-{{ message.tags }}">{{ message }}</div> {% endfor %} {% endif %} </pre> <!-- Form --> <!-- ... rest of the code ... --> </section>
Output
Now you will see success/error messages for all actions.
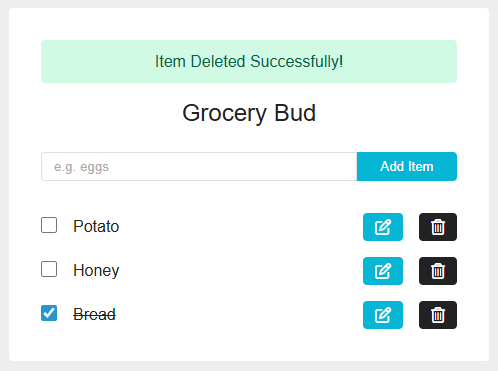
Run the Project
python manage.py runserver
Open your browser and navigate to http://127.0.0.1:8000/ to see your Grocery Bud in action.