
Table of Contents
- Getting Started
- JSX Basics
- React Architecture
- CSS Styling
- Components
- Props
- Images
- State with useState
- Forms and Controlled Components
- useEffect Hook
- React component lifecycle
- useRef Hook
- React Router
- React vs Angular vs Vue
- Questions
- Basic Project: Grocery Bud
Getting Started
React is JavaScript library for building user interfaces, maintained by Meta (Facebook), first released in 2013
Key Characteristics:
- Uses JSX (JavaScript XML) syntax
- Component-based architecture
- Virtual DOM for efficient rendering
- One-way data binding
- Requires additional libraries for routing and state management
- Flexible and unopinionated
- Large ecosystem and community
- Used by Facebook, Instagram, Netflix, Airbnb
Principles of React.js

Declarative Design you describe what the UI should look like based on the current state, rather than imperatively specifying how to change it step-by-step. You declare the desired outcome, and React figures out how to update the DOM efficiently.
Unidirectional Data Flow It refers to React's one-way data binding pattern. Data flows down from parent components to child components through props, creating a predictable and easier-to-debug application structure. When state changes, it triggers a cascade of updates flowing in one direction through the component tree.
Component-Based Architecture This means the UI is built from reusable, self-contained components. Each component manages its own state and logic, then composes together to create complex interfaces. This promotes modularity, reusability, and easier maintenance.
Setting Up Vite + React
Vite is a modern build tool that provides fast development experience. It's faster than Create React App and has better performance.
Steps:
# Create new project npm create vite@latest # Give Project name, select React, select JavaScript # Navigate to project cd project_name # Install dependencies npm install # Start development server npm run dev # stop the server CTRL + C
Project Structure:
my-react-app/ ├── node_modules/ ├── public/ ├── src/ │ ├── components/ │ │ ├── Button.jsx │ │ └── Card.jsx │ ├── context/ │ │ └── ThemeContext.jsx │ ├── hooks/ │ │ └── useWindowSize.js │ ├── pages/ │ │ ├── Home.jsx │ │ └── About.jsx │ ├── App.jsx │ ├── main.jsx │ └── App.css ├── index.html ├── package.json └── vite.config.js
Folder Structure
-
node_modulesContains all dependencies required by the app. Main dependencies also listed in package.json -
publicContains static assets -
index.html- id="root" - our entire app
-
srcIn simplest form it's the brain of our app. This is where we will do all of our work. src/index.js is the JavaScript entry point. -
.gitignoreSpecifies which files source control (Git) should ignore -
package.jsonEvery Node.js project has a package.json and it contains info about our project, for example list of dependencies and scripts -
package-lock.jsonA snapshot of the entire dependency tree -
READMEThe markdown file where you can share more info about the project for example build instructions and summary
JSX Basics
What is JSX?
JSX (JavaScript XML) is a syntax extension that allows you to write HTML-like code in JavaScript. It gets compiled to regular JavaScript function calls.
Rules Summary:
- Must return a single parent element
- Use
classNameinstead ofclass - Use
camelCasefor attributes (onClick, onChange) - JavaScript expressions go inside curly braces
{} - Self-closing tags must end with
/>
Example:
function Greeting() { const name = "Alice"; const age = 25; return ( <div className="greeting"> <h1>Hello, {name}!</h1> <p>You are {age} years old.</p> <p>Next year you'll be {age + 1}.</p> </div> ); } export default Greeting;
Everything is actually js
return ( <div> <h2>hello world</h2> </div> ); // Or return React.createElement( "div", {}, React.createElement("h2", {}, "hello world"), );
JSX Rules
- Every component should return single element (one parent element)
- semantics section/article
- Fragment - let's us group elements without adding extra nodes
return <React.Fragment>...rest of the return</React.Fragment>; // shorthand return <>...rest of the return</>;
- camelCase property naming convention
return ( <div tabIndex={1}> <button onClick={myFunction}>click me</button> <label htmlFor='name'>Name</label> <input readOnly={true} id='name' /> </div> ) // in html <div tabindex="1"> <button onclick="myFunction()">click me</button> <label for='name'>Name</label> <input readonly id='name' /> </div>
- className instead of class
return <div className="someValue">hello</div>;
- Close every element
return <img />; // or return <input />;
- Formatting
- opening tag in the same line as return or ()
function Greeting() { return <div className="someValue">hello</div>; } function Greeting() { return <div className="someValue">hello</div>; }
Extensions and settings.json
- Auto Rename Tag
- ES7+ React/Redux/React-Native snippets
- glean
- easy extract JSX into a new component
- Prettier
- format on save
- format on paste
- Default Formatter (Prettier - Code formatter)
- customize in settings.json or settings icon on left > settings > search
settings.json
{ "editor.formatOnPaste": true, "editor.formatOnSave": true, "editor.defaultFormatter": "esbenp.prettier-vscode" }
- ES7 Snippets
- rafce (arrow func with export)
- rfce (regular func with export)
- same as the file name
- Import React On Top
- uncheck
- React Snippets › Settings: Import React On Top
React Architecture
React App Architecture/Structure

This image depicts the Component-Based Architecture of React. It illustrates how an application is organized into a hierarchical tree structure.
- Root Component: At the top of the diagram is the "Root Component" (usually named
App). This is the entry point of the application that holds everything together. - Component Tree: The diagram shows branches stemming from the root to various child components (e.g.,
Header,MainContent,Footer). - Composition: It highlights that a React UI is not a single large file but a collection of small, independent, and reusable pieces. Each component can contain its own sub-components, allowing for a deeply nested and modular structure.
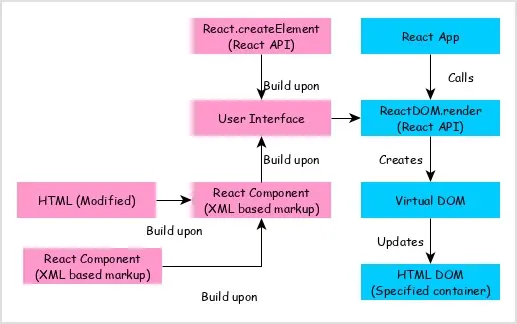
React Workflow
This image explains the rendering process and how React translates your code into what the user sees on the screen. The workflow typically follows these steps:
- React Component (JSX): The flow begins with the developer writing components using JSX (a syntax extension that looks like HTML but lives in JavaScript).
- Babel/Compilation: Although sometimes implicit, the workflow involves a compiler (like Babel) that transforms JSX into regular
React.createElement()calls that the browser can understand. - ReactDOM.render / createRoot: This is the execution step where the React library takes your components and the target HTML element (the container, usually a
<div id="root"></div>). - Virtual DOM: Instead of updating the browser's DOM immediately, React creates a Virtual DOM (a lightweight representation of the real DOM). It compares the new version of the UI with the previous version (a process called "Diffing").
- Browser DOM: Finally, React identifies the exact changes needed and performs a "reconciliation" to update only those specific parts in the real HTML DOM. This makes the application highly efficient and fast.
CSS Styling
Different Ways to Style Components
React supports multiple styling approaches: CSS files, inline styles, CSS Modules, and CSS-in-JS libraries.
Example 1: CSS
/* Button.css */ .button { background-color: #007bff; }
// Button.jsx import "./Button.css"; function Button() { return <button className="button">Click Me</button>; } export default Button;
Example 2: CSS Module
/* Button.module.css */ .button { background-color: #007bff; }
// Button.jsx import styles from "./Button.module.css"; function Button() { return <button className={styles.button}>Click Me</button>; } export default Button;
Example 3: Inline Styles
- style prop
- {} in JSX means going back to JS Land
- value is an object with key/value pairs - capitalized and with ''
function InlineStyled() { const titleStyle = { color: "#333", marginBottom: "10px", }; return ( <div> <h3 style={titleStyle}>Card Title</h3> <p>This card uses inline styles</p> </div> ); } export default InlineStyled;
Components
Functional Components
Components are reusable pieces of UI. They're JavaScript functions that return JSX. Component names must start with a capital letter.
Example:
// Welcome.jsx function Welcome() { return ( <div> <h2>Welcome to React!</h2> <p>This is a functional component.</p> </div> ); } export default Welcome; // App.jsx import Welcome from "./Welcome"; function App() { return ( <div> <Welcome /> <Welcome /> </div> ); } export default App;
Props
Passing Data to Components
Props (properties) allow you to pass data from parent to child components. Props are read-only and cannot be modified by the child component.
Example:
// ProductCard.jsx // 1. WITHOUT DESTRUCTURING function ProductCard(props) { return ( <div className="card"> <h3>{props.name}</h3> <p>Price: ${props.price}</p> </div> ); } export default ProductCard; // App.jsx function App() { return ( <div> <h2>Products:</h2> <ProductCard name="Acer Predator" price={300000} /> <ProductCard name="Macbook Air" price={150000} /> <ProductCard name="Lenovo Legion" price={200000} /> </div> ); } export default App; // 2. Passing whole object function ProductCard(props) { const { name, price } = props.laptop; return ( <div className="card"> <h3>{name}</h3> <p>Price: ${price}</p> </div> ); } function App() { const laptop1 = { name: "Acer Predator", price: 300000 }; const laptop2 = { name: "Macbook Air", price: 150000 }; const laptop3 = { name: "Lenovo Legion", price: 200000 }; return ( <div> <h2>Products:</h2> <ProductCard laptop={laptop1} /> <ProductCard laptop={laptop2} /> <ProductCard laptop={laptop3} /> </div> ); } // 3. WITH DESTRUCTURING function ProductCard({ name, price }) { return ( <div className="card"> <h3>{name}</h3> <p>Price: ${price}</p> </div> ); } // 4. ARRAY OF OBJECTS WITH MAP function App() { const laptops = [ { name: "Acer Predator", price: 300000 }, { name: "Macbook Air", price: 150000 }, { name: "Lenovo Legion", price: 200000 }, ]; return ( <div> <h2>Products:</h2> {laptops.map((laptop, index) => ( <ProductCard key={index} name={laptop.name} price={laptop.price} /> ))} </div> ); } // 5. Passing whole object (using spread operator) function App() { const laptops = [ { name: "Acer Predator", price: 300000 }, { name: "Macbook Air", price: 150000 }, { name: "Lenovo Legion", price: 200000 }, ]; return ( <div> <h2>Products:</h2> {laptops.map((laptop, index) => ( <ProductCard key={index} {...laptop} /> ))} </div> ); }
Use map() to transform an array into JSX elements. Each item needs a unique key prop to help React identify which items changed. Keys should be stable, predictable, and unique.
Children Prop
- everything we render between component tags
- during the course we will mostly use it Context API
- special prop, has to be "children"
- can place anywhere in JSX
// ProductCard.jsx function ProductCard({ name, price, children }) { return ( <div className="card"> <h3>{name}</h3> <p>Price: Rs. {price}</p> <div>{children}</div> </div> ); } export default ProductCard; // App.jsx import ProductCard from "./ProductCard"; function App() { const laptops = [ { name: "Acer Predator", price: 300000 }, { name: "Macbook Air", price: 150000 }, { name: "Lenovo Legion", price: 200000 }, ]; return ( <div> <h2>Products:</h2> {laptops.map((laptop, index) => ( <ProductCard key={index} {...laptop}> <p> This is a <strong>description</strong> </p> </ProductCard> ))} </div> ); } export default App;
Styling Card
Create ProductCard.css
.card { padding: 20px; border: 1px solid #ccc; border-radius: 5px; display: inline-block; margin-right: 20px; }
Update ProductCard.jsx
import "./ProductCard.css"; // ...
Images
Local Images (Public Folder)
-
external images (hosted on different server) - just need an url
-
local images (public folder) - less performant
-
local images (src folder) - better solution for assets, since under the hood they get optimized.
-
save image (Save Image As....)
-
create images folder in public
-
copy/paste image
-
rename (optional)
-
replace url in the src - './images/imageName.extension'
-
'./' because assets are on the same server
const Image = () => ( <img src="./images/book-1.jpg" alt="Interesting Facts For Curious Minds" /> );
- whatever assets we place in public - instantly available
- domain(localhost)/asset
Update App.jsx
Add images
// ... const laptops = [ { name: "Acer Predator", price: 300000, image: "./images/acer-predator.jpeg", }, { name: "Macbook Air", price: 150000, image: "./images/macbook-air.jpg" }, { name: "Lenovo Legion", price: 200000, image: "./images/lenovo-legion.jpg", }, ]; // ...
Update ProductCard.jsx
import "./ProductCard.css"; function ProductCard({ name, price, image }) { return ( <div className="card"> <img src={image} alt="Product Image" /> <h3>{name}</h3> <p>Price: Rs. {price}</p> </div> ); } export default ProductCard;
Update ProductCard.css
/* // ... */ .card > img { width: 200px; height: 200px; object-fit: cover; display: inline-block; }
Output:

Local Images (src folder)
- better performance because optimized (hashing and caching)
- add one more book to array
- download all three images (rename)
- setup images folder in the src
- import all three images in the App.jsx
- set image property equal to import
- and yes each image requires new import
Update App.jsx
import ProductCard from "./ProductCard"; import acerImage from "./images/acer-predator.jpeg"; import macImage from "./images/macbook-air.jpg"; import lenovoImage from "./images/lenovo-legion.jpg"; function App() { const laptops = [ { name: "Acer Predator", price: 300000, image: acerImage, }, { name: "Macbook Air", price: 150000, image: macImage }, { name: "Lenovo Legion", price: 200000, image: lenovoImage, }, ]; return ( <div> <h2>Products:</h2> {laptops.map((laptop, index) => ( <ProductCard key={index} {...laptop} /> ))} </div> ); } export default App;
State with useState
The Need For State
-
in App.jsx setup import and container div
Setup Challenge:
-
create count variable
-
display value in the JSX
-
add button and increase the value
-
the reason for bug - we don't trigger re-render
const ErrorExample = () => { let count = 0; const handleClick = () => { count = count + 1; console.log(count); // preserve value between renders // trigger re-render }; return ( <div> <h2>{count}</h2> <button type="button" className="btn" onClick={handleClick}> increment </button> </div> ); }; export default ErrorExample;
Managing Component State
useState Basics
- useState hook
- returns an array with two elements: the current state value, and a function that we can use to update the state
- destructuring from array (js basics)
- accepts default value as an argument
- state update triggers re-render
Example:
import { useState } from "react"; function Counter() { const [count, setCount] = useState(0); const handleClick = () => { setCount(count + 1); }; return ( <div> <h2>Count: {count}</h2> <button onClick={handleClick}>Increment</button> <button onClick={() => setCount(count - 1)}>Decrement</button> <button onClick={() => setCount(0)}>Reset</button> </div> ); } export default Counter;
Initial Render and Re-Renders
In a React application, the initial render is the first time that the component tree is rendered to the DOM. It happens when the application first loads, or when the root component is first rendered. This is also known as "mounting" the components.
Re-renders, on the other hand, happen when the component's state or props change, and the component needs to be updated in the DOM to reflect these changes. React uses a virtual DOM to optimize the process of updating the actual DOM, so that only the necessary changes are made.
There are a few ways that you can trigger a re-render in a React component:
-
By changing the component's state or props. When the component's state or props change, React will re-render the component to reflect these changes.
-
When the parent element re-renders, even if the component's state or props have not changed.
Infinite loop warning
const handleClick = () => { setCount(count + 1); }; handleClick();
- initial render happens
- handleClick is called - it changes state
- state change cause re-render
- re-render calls handleClick
General Rules of Hooks
- starts with "use" (both -react and custom hooks)
- invoke inside function/component body
- don't call hooks conditionally
- set functions don't update state immediately (
setCount(count => count + 1))
State update is not immediate
const handleClick = () => { // count is zero initially setCount((count) => count + 1); console.log(count); // prints zero not one };
const handleClick = () => { // setTimeout(() => { // setCount(count + 1); // }, 3000); setTimeout(() => { setCount((count) => count + 1); }, 3000); };
Automatic Batching
In React, "batching" refers to the process of grouping multiple state updates into a single update. This can be useful in certain cases because it allows React to optimize the rendering of your components by minimizing the number of DOM updates that it has to perform.
By default, React uses a technique called "auto-batching" to group state updates that occur within the same event loop into a single update. This means that if you call the state update function multiple times in a short period of time, React will only perform a single re-render for all of the updates.
React 18 ensures that state updates invoked from any location will be batched by default. This will batch state updates, including native event handlers, asynchronous operations, timeouts, and intervals.
const handleClick = () => { setCount((count) => count + 1); setCount((count) => count + 1); setCount((count) => count + 1); setCount((count) => count + 1); console.log(count); }; console.log("hello"); // runs once (twice due to strict mode in dev)
Conditional Rendering
You can use JavaScript operators like if, ternary operator ? :, and logical AND && (Short Circuit Evaluation) to conditionally render elements.
Example:
import { useState } from "react"; function LoginStatus() { const [isLoggedIn, setIsLoggedIn] = useState(false); return ( <div> {/* Using ternary operator */} <h2>{isLoggedIn ? "Welcome back!" : "Please log in"}</h2> {/* Using && operator */} {isLoggedIn && <p>You have 3 new messages</p>} {!isLoggedIn && <p>Log in to see your messages</p>} {/* Toggle button */} <button onClick={() => setIsLoggedIn(!isLoggedIn)}> {isLoggedIn ? "Logout" : "Login"} </button> </div> ); } export default LoginStatus;
Forms and Controlled Components
Managing Form Input
In controlled components, React state is the "single source of truth". The input's value is controlled by state, and updates happen via event handlers.
Example:
import { useState } from "react"; function RegistrationForm() { const [formData, setFormData] = useState({ username: "", email: "", age: "", }); const handleChange = (e) => { const { name, value } = e.target; setFormData({ ...formData, [name]: value, }); }; const handleSubmit = (e) => { e.preventDefault(); console.log("Form submitted:", formData); alert(`Welcome ${formData.username}!`); }; return ( <form onSubmit={handleSubmit}> <div> <label>Username:</label> <input type="text" name="username" value={formData.username} onChange={handleChange} /> </div> <div> <label>Email:</label> <input type="email" name="email" value={formData.email} onChange={handleChange} /> </div> <div> <label>Age:</label> <input type="number" name="age" value={formData.age} onChange={handleChange} /> </div> <button type="submit">Register</button> <div> <h3>Form Data:</h3> <pre>{JSON.stringify(formData, null, 2)}</pre> </div> </form> ); } export default RegistrationForm;
useEffect Hook
Side Effects in Components
useEffect is a hook in React that allows you to perform side effects in function components. Some examples of side effects are: subscriptions, fetching data, directly updating the DOM, event listeners, timers, etc.
- accepts two arguments (second optional)
- first argument - cb function
- second argument - dependency array
- by default runs on each render (initial and re-render)
- cb can't return promise (so can't make it async)
- if dependency array empty [] runs only on initial render
Note: subscription refers to listening to some external data source or event stream so your component can react to updates over time. Like websocket connection, firestore listener, scroll events, etc
Example 1: Event Listener + Cleanup
import { useState, useEffect } from "react"; function WindowResizeListener() { const [windowWidth, setWindowWidth] = useState(window.innerWidth); useEffect(() => { const handleResize = () => { setWindowWidth(window.innerWidth); console.log("Window resized:", window.innerWidth); }; window.addEventListener("resize", handleResize); console.log("Event listener added"); return () => { window.removeEventListener("resize", handleResize); console.log("Event listener removed"); }; }, []); return ( <div> <h2>Window Resize Example</h2> <p>Current window width: {windowWidth}px</p> </div> ); } export default WindowResizeListener;
If you want to test cleanup
import React from "react"; import WindowResizeListener from "./Test.jsx"; export default function Unmount() { const [isMounted, setIsMounted] = React.useState(true); const handleUnmount = () => { setIsMounted(!isMounted); }; return ( <> {isMounted && <WindowResizeListener />} <button onClick={handleUnmount}>Unmount</button> </> ); }
Example 2: Fetching Data from JSONPlaceholder
import { useState, useEffect } from "react"; function FetchUsers() { const [users, setUsers] = useState([]); const [loading, setLoading] = useState(true); const [error, setError] = useState(""); useEffect(() => { const fetchUsers = async () => { try { const response = await fetch( "https://jsonplaceholder.typicode.com/users", ); if (!response.ok) throw new Error("Failed to fetch users"); const data = await response.json(); setUsers(data); setLoading(false); } catch (err) { setError(err.message || "Something went wrong"); setLoading(false); } }; fetchUsers(); }, []); if (loading) return <p>Loading users...</p>; if (error) return <p style={{ color: "red" }}>Error: {error}</p>; return ( <div> <h2>User List</h2> <ul> {users.map((user) => ( <li key={user.id}> <strong>{user.name}</strong> — {user.email} </li> ))} </ul> </div> ); } export default FetchUsers;
Test by setting network throttling to 3G.
React component lifecycle
React components have a lifecycle that can be divided into three primary phases: Mounting, Updating, and Unmounting.
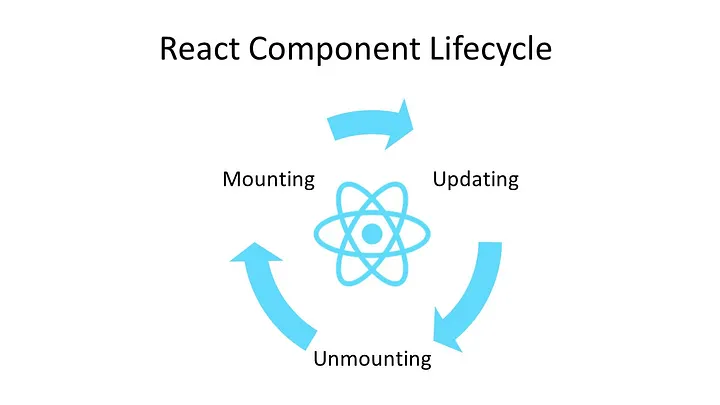
Phases of a Component Lifecycle
Mounting The Mounting phase signifies the time when a component is first created and inserted into the Document Object Model (DOM). It involves setting up the initial state, rendering the component, and performing any side-effects related to the component’s mounting.
Updating The Updating phase occurs when a component receives new props or its state changes. This phase is responsible for rendering updates, re-evaluating the component’s UI, and handling any side-effects associated with these updates.
Unmounting The Unmounting phase happens when a component is removed from the DOM. This is where you can clean up any resources or subscriptions to prevent memory leaks.
Traditionally class components used specific lifecycle methods (like componentDidMount, componentDidUpdate, and componentWillUnmount). But with functional components, these are replaced by React Hooks – primarily useEffect
import React, { useState, useEffect } from "react"; export default function Home() { const [count, setCount] = useState(0); // 1. MOUNTING & UPDATING: Runs after every render useEffect(() => { console.log("Component rendered or updated"); }); // 2. MOUNTING ONLY: Runs once (empty dependency array) useEffect(() => { console.log("Component mounted - like componentDidMount"); }, []); // Empty array = run once // 3. CONDITIONAL UPDATES: Runs when specific values change useEffect(() => { console.log("Count changed- like componentDidUpdate"); }, [count]); // Runs when count changes // 4. UNMOUNTING: Cleanup function useEffect(() => { const timer = setInterval(() => { console.log("Timer running..."); }, 1000); // Cleanup function - like componentWillUnmount return () => { console.log("Cleaning up timer before unmount"); clearInterval(timer); }; }, []); return ( <div> <p>Count: {count}</p> <button onClick={() => setCount(count + 1)}>Increment</button> </div> ); }
useRef Hook
Accessing DOM Elements and Persisting Values
- lets you store a mutable value
- preserves the value between renders
- DOES NOT TRIGGER RE-RENDER
- target DOM nodes/elements
Example:
import { useRef, useState } from "react"; function FocusInput() { const inputRef = useRef(null); const renderCount = useRef(0); const [name, setName] = useState(""); // Increment on every render (doesn't cause re-render) renderCount.current = renderCount.current + 1; const focusInput = () => { inputRef.current?.focus(); }; const handleChange = (e) => { setName(e.target.value); }; return ( <div> <h3>Render count: {renderCount.current}</h3> <input ref={inputRef} type="text" value={name} onChange={handleChange} placeholder="Enter your name" /> <button onClick={focusInput}>Focus Input</button> <p>Name: {name}</p> </div> ); } export default FocusInput;
React Router
Client-Side Routing
React Router enables navigation between different views in a single-page application. First, install it: npm install react-router-dom
Example:
import { BrowserRouter, Routes, Route, Link, useParams, } from "react-router-dom"; // Home Page function Home() { return <h2>Home Page</h2>; } // About Page function About() { return <h2>About Page</h2>; } // User Profile with dynamic route function UserProfile() { const { userId } = useParams(); return <h2>User Profile: {userId}</h2>; } // Navigation Component function Navigation() { return ( <nav> <Link to="/">Home</Link> | <Link to="/about">About</Link> | <Link to="/user/123">User 123</Link> </nav> ); } // App with Router function App() { return ( <BrowserRouter> <div> <Navigation /> <Routes> <Route path="/" element={<Home />} /> <Route path="/about" element={<About />} /> <Route path="/user/:userId" element={<UserProfile />} /> </Routes> </div> </BrowserRouter> ); } export default App;
What is a SPA?
A Single Page Application (SPA) is a web application that loads a single HTML page and dynamically updates content as the user interacts with it, without requiring full page reloads. The page never refreshes - instead, JavaScript fetches data and updates the DOM in place.
How it works:
- Initial load downloads HTML, CSS, and JavaScript bundles
- Navigation and interactions happen client-side via JavaScript
- Data is fetched from APIs (usually JSON) in the background
- The URL can change (via browser History API) without page reloads
Popular frameworks: React, Vue, Angular, Svelte
When SPAs are Better
- Highly interactive applications with complex user interfaces
- Real-time updates like chat apps or collaborative tools
- App-like experiences that feel native (Gmail, Figma, Notion)
- Dashboards with lots of filtering, sorting, and data manipulation
- Applications requiring offline capabilities or PWA features
- Smooth animations and transitions between views
When SPAs are NOT Better
- Content-heavy websites like blogs, news sites, or documentation
- Marketing or landing pages with mostly static content
- When SEO is critical
- Performance on slow devices or networks is a concern
Hybrid Approaches
Modern frameworks offer middle-ground solutions like Next.js, Nuxt.js, Astro, and Remix that combine server-side rendering with SPA features for the best of both worlds.
React vs Angular vs Vue
React
JavaScript library for building user interfaces, maintained by Meta (Facebook), first released in 2013
Key Characteristics:
- Uses JSX (JavaScript XML) syntax
- Component-based architecture
- Virtual DOM for efficient rendering
- One-way data binding
- Requires additional libraries for routing and state management
- Flexible and unopinionated
- Large ecosystem and community
- Used by Facebook, Instagram, Netflix, Airbnb
Strengths:
- Highly flexible and customizable
- Massive ecosystem with numerous third-party libraries
- Excellent performance with virtual DOM
- Strong community support and resources
- Reusable components across projects
- Great for mobile apps with React Native
- Large job market and developer availability
Weaknesses:
- Requires decisions on architecture and tooling choices
- JSX syntax can be confusing for beginners
- Frequent updates can sometimes break compatibility
- Lacks official conventions and best practices
- Need to combine multiple libraries for full functionality
- Can lead to inconsistent code across different projects
Use Cases:
- Single-page applications (SPAs)
- Progressive web apps
- Mobile applications (with React Native)
- Social media platforms
- Dynamic dashboards and data visualization
- Real-time applications
- Projects requiring maximum flexibility
- Startups and MVPs needing rapid development
Angular
Full-fledged framework for web applications, maintained by Google, originally released in 2010 (AngularJS), completely rewritten as Angular in 2016
Key Characteristics:
- Uses TypeScript with HTML templates
- Component-based architecture with MVC pattern
- Real DOM with incremental compilation
- Two-way data binding
- Includes built-in routing, forms, HTTP client, and more
- Opinionated with strict structure
- Comprehensive documentation and tooling
- Used by Google, Microsoft, IBM
Strengths:
- Complete solution out of the box
- Excellent TypeScript support and integration
- Powerful CLI for project scaffolding and code generation
- Comprehensive built-in testing utilities
- Dependency injection system for better code organization
- Great for large enterprise applications
- Consistent structure across projects and teams
- Strong architectural patterns and best practices
Weaknesses:
- Steepest learning curve among the three
- Verbose and complex for smaller projects
- Large bundle size affecting initial load time
- Frequent major version updates requiring migration effort
- Over-engineered for simple applications
- Requires learning TypeScript, RxJS, and Angular-specific concepts
- Can feel restrictive due to opinionated nature
Best Use Cases:
- Large enterprise applications
- Complex business logic applications
- Projects requiring strict structure and consistency
- Long-term maintainable applications with multiple teams
- When TypeScript is mandatory or preferred
- Applications with many developers needing standardization
- Progressive web apps with complex requirements
- Heavy data-driven applications with forms
Vue
Progressive framework for building user interfaces, maintained by Evan You and community, first released in 2014
Key Characteristics:
- Uses HTML templates with optional JSX
- Component-based architecture
- Virtual DOM similar to React
- Both one-way and two-way data binding
- Includes core library with official routing and state management
- Flexible with gentle learning curve
- Growing ecosystem with excellent documentation
- Used by Alibaba, GitLab, Nintendo
Strengths:
- Easiest to learn among the three frameworks
- Excellent and comprehensive documentation
- Lightweight and fast performance
- Flexible architecture allowing gradual adoption
- Good balance between React's flexibility and Angular's structure
- Great developer experience with intuitive API
- Easy migration and integration with existing projects
- Less boilerplate code required
Weaknesses:
- Smaller community compared to React and Angular
- Fewer job opportunities in the market
- Less corporate backing and enterprise adoption
- Fewer resources, tutorials, and third-party plugins
- Risk perception in large enterprises
- Smaller ecosystem of third-party components
- Language barrier in some Chinese-language resources
Use Cases:
- Small to medium-sized applications
- Rapid prototyping and quick development
- Integrating into existing projects progressively
- Projects with mixed skill levels on the team
- Single-page applications without complex requirements
- When quick development time is prioritized
- Progressive enhancement of server-rendered applications
- Lightweight dashboards and admin panels
- Projects where easy onboarding is important
| React | Angular | Vue |
|---|---|---|
| JavaScript library for building user interfaces | Full-fledged framework for web applications | Progressive framework for building user interfaces |
| Maintained by Meta (Facebook) | Maintained by Google | Maintained by Evan You and community |
| First released in 2013 | First released in 2010 (AngularJS), rewritten as Angular in 2016 | First released in 2014 |
| Uses JSX (JavaScript XML) syntax | Uses TypeScript with HTML templates | Uses HTML templates with optional JSX |
| Component-based architecture | Component-based architecture with MVC pattern | Component-based architecture |
| Virtual DOM for efficient rendering | Real DOM with incremental compilation | Virtual DOM similar to React |
| One-way data binding | Two-way data binding | Both one-way and two-way data binding |
| Requires additional libraries for routing, state management | Includes built-in routing, forms, HTTP client, and more | Includes core library with official routing and state management libraries |
| Flexible, unopinionated | Opinionated with strict structure | Moderately opinionated but flexible |
| Large ecosystem and community | Comprehensive documentation and tooling | Growing ecosystem with good documentation |
| Steep learning curve initially | Steepest learning curve | Easiest learning curve |
| Used by Facebook, Instagram, Netflix, Airbnb | Used by Google, Microsoft, IBM | Used by Alibaba, GitLab, Nintendo |
Questions
- What is React? Explain the key features of React that make it popular for building user interfaces. (4 marks)
- Differentiate between a library and a framework. Explain why React is considered a library rather than a framework. (4 marks)
- Explain the concept of Virtual DOM in React. How does it improve performance compared to traditional DOM manipulation? (5 marks)
- What is JSX? Explain its syntax with examples. How is JSX different from HTML? (5 marks)
- Write a React component that demonstrates the following JSX features: (6 marks)
- Embedding JavaScript expressions
- Using className instead of class
- Self-closing tags
- Conditional rendering
- Explain the rules and limitations of JSX. Why can't we return multiple elements without a parent wrapper? (4 marks)
- What are JSX fragments? Why are they useful? Write code examples showing two ways to use fragments. (5 marks)
- Explain the component-based architecture of React. What are the advantages of breaking an application into components? (5 marks)
- Describe the concept of unidirectional data flow in React. How does it differ from two-way data binding? (6 marks)
- Draw and explain the React component lifecycle. Describe the three main phases with examples. (7 marks)
- What is the difference between declarative and imperative programming? How does React follow the declarative approach? (5 marks)
- Explain different methods of styling React components: (6 marks)
- Inline styles
- External CSS files
- CSS Modules
- Write a React component that demonstrates inline styling with dynamic styles based on props. (5 marks)
- What are CSS Modules? How do they help in avoiding CSS naming conflicts? Provide an example. (5 marks)
- Explain the concept of component composition in React. Write code showing how to compose multiple components together. (7 marks)
- Write a functional component that displays a user profile card with the following information: name, email, and profile picture. (5 marks)
- What is the difference between stateful and stateless components? When should you use each type? (5 marks)
- What are props in React? Explain how data flows from parent to child components using props. (5 marks)
- What is prop drilling? Explain its disadvantages and suggest solutions to avoid it. (6 marks)
- Explain the concept of
childrenprop in React. Write an example showing how to create a reusable Card component using children. (6 marks) - Differentiate between props and state in React with examples. (7 marks)
- Write a React component that displays an image from: (5 marks)
- The public folder
- The src folder (imported)
- An external URL
- What is state in React? Explain the useState hook with its syntax and usage examples. (6 marks)
- Write a component that manages form state using useState for multiple input fields (name, email, age). (7 marks)
- What is the useEffect hook? Explain the dependency array in useEffect. What happens when: (7 marks)
- No dependency array is provided
- An empty dependency array is provided
- Dependencies are specified
- Write a component that fetches data from an API using useEffect and displays it. Handle loading and error states. (8 marks)
- What is the cleanup function in useEffect? When and why is it used? Provide examples. (7 marks)
- What is React Router? Explain its importance in building single-page applications. (6 marks)
- Write code to implement a multi-page application with navigation between Home, About, and Contact pages using React Router. (7 marks)
- Compare React, Angular, and Vue on the following parameters: (8 marks)
- Type (library vs framework)
- Learning curve
- Performance
- Community support
- Use cases
- Discuss the advantages and disadvantages of React compared to Angular and Vue. (8 marks)
Basic Project: Grocery Bud
Build a Grocery list app.
Create Vite Project
cd Desktop npm create vite@latest grocery-bud -- --template react code grocery-bud
Project Structure
grocery-bud/ ├── src/ │ ├── components/ │ │ ├── Form.jsx │ │ ├── Form.css │ │ ├── Items.jsx │ │ ├── Items.css │ │ ├── SingleItem.jsx │ │ └── SingleItem.css │ ├── data/ │ │ └── groceryItems.js │ ├── App.jsx │ ├── App.css │ ├── index.css │ └── main.jsx
Create Data File
Create src/data/groceryItems.js
export const groceryItems = [ { id: "1", name: "milk", completed: true }, { id: "2", name: "bread", completed: true }, { id: "3", name: "eggs", completed: false }, { id: "4", name: "butter", completed: false }, ];
Setup Global Styles
Create src/index.css
*, ::after, ::before { margin: 0; padding: 0; box-sizing: border-box; } body { background: #eee; font-family: Helvetica, sans-serif; font-weight: 400; line-height: 1.2; color: #222; }
Create SingleItem Component
Install react-icons
npm install react-icons
Create src/components/SingleItem.jsx
import { FiEdit, FiTrash2 } from "react-icons/fi"; import "./SingleItem.css"; const SingleItem = ({ item }) => { return ( <div className="single-item"> <input type="checkbox" checked={item.completed} onChange={() => null} /> <p style={{ textTransform: "capitalize", textDecoration: item.completed ? "line-through" : "none", }} > {item.name} </p> <button className="btn icon-btn" type="button" onClick={() => null}> <FiEdit size={18} /> </button> <button className="btn icon-btn remove-btn" type="button" onClick={() => null} > <FiTrash2 size={18} /> </button> </div> ); }; export default SingleItem;
Create src/components/SingleItem.css
.single-item { display: grid; grid-template-columns: auto 1fr auto auto; column-gap: 1rem; align-items: center; } .single-item .btn { cursor: pointer; color: #fff; background: #06b6d4; border: transparent; border-radius: 0.25rem; padding: 0.375rem 0.75rem; font-size: 0.75rem; } .single-item .btn:hover { background: #0e7490; } .single-item .remove-btn { background: #222; } .single-item .remove-btn:hover { background: #900e0e; }
Create Items Component
Create src/components/Items.jsx
import SingleItem from "./SingleItem"; import "./Items.css"; const Items = ({ items }) => { return ( <div className="items"> {items.map((item) => { return <SingleItem key={item.id} item={item} />; })} </div> ); }; export default Items;
Create src/components/Items.css
.items { margin-top: 2rem; display: grid; row-gap: 1rem; }
Update Main App Component
Update src/App.jsx
import Items from "./components/Items"; import { groceryItems } from "./data/groceryItems"; import "./App.css"; const App = () => { return ( <section className="section-center"> <Items items={groceryItems} /> </section> ); }; export default App;
Create src/App.css
.section-center { margin: 0 auto; margin-top: 8rem; max-width: 30rem; background: #fff; border-radius: 0.25rem; padding: 2rem; }
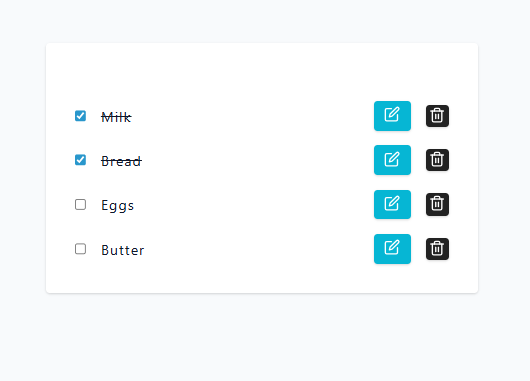
Output
ADD Edit Completed Feature
Update src/App.jsx
import Items from "./components/Items"; import { groceryItems } from "./data/groceryItems"; import { useState } from "react"; import "./App.css"; const App = () => { const [items, setItems] = useState(groceryItems); const editCompleted = (itemId) => { const newItems = items.map((item) => { if (item.id === itemId) { return { ...item, completed: !item.completed }; } return item; }); setItems(newItems); }; return ( <section className="section-center"> <Items items={items} editCompleted={editCompleted} /> </section> ); }; export default App;
Update src/components/Items.jsx
import SingleItem from "./SingleItem"; import "./Items.css"; const Items = ({ items, editCompleted }) => { return ( <div className="items"> {items.map((item) => { return ( <SingleItem key={item.id} item={item} editCompleted={editCompleted} /> ); })} </div> ); }; export default Items;
Update src/components/SingleItem.jsx
// ... const SingleItem = ({ item, editCompleted }) => { return ( <div className="single-item"> <input type="checkbox" checked={item.completed} onChange={() => editCompleted(item.id)} /> // .... </div> ); }; export default SingleItem;
Output

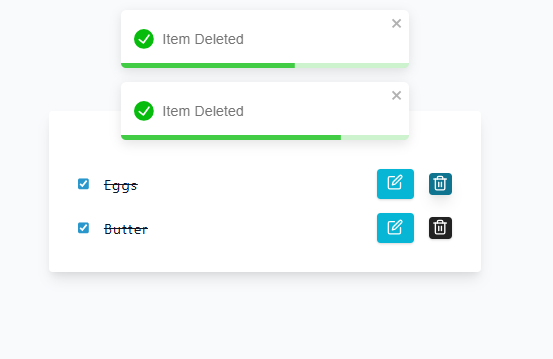
ADD Delete Feature
Install react-toastify
npm install react-toastify
Update src/App.jsx
// ... import { ToastContainer, toast } from "react-toastify"; import "react-toastify/dist/ReactToastify.css"; import "./App.css"; const App = () => { const [items, setItems] = useState(groceryItems); // ... const removeItem = (itemId) => { const newItems = items.filter((item) => item.id !== itemId); setItems(newItems); toast.success("item deleted"); }; return ( <section className="section-center"> <ToastContainer position="top-center" /> <Items items={items} editCompleted={editCompleted} removeItem={removeItem} /> </section> ); }; export default App;
Update src/App.css
/* .... */ .Toastify__toast { text-transform: capitalize; }
Update src/components/Items.jsx
import SingleItem from "./SingleItem"; import "./Items.css"; const Items = ({ items, editCompleted, removeItem }) => { return ( <div className="items"> {items.map((item) => { return ( <SingleItem key={item.id} item={item} editCompleted={editCompleted} removeItem={removeItem} /> ); })} </div> ); }; export default Items;
Update src/components/SingleItem.jsx
// ... const SingleItem = ({ item, editCompleted, removeItem }) => { return ( <div className="single-item"> // .... <button className="btn icon-btn remove-btn" type="button" onClick={() => removeItem(item.id)} > <FiTrash2 size={18} /> </button> </div> ); }; export default SingleItem;
Output
Create Form Component to add new grocery item
Create src/components/Form.jsx
import { useState } from "react"; import { toast } from "react-toastify"; import "./Form.css"; const Form = ({ addItem }) => { const [newItemName, setNewItemName] = useState(""); const handleSubmit = (e) => { e.preventDefault(); if (!newItemName) { toast.error("please provide value"); return; } addItem(newItemName); setNewItemName(""); }; return ( <form onSubmit={handleSubmit}> <h2>grocery bud</h2> <div className="form-control"> <input type="text" className="form-input" value={newItemName} placeholder="e.g. eggs" onChange={(event) => setNewItemName(event.target.value)} /> <button type="submit" className="btn"> add item </button> </div> </form> ); }; export default Form;
Create src/components/Form.css
form h2 { text-align: center; margin-bottom: 1.5rem; text-transform: capitalize; font-weight: normal; } .form-control { display: grid; grid-template-columns: 1fr 100px; } .form-input { width: 100%; padding: 0.375rem 0.75rem; border-radius: 0; border-top-left-radius: 0.25rem; border-bottom-left-radius: 0.25rem; border: 1px solid #ddd; } .form-input::placeholder { color: #aaa; } .form-control .btn { cursor: pointer; color: #fff; background: #06b6d4; border: transparent; border-radius: 0; border-top-right-radius: 0.25rem; border-bottom-right-radius: 0.25rem; padding: 0.375rem 0.75rem; text-transform: capitalize; } .form-control .btn:hover { background: #0e7490; }
Update Main App Component to add Grocery
Install nanoid
npm install nanoid
Update src/App.jsx
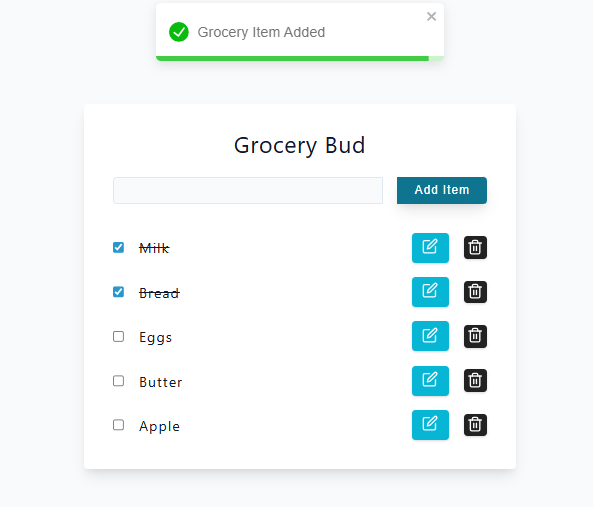
//... import { nanoid } from "nanoid"; import Form from "./components/Form"; const App = () => { const [items, setItems] = useState(groceryItems); const addItem = (itemName) => { const newItem = { name: itemName, completed: false, id: nanoid(), }; const newItems = [...items, newItem]; setItems(newItems); toast.success("grocery item added"); }; //... return ( <section className="section-center"> <ToastContainer position="top-center" /> <Form addItem={addItem} /> <Items items={items} editCompleted={editCompleted} removeItem={removeItem} /> </section> ); }; export default App;
Output
ADD Edit Grocery Name Feature
Update src/App.jsx
//... import { useEffect, useRef, useState } from "react"; //.... const App = () => { const [items, setItems] = useState(groceryItems); const [editId, setEditId] = useState(null); const inputRef = useRef(null); useEffect(() => { if (editId && inputRef.current) { inputRef.current.focus(); } }, [editId]); // ... const updateItemName = (newName) => { const newItems = items.map((item) => { if (item.id === editId) { return { ...item, name: newName }; } return item; }); setItems(newItems); setEditId(null); toast.success("item updated"); }; return ( <section className="section-center"> <ToastContainer position="top-center" /> <Form addItem={addItem} updateItemName={updateItemName} editItemId={editId} itemToEdit={items.find((item) => item.id === editId)} inputRef={inputRef} /> <Items items={items} editCompleted={editCompleted} removeItem={removeItem} setEditId={setEditId} /> </section> ); }; export default App;
Update src/components/Items.jsx
import SingleItem from "./SingleItem"; import "./Items.css"; const Items = ({ items, editCompleted, removeItem, setEditId }) => { return ( <div className="items"> {items.map((item) => { return ( <SingleItem key={item.id} item={item} editCompleted={editCompleted} removeItem={removeItem} setEditId={setEditId} /> ); })} </div> ); }; export default Items;
Update src/components/SingleItem.jsx
// .... const SingleItem = ({ item, editCompleted, removeItem, setEditId }) => { return ( <div className="single-item"> // .... <button className="btn icon-btn" type="button" onClick={() => setEditId(item.id)} > <FiEdit size={18} /> </button> // .... </div> ); }; export default SingleItem;
Update src/components/Form.jsx
import { useState, useEffect } from "react"; import { toast } from "react-toastify"; import "./Form.css"; const Form = ({ addItem, editItemId, updateItemName, itemToEdit, inputRef, }) => { const [newItemName, setNewItemName] = useState(""); useEffect(() => { if (itemToEdit) { setNewItemName(itemToEdit.name); } else { setNewItemName(""); } }, [itemToEdit]); const handleSubmit = (e) => { e.preventDefault(); if (!newItemName) { toast.error("please provide value"); return; } if (editItemId) { updateItemName(newItemName); } else { addItem(newItemName); } setNewItemName(""); }; return ( <form onSubmit={handleSubmit}> <h2>grocery bud</h2> <div className="form-control"> <input type="text" className="form-input" value={newItemName} ref={inputRef} placeholder="e.g. eggs" onChange={(event) => setNewItemName(event.target.value)} /> <button type="submit" className="btn"> {editItemId ? "edit item" : "add item"} </button> </div> </form> ); }; export default Form;
Output

Save Grocery to local storage
Update src/App.jsx
// import { groceryItems } from "./data/groceryItems"; // .... const getLocalStorage = () => { let list = localStorage.getItem("grocery-list"); if (list) { return JSON.parse(list); } return []; }; const setLocalStorage = (items) => { localStorage.setItem("grocery-list", JSON.stringify(items)); }; const initialList = getLocalStorage(); const App = () => { const [items, setItems] = useState(initialList); // .... const addItem = (itemName) => { // .... setLocalStorage(newItems); toast.success("item added to the list"); }; const editCompleted = (itemId) => { // ... setLocalStorage(newItems); }; const removeItem = (itemId) => { // .... setLocalStorage(newItems); toast.success("item deleted"); }; const updateItemName = (itemEditName) => { // .... setLocalStorage(newItems); toast.success("item updated"); }; };
Run the Project
npm run dev
Visit http://localhost:5173 to see your Grocery bud in action.