
Table of Contents
- API Basics
- REST Principles and Design, RESTful APIs
- HTTP Verbs
- Endpoints and URL Design
- Resource Modeling
- API Structure Best Practices
- JSON versus XML Data Exchange
- Data Validation and Serialization
- Microservices
- Questions
- Lab: CRUD with DRF
API Basics
An API (Application Programming Interface) is a set of rules, protocols, and tools that allows different software applications to communicate with each other. Think of an API as a waiter in a restaurant: you (the client) tell the waiter (the API) what you want, and the waiter communicates your order to the kitchen (the server) and brings back your food (the response).
In technical terms, an API defines:
- What operations are available (e.g., get user data, create a post, delete a record)
- How to request those operations (e.g., what URL to call, what data to send)
- What format the response will be in (e.g., JSON, XML)
APIs act as intermediaries that enable software components to interact without needing to know the internal workings of each other. This abstraction is powerful because it allows developers to use complex services without understanding their complete implementation.
Types of APIs
There are several types of APIs based on their accessibility and purpose:
1. Open APIs (Public APIs)
Open APIs are publicly available and can be used by any developer. They often require registration and an API key for access control and rate limiting. Examples include:
- Twitter API for accessing tweets and user data
- Google Maps API for embedding maps and location services
- OpenWeatherMap API for weather information
2. Internal APIs (Private APIs)
Internal APIs are used within an organization to connect different internal systems. They are not exposed to external developers and are designed to improve productivity and data sharing among internal teams. For example, a company might have an internal API that connects their HR system with their payroll system.
3. Partner APIs
Partner APIs are shared with specific business partners under agreed terms. They require special authorization and are used for B2B (business-to-business) integrations. An example would be an e-commerce platform sharing an API with its payment processor.
4. Composite APIs
Composite APIs combine multiple API calls into a single request. They are useful when a client needs data from several sources. Instead of making five separate API calls, a composite API can bundle them together, reducing network overhead and improving performance.
Why APIs are Used
APIs serve numerous critical purposes in modern software development:
1. Modularity and Separation of Concerns
APIs allow developers to build modular systems where each component has a specific responsibility. The frontend can focus on user interface and experience, while the backend handles data processing and business logic. This separation makes systems easier to develop, test, and maintain.
2. Reusability
Once an API is built, it can be used by multiple clients. A single backend API can serve a web application, a mobile app, a desktop application, and even third-party integrations. This eliminates code duplication and ensures consistency across platforms.
3. Scalability
APIs enable horizontal scaling. As demand grows, you can deploy multiple instances of your API server behind a load balancer. Each API endpoint can also be scaled independently based on its usage patterns.
4. Integration
APIs make it possible to integrate with external services without building everything from scratch. Need payment processing? Use Stripe's API. Need email delivery? Use SendGrid's API. Need maps? Use Google Maps API. This dramatically accelerates development.
5. Security and Access Control
APIs provide a controlled way to expose functionality. Instead of giving direct database access (which would be extremely dangerous), you expose specific endpoints with defined permissions. This allows fine-grained control over who can access what data and what operations they can perform.
6. Platform Independence
APIs abstract away implementation details. A client written in JavaScript can communicate with a server written in Python, which might store data in a PostgreSQL database. The client doesn't need to know anything about Python or PostgreSQL—it just needs to know how to make HTTP requests.
Synchronous vs Asynchronous Communication
Synchronous communication blocks the execution until a response is received. In early web development, page loads were synchronous—clicking a link would freeze the browser until the new page loaded.
Asynchronous communication allows the page to remain interactive while waiting for responses. Modern web applications use AJAX (Asynchronous JavaScript and XML) and the Fetch API to make asynchronous requests. This enables dynamic updates without full page reloads.
REST Principles and Design, RESTful APIs
What is REST?
REST (Representational State Transfer) is an architectural style for designing networked applications. It was introduced by Roy Fielding in his doctoral dissertation in 2000. REST is not a protocol or a standard—it's a set of architectural constraints that, when applied to web services, create systems that are scalable, flexible, and easy to understand.
A RESTful API is an API that adheres to REST principles. It uses HTTP as its communication protocol and follows specific conventions for how resources are identified, accessed, and manipulated.
REST has become the dominant architectural style for web APIs because it leverages the existing infrastructure of the web (HTTP, URLs, caching mechanisms) and provides a intuitive way to model operations on data.
The Six Constraints of REST
Roy Fielding defined six architectural constraints that characterize REST:
1. Client-Server Architecture
The client and server must be separate and independent. The client handles the user interface and user experience. The server handles data storage, business logic, and security. This separation allows each to evolve independently—you can completely rewrite the frontend without touching the backend, and vice versa.
Benefits:
- Portability of the user interface across multiple platforms
- Scalability by simplifying server components
- Independent evolution of client and server
2. Statelessness
Each request from the client must contain all the information needed to process that request. The server does not store any client state between requests. If authentication is required, the client must include authentication credentials (like a token) with every request.
Why statelessness matters:
- Scalability: Any server can handle any request because there's no session state to maintain
- Reliability: If a server fails, requests can be routed to another server without losing state
- Simplicity: The server doesn't need complex session management logic
Example of statelessness:
Request 1: GET /api/users/123 Headers: Authorization: Bearer abc123token Request 2: GET /api/users/123/posts Headers: Authorization: Bearer abc123token
Each request includes the authentication token. The server doesn't remember that Request 1 was authenticated—the client must prove its identity every time.
3. Cacheability
Responses must explicitly or implicitly define themselves as cacheable or non-cacheable. If cacheable, clients can reuse response data for equivalent requests, reducing server load and improving performance.
HTTP provides caching mechanisms through headers like:
Cache-Control: Specifies caching directivesExpires: Specifies when the response becomes staleETag: A version identifier for the resource
Example cache headers:
HTTP/1.1 200 OK Cache-Control: max-age=3600 ETag: "abc123"
This tells the client it can cache the response for 3600 seconds (1 hour).
4. Uniform Interface
This is the fundamental constraint that distinguishes REST from other architectural styles. A uniform interface simplifies and decouples the architecture, allowing each part to evolve independently.
The uniform interface has four sub-constraints:
a) Identification of Resources: Resources are identified by URIs (Uniform Resource Identifiers). A resource could be a user, a product, an order, or any other entity. Each resource has a unique URI.
b) Manipulation of Resources Through Representations: When a client holds a representation of a resource (like a JSON object), it has enough information to modify or delete that resource.
c) Self-Descriptive Messages: Each message (request or response) contains enough information to describe how to process it. This includes the content type, caching headers, and status codes.
d) Hypermedia as the Engine of Application State (HATEOAS): Responses should include links to related resources and available actions. The client can navigate the API by following these links.
5. Layered System
The architecture can be composed of hierarchical layers, with each layer only knowing about the layer immediately adjacent to it. A client cannot tell whether it's connected directly to the end server or an intermediary. This allows for:
- Load balancers: Distributing requests across multiple servers
- Proxies: Caching responses or filtering content
- Gateways: Translating between protocols or handling authentication
HTTP Verbs
REST APIs use standard HTTP methods to define actions on resources. Each method has specific semantics:
1. GET - Retrieve Resources
GET requests retrieve data without modifying it. They are safe (don't change server state) and idempotent (calling multiple times has the same effect as calling once).
Use cases:
- Fetching a list of users:
GET /api/users - Fetching a specific user:
GET /api/users/123 - Searching with filters:
GET /api/users?role=admin&active=true
Characteristics:
- Should never modify data
- Can be cached
- Can be bookmarked
- Parameters go in the URL
2. POST - Create Resources
POST requests create new resources. They are neither safe nor idempotent—each POST typically creates a new resource.
Use cases:
- Creating a new user:
POST /api/users - Submitting a form:
POST /api/contact - Uploading a file:
POST /api/uploads
Characteristics:
- Creates new resources
- Request body contains the resource data
- Returns the created resource (usually with its new ID)
- Typically returns 201 (Created) status code
3. PUT - Update/Replace Resources
PUT requests replace an existing resource entirely. They are idempotent—making the same PUT request multiple times has the same effect as making it once.
Use cases:
- Updating a user:
PUT /api/users/123 - Replacing a configuration:
PUT /api/settings/notifications
Characteristics:
- Replaces the entire resource
- Client must send the complete resource
- If the resource doesn't exist, it may create it
- Idempotent
4. PATCH - Partial Update
PATCH requests partially modify a resource. Unlike PUT, you only send the fields that need to change.
Use cases:
- Updating only the email:
PATCH /api/users/123with body{"email": "[email protected]"} - Changing the status:
PATCH /api/orders/456with body{"status": "shipped"}
Characteristics:
- Partial update
- Only changed fields in the request body
- More efficient for small updates
5. DELETE - Remove Resources
DELETE requests remove a resource. They are idempotent—deleting a resource that doesn't exist should return the same response as successfully deleting it.
Use cases:
- Deleting a user:
DELETE /api/users/123 - Removing an item from cart:
DELETE /api/cart/items/789
Characteristics:
- Removes the resource
- Should be idempotent
- Typically returns 204 (No Content) or 200 with a confirmation message
Endpoints and URL Design
Good URL design is crucial for creating intuitive and maintainable APIs. Here are the key principles:
1. Use Nouns, Not Verbs
URLs should represent resources (nouns), and HTTP methods should represent actions (verbs).
Good:
GET /users- Get all usersPOST /users- Create a userDELETE /users/123- Delete user 123
Bad:
GET /getUsersPOST /createUserGET /deleteUser/123
2. Use Plural Nouns
Use plural nouns for consistency, even when referring to a single resource.
Good:
/users/users/123/posts/posts/456
Avoid mixing:
/userfor single,/usersfor collection
3. Hierarchical Relationships
Use URL hierarchy to represent relationships between resources.
GET /users/123/posts- All posts by user 123GET /users/123/posts/456- Post 456 by user 123GET /posts/456/comments- All comments on post 456
4. Use Query Parameters for Filtering
Use query strings for filtering, sorting, and pagination:
GET /users?role=admin- Filter by roleGET /users?sort=name&order=asc- Sort resultsGET /users?page=2&limit=20- PaginationGET /products?minPrice=10&maxPrice=100- Range filter
5. Use Consistent Naming Conventions
Choose a naming convention and stick to it:
- Lowercase:
/users,/blog-posts - Hyphens for multi-word:
/user-profiles,/order-items - Avoid underscores:
/user_profiles(less readable in URLs)
Resource Modeling
Resource modeling is the process of identifying and designing the resources in your API. Good resource modeling leads to intuitive, usable APIs.
Identifying Resources
Resources are the fundamental units of your API. They typically map to:
- Database entities (users, products, orders)
- Business concepts (shopping cart, checkout, payment)
- Actions that behave like resources (authentication, search results)
Resource Relationships
Resources often have relationships with each other:
One-to-Many:
- User has many Posts
/users/123/posts
Many-to-Many:
- Users belong to many Groups, Groups have many Users
/users/123/groupsor/groups/456/members
Nested vs. Flat:
Nested approach:
GET /authors/123/books/456/chapters/789
Flat approach:
GET /chapters/789
The nested approach shows the hierarchy but can become unwieldy. A common practice is to limit nesting to one or two levels, using query parameters for deeper filtering.
HTTP Status Codes
Status codes communicate the result of an API request. They are grouped into categories:
2xx - Success
- 200 OK: Request succeeded. Used for GET, PUT, PATCH when returning data.
- 201 Created: Resource created successfully. Used for POST.
- 204 No Content: Request succeeded but no content to return. Used for DELETE.
3xx - Redirection
- 301 Moved Permanently: Resource has moved to a new URL permanently.
- 304 Not Modified: Cached version is still valid (for conditional requests).
4xx - Client Errors
- 400 Bad Request: Malformed request (invalid JSON, missing required fields).
- 401 Unauthorized: Authentication required or invalid credentials.
- 403 Forbidden: Authenticated but not authorized for this resource.
- 404 Not Found: Resource doesn't exist.
- 405 Method Not Allowed: HTTP method not supported for this endpoint.
- 422 Unprocessable Entity: Request is well-formed but contains semantic errors.
- 429 Too Many Requests: Rate limit exceeded.
5xx - Server Errors
- 500 Internal Server Error: Generic server error.
- 502 Bad Gateway: Server received an invalid response from upstream server.
- 503 Service Unavailable: Server is temporarily unavailable.
API Structure Best Practices
1. Versioning
APIs evolve over time. Versioning allows you to make changes without breaking existing clients.
URL versioning:
/api/v1/users
/api/v2/users
Header versioning:
GET /api/users
Headers: Api-Version: 2
Query parameter versioning:
/api/users?version=2
URL versioning is the most common and explicit approach.
2. Consistent Response Format
Maintain a consistent response structure across all endpoints:
{ "success": true, "data": { "id": 123, "name": "John Doe", "email": "[email protected]" }, "message": null }
For errors:
{ "success": false, "data": null, "message": "User not found", "errors": [ { "field": "id", "message": "No user exists with id 999" } ] }
3. Pagination
For large collections, always implement pagination:
{ "data": [...], "pagination": { "currentPage": 2, "totalPages": 10, "totalItems": 195, "itemsPerPage": 20 } }
4. Authentication
Common authentication approaches:
- API Keys: Simple but less secure. Include in headers.
- Bearer Tokens (JWT): More secure. Include in Authorization header.
- OAuth 2.0: For third-party access and delegated permissions.
JSON versus XML Data Exchange
Introduction to Data Exchange Formats
When APIs communicate, they need a common language to exchange data. This data must be structured in a way that both the sender and receiver can understand. The two most common formats for data exchange in web APIs are JSON (JavaScript Object Notation) and XML (eXtensible Markup Language).
Choosing the right data format affects the performance, readability, and ease of development of your API. While both formats can represent the same data, they have different characteristics that make each better suited for specific use cases.
What is JSON?
JSON (JavaScript Object Notation) is a lightweight, text-based data interchange format. Despite its name suggesting a connection to JavaScript, JSON is language-independent and can be used with virtually any programming language.
JSON was derived from JavaScript object literal syntax but has become a standard format used across all platforms. Its simplicity and readability have made it the dominant format for web APIs.
JSON Syntax Rules
JSON follows strict syntax rules:
- Data is in name/value pairs: Each piece of data consists of a field name (in double quotes) followed by a colon and a value.
- Data is separated by commas: Multiple name/value pairs are separated by commas.
- Curly braces hold objects: An object is enclosed in curly braces
{}and contains zero or more name/value pairs. - Square brackets hold arrays: An array is enclosed in square brackets
[]and contains zero or more values. - Values can be: strings (in double quotes), numbers, booleans (
trueorfalse),null, objects, or arrays. - Strings must use double quotes: Single quotes are not allowed in JSON.
JSON Data Types
JSON supports the following data types:
| Data Type | Example | Description |
|---|---|---|
| String | "Hello World" | Text enclosed in double quotes |
| Number | 42, 3.14, -17 | Integer or floating-point, no quotes |
| Boolean | true, false | Logical true or false values |
| Null | null | Represents empty or unknown value |
| Object | {"key": "value"} | Collection of key-value pairs |
| Array | [1, 2, 3] | Ordered list of values |
JSON Example
{ "id": 1, "title": "The Great Gatsby", "author": { "firstName": "F. Scott", "lastName": "Fitzgerald", "nationality": "American" }, "year": 1925, "genres": ["Fiction", "Classic", "Literary"], "available": true, "rating": 4.5, "publisher": null }
This example demonstrates:
- Simple values (id, title, year, available, rating)
- Nested object (author)
- Array (genres)
- Null value (publisher)
What is XML?
XML (eXtensible Markup Language) is a markup language designed to store and transport data. Unlike HTML, which is designed to display data, XML is designed to carry data with a focus on what the data is.
XML was developed by the W3C (World Wide Web Consortium) and was the dominant data exchange format before JSON gained popularity. It is still widely used in enterprise systems, document formats, and configuration files.
XML Syntax Rules
XML follows these syntax rules:
- XML must have a root element: Every XML document must have exactly one root element that contains all other elements.
- Tags are case-sensitive:
<Book>and<book>are different elements. - Elements must have closing tags: Every opening tag must have a corresponding closing tag (
<title></title>) or be self-closing (<empty/>). - Elements must be properly nested: Child elements must be closed before parent elements.
- Attribute values must be quoted: Attributes are specified in the opening tag with values in quotes.
- Special characters must be escaped: Characters like
<,>,&must use entity references (<,>,&).
XML Structure Components
| Component | Syntax | Description |
|---|---|---|
| Declaration | <?xml version="1.0"?> | Optional header specifying XML version |
| Element | <name>content</name> | The basic building block of XML |
| Attribute | <element attr="value"> | Metadata attached to an element |
| Comment | <!-- comment --> | Notes that are not processed |
| CDATA | <![CDATA[content]]> | Content that should not be parsed |
XML Example
<?xml version="1.0" encoding="UTF-8"?> <book id="1"> <title>The Great Gatsby</title> <author> <firstName>F. Scott</firstName> <lastName>Fitzgerald</lastName> <nationality>American</nationality> </author> <year>1925</year> <genres> <genre>Fiction</genre> <genre>Classic</genre> <genre>Literary</genre> </genres> <available>true</available> <rating>4.5</rating> <publisher/> </book>
This example shows:
- XML declaration
- Root element with attribute (book id="1")
- Nested elements (author)
- Multiple child elements for arrays (genre)
- Self-closing empty element (publisher)
Namespace in XML
XML Namespaces provide a method to avoid element name conflicts.
Name Conflicts
-
In XML, element names are defined by the developer. This often results in a conflict when trying to mix XML documents from different XML applications.
-
Name conflicts in XML can easily be avoided using a name prefix.
XML Namespaces - The xmlns Attribute
- When using prefixes in XML, a namespace for the prefix must be defined.
- The namespace can be defined by an xmlns attribute in the start tag of an element.
- The namespace declaration has the following syntax. xmlns:prefix="URI".
Example
<root> <h:table xmlns:h="https://www.bidursapkota.com.np/fruits"> <h:tr> <h:td>Apples</h:td> <h:td>Bananas</h:td> </h:tr> </h:table> <f:table xmlns:f="https://www.bidursapkota.com.np/furnitures"> <f:name>African Coffee Table</f:name> <f:width>80</f:width> <f:length>120</f:length> </f:table> </root>
In the example above:
- The xmlns attribute in the first
<table>element gives the h: prefix a qualified namespace. - The xmlns attribute in the second
<table>element gives the f: prefix a qualified namespace. - When a namespace is defined for an element, all child elements with the same prefix are associated with the same namespace.
- Namespaces can also be declared in the XML root element:
Example
<root xmlns:h="https://www.bidursapkota.com.np/fruits" xmlns:f="https://www.bidursapkota.com.np/furnitures"> <h:table> <h:tr> <h:td>Apples</h:td> <h:td>Bananas</h:td> </h:tr> </h:table> <f:table> <f:name>African Coffee Table</f:name> <f:width>80</f:width> <f:length>120</f:length> </f:table> </root>
JSON vs XML: Detailed Comparison
1. Syntax and Readability
JSON:
- Uses minimal punctuation (braces, brackets, colons, commas)
- More compact and less verbose
- Native to JavaScript, easy to read for web developers
- No closing tags or attributes
XML:
- Uses opening and closing tags for every element
- More verbose, requires more characters for the same data
- Tag names provide context but add bulk
- Supports attributes for metadata
Example comparison for the same data:
JSON (89 characters):
{ "name": "John", "age": 30, "city": "New York" }
XML (119 characters):
<person><name>John</name><age>30</age><city>New York</city></person>
JSON is approximately 25% smaller for the same data.
2. Data Types
JSON:
- Has built-in data types: string, number, boolean, null, array, object
- Numbers and booleans are native types (no quotes)
- Easy to distinguish between data types
XML:
- Everything is text by default
- No native data types; all values are strings
- Data types must be inferred or defined in a schema
- Requires parsing to determine if "30" is a number or string
3. Arrays and Collections
JSON:
- Arrays are first-class citizens with
[]syntax - Easy to represent ordered collections
- Clear and concise:
"colors": ["red", "green", "blue"]
XML:
- No native array support
- Collections are represented by repeating elements
- Requires wrapper elements or conventions
- More verbose:
<colors><color>red</color><color>green</color></colors>
4. Comments
JSON:
- Does not support comments
- Comments must be stripped before parsing
- Some parsers support non-standard comment syntax
XML:
- Supports comments with
<!-- comment -->syntax - Useful for documentation within the data
5. Namespace Support
JSON:
- No built-in namespace support
- Naming conflicts must be handled by convention
XML:
- Full namespace support for avoiding naming conflicts
- Useful for combining data from multiple sources
- Example:
<book xmlns="http://example.com/books">
6. Schema Validation
JSON:
- JSON Schema available but not universally adopted
- Simpler validation rules
- Less mature tooling compared to XML
XML:
- Mature schema languages: DTD, XSD, RelaxNG
- Comprehensive validation capabilities
- Strong typing and complex constraints supported
7. Parsing and Performance
JSON:
- Native parsing in JavaScript with
JSON.parse() - Fast parsing in most languages
- Lower memory overhead
- Simpler parser implementation
XML:
- Requires dedicated parser (DOM, SAX, StAX)
- DOM parsing loads entire document into memory
- SAX parsing is event-driven and memory-efficient
- XPath and XSLT for querying and transformation
Comparison Summary Table
| Feature | JSON | XML |
|---|---|---|
| Readability | High (for developers) | Medium |
| Verbosity | Low | High |
| File Size | Smaller | Larger |
| Data Types | Built-in | Text only |
| Arrays | Native support | No native support |
| Comments | Not supported | Supported |
| Namespaces | Not supported | Supported |
| Schema | JSON Schema | DTD, XSD, RelaxNG |
| Parsing Speed | Faster | Slower |
| JavaScript Integration | Native | Requires conversion |
| Metadata (attributes) | Not supported | Supported |
| Document markup | Not suitable | Well suited |
| Configuration files | Good | Good |
| Web APIs | Dominant | Legacy systems |
When to Use JSON
- Web APIs and REST services: JSON is the standard for modern web APIs
- JavaScript/Node.js applications: Native support makes it the obvious choice
- Mobile applications: Smaller payload sizes reduce bandwidth
- Configuration files: Many modern tools use JSON for configuration
- Data storage in NoSQL databases: MongoDB, CouchDB store JSON documents
- Real-time applications: Lower parsing overhead benefits performance
When to Use XML
- Enterprise applications: Many legacy systems use XML
- Document-centric data: Books, articles, contracts with mixed content
- Complex data validation: When strict schema validation is required
- SOAP web services: SOAP is XML-based and still used in enterprises
- Configuration files: Many Java applications use XML configuration
- Data interchange with namespaces: When combining data from multiple sources
- Office documents: DOCX, XLSX are XML-based formats
Parsing JSON in Python
Python provides the built-in json module for working with JSON data.
""" JSON Parsing Demo in Python This script demonstrates how to parse JSON data and convert Python objects to JSON. """ import json # Sample JSON string (as received from an API) json_string = ''' { "id": 1, "title": "The Great Gatsby", "author": "F. Scott Fitzgerald", "year": 1925, "genres": ["Fiction", "Classic"], "available": true } ''' # Parse JSON string to Python dictionary book = json.loads(json_string) # Access data from the parsed JSON print("Title:", book["title"]) print("Author:", book["author"]) print("Year:", book["year"]) print("Genres:", ", ".join(book["genres"])) print("Available:", book["available"]) # Modify the data book["rating"] = 4.5 book["genres"].append("Literary") # Convert Python dictionary back to JSON string json_output = json.dumps(book, indent=4) print("\nModified JSON:") print(json_output)
Output:
Title: The Great Gatsby Author: F. Scott Fitzgerald Year: 1925 Genres: Fiction, Classic Available: True Modified JSON: { "id": 1, "title": "The Great Gatsby", "author": "F. Scott Fitzgerald", "year": 1925, "genres": [ "Fiction", "Classic", "Literary" ], "available": true, "rating": 4.5 }
Parsing XML in Python
Python provides the xml.etree.ElementTree module for working with XML data.
""" XML Parsing Demo in Python This script demonstrates how to parse XML data and extract values. """ import xml.etree.ElementTree as ET # Sample XML string xml_string = '''<?xml version="1.0" encoding="UTF-8"?> <book id="1"> <title>The Great Gatsby</title> <author>F. Scott Fitzgerald</author> <year>1925</year> <genres> <genre>Fiction</genre> <genre>Classic</genre> </genres> <available>true</available> </book> ''' # Parse XML string root = ET.fromstring(xml_string) # Access data from the parsed XML print("Book ID:", root.attrib["id"]) print("Title:", root.find("title").text) print("Author:", root.find("author").text) print("Year:", root.find("year").text) # Access nested elements (genres) genres = root.find("genres") genre_list = [genre.text for genre in genres.findall("genre")] print("Genres:", ", ".join(genre_list)) # Access boolean (stored as string in XML) available_text = root.find("available").text available = available_text.lower() == "true" print("Available:", available) # Modify the XML # Updating existing property root.find('title').text = "The Great Gatsby!!!" # Creating new property with ET.SubElement rating = ET.SubElement(root, "rating") rating.text = "4.5" # Add a new genre new_genre = ET.SubElement(genres, "genre") new_genre.text = "Literary" # Convert back to string modified_xml = ET.tostring(root, encoding="unicode") print("\nModified XML:") print(modified_xml)
Output:
Book ID: 1 Title: The Great Gatsby Author: F. Scott Fitzgerald Year: 1925 Genres: Fiction, Classic Available: True Modified XML: <book id="1"> <title>The Great Gatsby!!!</title> <author>F. Scott Fitzgerald</author> <year>1925</year> <genres> <genre>Fiction</genre> <genre>Classic</genre> <genre>Literary</genre></genres> <available>true</available> <rating>4.5</rating></book>
JSON in Django REST Framework
Django REST Framework supports JSON format for API responses using JSONParser. When you make requests and receive responses, DRF automatically handles the conversion between Python objects and JSON.
DRF also supports content negotiation, allowing clients to request different formats by setting the Accept header or using format suffixes in URLs.
Data Validation and Serialization
Serialization is the process of converting complex data types (like Python objects, database models, or querysets) into a format that can be easily transmitted over a network or stored. In the context of web APIs, serialization typically means converting data to JSON or XML.
Deserialization is the reverse process—converting data received in a format like JSON back into complex data types that can be used by the application.
In Django REST Framework, serializers handle both serialization and deserialization. They are one of the most powerful features of DRF, providing:
- Conversion: Transform complex types to native Python datatypes that can then be rendered into JSON
- Validation: Validate incoming data before it is saved to the database
- Parsing: Parse incoming JSON data into Python objects
Why is Serialization Important?
Serialization is crucial for web APIs because:
-
Data Transfer: HTTP is a text-based protocol. Complex objects like Python classes or database records cannot be sent directly over HTTP. They must be converted to a text format like JSON.
-
Language Independence: JSON can be understood by any programming language. A Python backend can serve data to JavaScript, Java, Swift, or any other client.
-
Security: Serialization allows you to control exactly what data is exposed. You can exclude sensitive fields like passwords or internal IDs.
-
Data Transformation: Serialization can transform data during the process, such as formatting dates, computing derived fields, or restructuring nested data.
-
Consistency: Serializers ensure that the API response format is consistent across all endpoints.
What is Data Validation?
Data validation is the process of ensuring that incoming data meets specific requirements before it is processed or stored. Validation protects your application from:
- Invalid Data: Ensuring data types are correct (e.g., age is a number, not a string)
- Missing Required Fields: Ensuring all mandatory fields are present
- Business Rule Violations: Ensuring data makes sense (e.g., end date is after start date)
- Security Threats: Preventing malicious input like SQL injection or XSS attacks
- Data Corruption: Maintaining data integrity in the database
Validation Levels
Validation can occur at multiple levels:
| Level | Description | Example |
|---|---|---|
| Client-side | Validation in the browser before sending | HTML5 form validation |
| Request-level | Validating the HTTP request format | Checking Content-Type header |
| Field-level | Validating individual fields | Email format, string length |
| Object-level | Validating relationships between fields | Password confirmation match |
| Database-level | Constraints enforced by the database | Unique constraints, foreign keys |
Django REST Framework provides powerful tools for field-level and object-level validation through serializers.
Django REST Framework Serializers
DRF provides several types of serializers:
1. Serializer
The base Serializer class gives you full control over the serialization process. You manually define each field and how it should be serialized.
2. ModelSerializer
ModelSerializer automatically generates fields based on a Django model. It provides default implementations for create() and update() methods, reducing boilerplate code significantly.
Serializer Field Types
DRF provides many field types that correspond to different data types:
| Field Type | Python Type | Description |
|---|---|---|
CharField | str | Text field |
IntegerField | int | Integer numbers |
FloatField | float | Floating-point numbers |
DecimalField | Decimal | Fixed-precision decimal |
BooleanField | bool | True/False values |
DateField | date | Date values |
DateTimeField | datetime | Date and time values |
EmailField | str | Validated email addresses |
URLField | str | Validated URLs |
ChoiceField | str | One of predefined choices |
ListField | list | List of values |
DictField | dict | Dictionary of key-value pairs |
Field Validation Options
Each field can have validation options:
| Option | Description | Example |
|---|---|---|
required | Field must be present | required=True |
allow_null | Allow None values | allow_null=True |
allow_blank | Allow empty strings | allow_blank=True |
default | Default value if not provided | default=0 |
max_length | Maximum string length | max_length=100 |
min_length | Minimum string length | min_length=3 |
max_value | Maximum numeric value | max_value=100 |
min_value | Minimum numeric value | min_value=0 |
read_only | Field only for output | read_only=True |
write_only | Field only for input | write_only=True |
Types of Validation in DRF
1. Built-in Field Validation
Each field type has built-in validation. For example, EmailField validates email format, URLField validates URL format, and IntegerField ensures the value is an integer.
2. Field-Level Validation
You can add custom validation for individual fields by defining validate_<fieldname> methods in your serializer.
3. Object-Level Validation
For validation that depends on multiple fields, you override the validate() method. This is useful for validating relationships between fields.
4. Custom Validators
You can create reusable validator functions or classes that can be applied to multiple fields or serializers.
Complete Code Example
Data Validation and Serialization with DRF
Serialization and Deserialization Flow
Understanding the complete flow helps in debugging and designing APIs:
- Incoming Request (Deserialization)
- The client sends JSON data to the server.
- The server receives the request body.
- The serializer reads the incoming data.
- Field-level validation is performed on each input field.
- Object-level validation checks relationships between fields.
- Validated data is generated by the serializer.
- A model instance is created or updated using the validated data.
- The data is saved into the database.
- Outgoing Response (Serialization)
- Data is retrieved from the database.
- A model instance is passed to the serializer.
- The serializer converts the model into Python data.
- Custom representation logic is applied if defined.
- A Python dictionary is produced.
- The JSON renderer converts the data to JSON.
- The response body is created by the server.
- The client receives the JSON response.
Microservices
Microservices (or Microservices Architecture) is an architectural approach where an application is built as a collection of small, independent services. Each service runs in its own process, can be deployed independently, and communicates with other services through well-defined APIs.
This is in contrast to the traditional monolithic architecture, where an entire application is built as a single, unified codebase. In a monolith, all features—user management, payments, notifications, reporting—are tightly integrated into one large application.
Monolithic vs Microservices Architecture
1. Monolithic Architecture
In a monolithic application:
- All functionality exists in a single codebase
- The entire application is deployed as one unit
- All components share the same database
- Changes to any part require redeploying the entire application
- Scaling means replicating the entire application
Example of a Monolithic E-commerce Application:
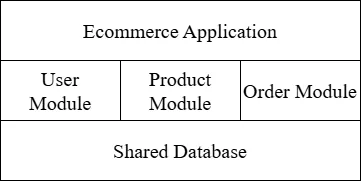
2. Microservices Architecture
In a microservices application:
- Each service is a small, focused application
- Services can be deployed independently
- Each service can have its own database
- Services communicate via APIs (REST, gRPC, message queues)
- Individual services can be scaled independently
Example of a Microservices E-commerce Application:
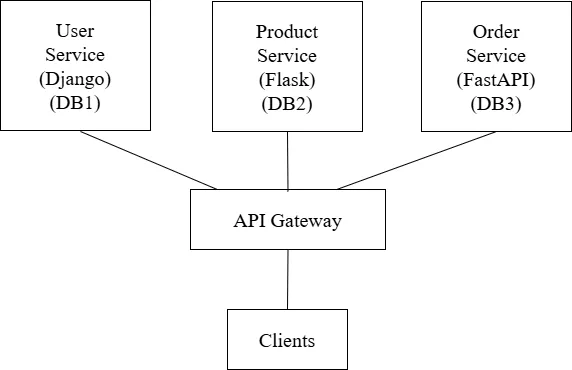
Key Characteristics of Microservices
1. Single Responsibility
Each microservice should do one thing and do it well. It focuses on a specific business capability. For example:
- User Service: Handles user registration, authentication, profile management
- Product Service: Manages product catalog, inventory, pricing
- Order Service: Processes orders, manages order status
- Payment Service: Handles payment processing, refunds
- Notification Service: Sends emails, SMS, push notifications
2. Independence
Microservices are independent in several ways:
- Development Independence: Different teams can work on different services without stepping on each other's toes.
- Technology Independence: Each service can use the best technology for its specific needs. The User Service might use Django, while the Payment Service uses Node.js.
- Deployment Independence: Services can be deployed separately. Updating the Product Service doesn't require redeploying the Order Service.
- Scaling Independence: Services experiencing high load can be scaled independently. If the Product Service gets 10x more traffic, you scale only that service.
3. Decentralized Data Management
Each microservice typically owns and manages its own data:
- Services have their own databases
- No direct database access across services
- Data is accessed only through service APIs
- This ensures loose coupling between services
4. Resilience and Fault Isolation
If one service fails, it shouldn't bring down the entire system:
- Services are designed to handle failures gracefully
- Circuit breakers prevent cascading failures
- Fallback mechanisms provide degraded functionality
- The system remains partially operational even during failures
Loose Coupling
Loose coupling means that services have minimal dependencies on each other. Changes to one service should not require changes to other services.
Why Loose Coupling
- Independent Development: Teams can work without waiting for other teams
- Independent Deployment: Deploy one service without affecting others
- Fault Isolation: Failures in one service don't cascade
- Technology Flexibility: Change implementation without affecting consumers
- Easier Testing: Test services in isolation
Achieving Loose Coupling
- API Contracts: Define clear interfaces between services. As long as the API contract is maintained, internal implementation can change freely.
- Avoid Shared Databases: Each service owns its data. Other services access data only through APIs.
- Asynchronous Communication: Use message queues for non-time-critical operations. The sender doesn't wait for the receiver.
- Event-Driven Architecture: Services publish events when something happens. Other services subscribe to events they care about.
- Versioned APIs: When APIs change, support multiple versions to avoid breaking existing consumers.
Service Communication
Microservices need to communicate with each other. There are two main patterns:
Synchronous Communication
In synchronous communication, the caller waits for a response before proceeding.
REST APIs: The most common approach. Services expose REST endpoints and call each other using HTTP requests.
gRPC: A high-performance RPC framework using Protocol Buffers. Faster than REST but more complex to implement.
Pros of Synchronous:
- Simple to understand and implement
- Immediate feedback
- Easy to debug
Cons of Synchronous:
- Tight temporal coupling (caller must wait)
- If the called service is slow or down, the caller is blocked
- Can create cascading failures
Asynchronous Communication
In asynchronous communication, the caller sends a message and continues without waiting for a response.
Message Queues: Services communicate through a message broker (RabbitMQ, Redis, Amazon SQS).
Event-Driven Architecture: Services emit events when something significant happens. Other services react to these events.
Pros of Asynchronous:
- Loose temporal coupling
- Better resilience (messages are queued if service is down)
- Better scalability
- Natural fit for event-driven systems
Cons of Asynchronous:
- More complex to implement and debug
- Eventual consistency (data may not be immediately consistent)
- Requires message broker infrastructure
API Gateway
An API Gateway is a server that acts as a single entry point for all client requests. Instead of clients calling individual microservices directly, they call the API Gateway, which routes requests to the appropriate services.
Why Use an API Gateway?
1. Single Entry Point: Clients only need to know about one URL (the gateway), not dozens of service URLs.
2. Request Routing: The gateway routes requests to the appropriate backend services based on the URL path, headers, or other criteria.
3. Authentication and Authorization: Centralized security. The gateway handles authentication (verifying identity) and authorization (checking permissions) before requests reach backend services.
4. Rate Limiting: Protect services from abuse by limiting the number of requests from each client.
5. Request/Response Transformation: Transform requests and responses. For example, aggregate data from multiple services into a single response.
6. Load Balancing: Distribute requests across multiple instances of a service.
7. Caching: Cache frequently requested data to reduce load on backend services.
8. SSL Termination: Handle HTTPS at the gateway level, allowing internal communication to use plain HTTP.
9. Monitoring and Logging: Centralized logging and monitoring of all API traffic.
Advantages of Microservices
- Scalability: Scale individual services based on demand
- Technology Flexibility: Use the best tool for each job
- Faster Development: Smaller codebases are easier to understand and modify
- Independent Deployment: Deploy services without affecting others
- Fault Isolation: Failures are contained within individual services
- Team Autonomy: Teams own their services end-to-end
- Easier Maintenance: Smaller, focused codebases are easier to maintain
Disadvantages of Microservices
- Complexity: Distributed systems are inherently more complex
- Network Latency: Service-to-service calls add latency
- Data Consistency: Maintaining consistency across services is challenging
- Debugging Difficulty: Tracing issues across multiple services is harder
- Operational Overhead: More services mean more things to deploy and monitor
- Testing Challenges: Integration testing across services is complex
- Initial Cost: Higher upfront investment in infrastructure and tooling
Use Microservices When:
- Your application is large and complex
- You have multiple development teams
- Different parts of the application have different scaling needs
- You need technology diversity
- You need to deploy parts of the application independently
Stick with Monolith When:
- Your application is small or simple
- You have a small team
- You're building a prototype
- You don't have the operational expertise for distributed systems
- Performance is critical (fewer network calls)
Questions
-
Define API (Application Programming Interface). Differentiate between Open APIs and Internal APIs. Explain why APIs are important in modern software development with at least four purposes. [2+2+4]
-
What is REST? Explain the six architectural constraints of REST with their benefits. [2+6]
-
What is statelessness in REST architecture? What is the purpose of the
Cache-Controlheader in REST APIs? Explain the Client-Server and Cacheability constraints of REST architecture with their benefits and examples. [2+2+4] -
Explain the Uniform Interface constraint in REST in detail including its definition and importance, Resource Identification using URIs, Manipulation of Resources through Representations, Self-Descriptive Messages, HATEOAS (Hypermedia as the Engine of Application State), and examples for each sub-constraint. [8]
-
List the five main HTTP verbs used in RESTful APIs. Explain the purpose, use cases, and characteristics of GET, POST, PUT, PATCH, and DELETE HTTP methods with examples including which methods are idempotent. [2+6]
-
What is the difference between PUT and PATCH HTTP methods? What status code is returned when a resource is successfully created using POST? Explain any six HTTP status codes with their meanings including at least two from 2xx, two from 4xx, and two from 5xx categories. [2+2+4]
-
What is the principle of "Use Nouns, Not Verbs" in RESTful URL design? Explain the practices for Endpoints and URL design in RESTful APIs with good and bad examples for each. [2+6]
-
Explain the concept of resource modeling in RESTful APIs including how to identify resources, resource relationships (One-to-Many, Many-to-Many) with URL examples, nested vs flat approach with pros and cons, HTTP status codes grouped by categories (2xx, 3xx, 4xx, 5xx), and examples for each type of status code. [8]
-
What is API versioning and why is it needed? List the three common approaches for API versioning. Explain API structure best practices including consistent response format with JSON examples for success and error responses, and pagination implementation. [2+2+4]
-
Define JSON (JavaScript Object Notation). List the syntax rules of JSON. Explain JSON data types with examples and provide a complete JSON example showing simple values, nested objects, arrays, and null values. [2+2+4]
-
Define XML (eXtensible Markup Language) and write any two syntax rules. Explain XML structure components (Declaration, Element, Attribute, Comment, CDATA) with examples and provide a complete XML example showing nested elements, attributes, and arrays representation. [2+6]
-
Compare JSON and XML data exchange formats comprehensively including syntax and structure of each with examples, data types support comparison, array handling in both formats, comments and namespace support, parsing and performance comparison, a comparison table with at least six features, and use cases for JSON and XML. [8]
-
How do you parse JSON data in Python using the
jsonmodule? How do you convert Python dictionary back to JSON string? Write a Python program to parse a JSON string containing book information (id, title, author, year, genres array), access and print each field, modify the data (add rating, append to genres), and convert back to JSON. [2+2+4] -
How do you parse XML data in Python using
xml.etree.ElementTree? Write a Python program to parse an XML string containing book information with nested elements, access attributes and element text, extract array-like elements (genres), modify the XML (add new elements), and convert back to XML string. [2+6] -
Define serialization in the context of Django REST Framework. Define deserialization and explain why it is important. Explain the complete serialization and deserialization flow in Django REST Framework for both incoming requests and outgoing responses with step-by-step process. [2+2+4]
-
What is data validation in web APIs? Explain the importance of data validation and the different levels of validation including client-side validation, request-level validation, field-level validation, object-level validation, and database-level validation with examples for each level. [2+6]
-
Define microservices architecture. Define monolithic architecture. Compare monolithic and microservices architecture including key differences (deployment, scaling, database, technology), when to use each approach, and diagram representation of each. [2+2+4]
-
Explain the key characteristics of microservices architecture in detail including Single Responsibility principle with examples, Independence (Development, Technology, Deployment, Scaling), Decentralized Data Management, Resilience and Fault Isolation, and provide real-world examples for each characteristic. [8]
-
What is loose coupling in microservices and why is it important? Explain how to achieve loose coupling in microservices through API Contracts, avoiding shared databases, asynchronous communication, event-driven architecture, versioned APIs, and benefits of loose coupling. [2+6]
-
What is synchronous communication in microservices with an example? What is asynchronous communication in microservices with an example? Compare synchronous (REST APIs, gRPC) and asynchronous (Message Queues, Event-Driven) communication patterns with their pros and cons. [2+2+4]
-
What is an API Gateway? Explain the role and functions of an API Gateway in microservices including single entry point, request routing, authentication and authorization, rate limiting, load balancing, caching, SSL termination, and include an architecture diagram description. [2+6]
-
Explain service communication patterns in microservices architecture comprehensively including synchronous communication (REST APIs, gRPC) with pros and cons, asynchronous communication (Message Queues, Event-Driven) with pros and cons, API Gateway purpose, architecture and functions, and when to use each communication pattern. [8]
-
List any four advantages of microservices architecture. List any four disadvantages of microservices architecture. Explain when to use microservices vs monolithic architecture discussing factors like application size, team size, scaling needs, and operational expertise. [2+2+4]
-
What is gRPC and how does it differ from REST APIs? Explain Event-Driven Architecture in microservices including how services publish and subscribe to events, message brokers (RabbitMQ, Redis, Amazon SQS), benefits for loose coupling, eventual consistency challenges, and use cases for event-driven architecture. [2+6]
-
Explain microservices architecture in detail including definition and comparison with monolithic architecture, key characteristics (at least four), advantages (at least five), disadvantages (at least four), service communication patterns, and when to use microservices vs monolithic architecture. [8]
Complete Form Validation API
Create a REST API to accept Name, gender, hobbies, appointment date & time, country, resume, Email, password and confirm Password. Write server side code to perform form validation. All fields are required. Appointment date cannot be in past. Resume should be either pdf, ms-word or image. File size should be less than 2MB. Email should be valid. Phone number should be valid ( 9********* or 01******* ). Password must be at least 8 character long with at least one lowercase, uppercase, number and symbol. Password and confirm password should match.
Prerequisites
- Python 3.x installed
- pip (Python package installer)
Create Project
cd Desktop mkdir drf-form-validation cd drf-form-validation
Create Virtual Environment
python -m venv venv
Activate Virtual Environment
# Windows venv\Scripts\activate # Linux/Mac source venv/bin/activate
Install Django and Django Rest Framework
pip install django djangorestframework
Create Django Project
django-admin startproject config .
Create Django App
python manage.py startapp registration
Project Structure
drf-form-validation/ ├── config/ │ ├── __init__.py │ ├── asgi.py │ ├── settings.py │ ├── urls.py │ └── wsgi.py ├── registration/ │ ├── migrations/ │ ├── __init__.py │ ├── admin.py │ ├── apps.py │ ├── models.py │ ├── serializers.py │ ├── urls.py │ └── views.py ├── media/ │ └── resumes/ ├── manage.py └── venv/
Register App in Settings
Update config/settings.py
INSTALLED_APPS = [ 'django.contrib.admin', 'django.contrib.auth', 'django.contrib.contenttypes', 'django.contrib.sessions', 'django.contrib.messages', 'django.contrib.staticfiles', 'rest_framework', # Add DRF 'registration', # Add registration ]
Add Media Settings (at the bottom of config/settings.py)
import os MEDIA_URL = '/media/' MEDIA_ROOT = os.path.join(BASE_DIR, 'media')
Create Model
Update registration/models.py
from django.db import models class Registration(models.Model): GENDER_CHOICES = [ ('M', 'Male'), ('F', 'Female'), ('O', 'Other'), ] HOBBY_CHOICES = [ ('football', 'Football'), ('tableTennis', 'Table Tennis'), ('basketball', 'Basketball'), ] COUNTRY_CHOICES = [ ('', '-- Select --'), ('Nepal', 'Nepal'), ('India', 'India'), ('USA', 'USA'), ] name = models.CharField(max_length=100) gender = models.CharField(max_length=1, choices=GENDER_CHOICES) hobbies = models.JSONField(default=list) # Store multiple hobbies as JSON appointment = models.DateTimeField() country = models.CharField(max_length=50, choices=COUNTRY_CHOICES) email = models.EmailField(unique=True) phone = models.CharField(max_length=15) resume = models.FileField(upload_to='resumes/') password = models.CharField(max_length=128) created_at = models.DateTimeField(auto_now_add=True) def __str__(self): return self.name class Meta: ordering = ['-created_at']
Create and Run Migrations
python manage.py makemigrations python manage.py migrate
Create DRF Serializer with Validation
Create registration/serializers.py
from rest_framework import serializers from django.utils import timezone from django.contrib.auth.hashers import make_password from .models import Registration import re class RegistrationSerializer(serializers.Serializer): """Registration serializer with comprehensive validation""" id = serializers.IntegerField(read_only=True) name = serializers.CharField( max_length=100, error_messages={'required': 'Name is required', 'blank': 'Name is required'} ) gender = serializers.ChoiceField( choices=[('M', 'Male'), ('F', 'Female'), ('O', 'Other')], error_messages={'required': 'Gender is required'} ) hobbies = serializers.ListField( child=serializers.CharField(), error_messages={'required': 'Hobbies is required'} ) appointment = serializers.DateTimeField( error_messages={'required': 'Appointment date & time is required'} ) country = serializers.ChoiceField( choices=[('Nepal', 'Nepal'), ('India', 'India'), ('USA', 'USA')], error_messages={'required': 'Country is required'} ) email = serializers.EmailField( error_messages={'required': 'Email is required', 'invalid': 'Enter a valid email address'} ) phone = serializers.CharField( max_length=15, error_messages={'required': 'Phone number is required', 'blank': 'Phone number is required'} ) resume = serializers.FileField( error_messages={'required': 'Resume file is required'} ) password = serializers.CharField( write_only=True, error_messages={'required': 'Password is required', 'blank': 'Password is required'} ) confirm_password = serializers.CharField( write_only=True, error_messages={'required': 'Confirm Password is required'} ) created_at = serializers.DateTimeField(read_only=True) def validate_appointment(self, value): """Validate appointment is not in the past""" now = timezone.now() if value < now: raise serializers.ValidationError( 'Appointment date & time cannot be in the past' ) return value def validate_phone(self, value): """Validate phone number format (Nepal format)""" phone_regex = r'^(?:9\d{9}|01\d{7})$' if not re.match(phone_regex, value): raise serializers.ValidationError( 'Please enter a valid phone number (9xxxxxxxxx or 01xxxxxxx)' ) return value def validate_resume(self, value): """Validate resume file type and size""" allowed_extensions = ['pdf', 'jpg', 'jpeg', 'png', 'doc', 'docx'] extension = value.name.split('.')[-1].lower() if extension not in allowed_extensions: raise serializers.ValidationError( f'Unsupported file format. Allowed: {", ".join(allowed_extensions)}' ) max_size = 2 * 1024 * 1024 # 2MB in bytes if value.size > max_size: raise serializers.ValidationError( 'File size should be less than 2MB' ) return value def validate_password(self, value): """Validate password strength""" password_regex = r'^(?=.*[a-z])(?=.*[A-Z])(?=.*\d)(?=.*[^a-zA-Z\d\s]).{8,}$' if not re.match(password_regex, value): raise serializers.ValidationError( 'Password must be at least 8 characters long and include ' 'one uppercase letter, one lowercase letter, one number, ' 'and one symbol' ) return value def validate_hobbies(self, value): """Validate at least one hobby is selected""" if not value or len(value) == 0: raise serializers.ValidationError( 'Please select at least one hobby' ) return value def validate(self, data): """Validate confirm password matches password""" password = data.get('password') confirm_password = data.get('confirm_password') if password != confirm_password: raise serializers.ValidationError({ 'confirm_password': 'Confirm Password did not match Password' }) return data def create(self, validated_data): """Create registration with hashed password""" validated_data.pop('confirm_password') validated_data['password'] = make_password(validated_data['password']) return Registration.objects.create(**validated_data) def update(self, instance, validated_data): """Update registration instance""" validated_data.pop('confirm_password', None) if 'password' in validated_data: validated_data['password'] = make_password(validated_data['password']) for attr, value in validated_data.items(): setattr(instance, attr, value) instance.save() return instance
Create API Views (Class-Based)
Update registration/views.py
from rest_framework import status from rest_framework.views import APIView from rest_framework.parsers import MultiPartParser, FormParser, JSONParser from rest_framework.response import Response from .serializers import RegistrationSerializer from .models import Registration class RegistrationListAPIView(APIView): """Handle registration API - List all or Create new""" parser_classes = [MultiPartParser, FormParser, JSONParser] def get(self, request): registrations = Registration.objects.all() serializer = RegistrationSerializer(registrations, many=True) return Response(serializer.data) def post(self, request): serializer = RegistrationSerializer(data=request.data) if serializer.is_valid(): serializer.save() return Response({ 'message': 'Registration successful!', 'data': serializer.data }, status=status.HTTP_201_CREATED) return Response(serializer.errors, status=status.HTTP_400_BAD_REQUEST) class RegistrationDetailAPIView(APIView): """Handle single registration - Get, Update or Delete""" parser_classes = [MultiPartParser, FormParser] def get_object(self, pk): try: return Registration.objects.get(pk=pk) except Registration.DoesNotExist: return None def get(self, request, pk): registration = self.get_object(pk) if not registration: return Response( {'error': 'Registration not found'}, status=status.HTTP_404_NOT_FOUND ) serializer = RegistrationSerializer(registration) return Response(serializer.data) def put(self, request, pk): registration = self.get_object(pk) if not registration: return Response( {'error': 'Registration not found'}, status=status.HTTP_404_NOT_FOUND ) serializer = RegistrationSerializer(registration, data=request.data) if serializer.is_valid(): serializer.save() return Response({ 'message': 'Registration updated successfully!', 'data': serializer.data }) return Response(serializer.errors, status=status.HTTP_400_BAD_REQUEST) def delete(self, request, pk): registration = self.get_object(pk) if not registration: return Response( {'error': 'Registration not found'}, status=status.HTTP_404_NOT_FOUND ) registration.delete() return Response( {'message': 'Registration deleted successfully!'}, status=status.HTTP_204_NO_CONTENT )
Create App URLs
Create registration/urls.py
from django.urls import path from . import views app_name = 'registration' urlpatterns = [ path('', views.RegistrationListAPIView.as_view(), name='registration-list'), path('<int:pk>/', views.RegistrationDetailAPIView.as_view(), name='registration-detail'), ]
Configure Project URLs
Update config/urls.py
from django.contrib import admin from django.urls import path, include from django.conf import settings from django.conf.urls.static import static urlpatterns = [ path('admin/', admin.site.urls), path('api/registration/', include('registration.urls')), ] # Serve media files during development if settings.DEBUG: urlpatterns += static(settings.MEDIA_URL, document_root=settings.MEDIA_ROOT)
Run the Project
python manage.py runserver
API Endpoints:
GET /api/registration/- List all registrationsPOST /api/registration/- Create new registrationGET /api/registration/<id>/- Get single registrationPUT /api/registration/<id>/- Update registrationDELETE /api/registration/<id>/- Delete registration
Authentication with JWT
Write an API view that accepts username and password as arguments and check with student table, if credential match, return JWT token otherwise display 'Invalid username/password'.
Simple implementation using Django's built-in User model and SimpleJWT's built-in token endpoints.
Step 1: Install Required Packages
pip install djangorestframework djangorestframework-simplejwt
Step 2: Configure Settings
# settings.py INSTALLED_APPS = [ 'django.contrib.admin', 'django.contrib.auth', 'django.contrib.contenttypes', 'django.contrib.sessions', 'django.contrib.messages', 'django.contrib.staticfiles', 'rest_framework', 'rest_framework_simplejwt', 'rest_framework_simplejwt.token_blacklist', # Required for logout 'myapp', # your app name ] REST_FRAMEWORK = { 'DEFAULT_AUTHENTICATION_CLASSES': ( 'rest_framework_simplejwt.authentication.JWTAuthentication', ), }
Note: Default SIMPLE_JWT settings are fine for basic usage. Only add custom SIMPLE_JWT configuration if you need to change token lifetimes or other specific behaviors.
Step 3: Run Migrations
Important: After adding token_blacklist to INSTALLED_APPS, run migrations:
python manage.py migrate
This creates the necessary database tables for token blacklisting.
Step 4: Create Views
# views.py from rest_framework import status from rest_framework.views import APIView from rest_framework.permissions import IsAuthenticated from rest_framework.response import Response from rest_framework_simplejwt.tokens import RefreshToken class DashboardAPIView(APIView): """Protected dashboard - Requires JWT token""" permission_classes = [IsAuthenticated] def get(self, request): return Response({ 'message': f'Welcome {request.user.username}!', 'user': { 'id': request.user.id, 'username': request.user.username, 'email': request.user.email, 'first_name': request.user.first_name, 'last_name': request.user.last_name, } }) class LogoutAPIView(APIView): """Logout API - Blacklist refresh token""" permission_classes = [IsAuthenticated] def post(self, request): try: refresh_token = request.data.get('refresh') if not refresh_token: return Response( {'error': 'Refresh token is required'}, status=status.HTTP_400_BAD_REQUEST ) token = RefreshToken(refresh_token) token.blacklist() return Response( {'message': 'Logout successful'}, status=status.HTTP_200_OK ) except Exception as e: return Response( {'error': f'Invalid token: {str(e)}'}, status=status.HTTP_400_BAD_REQUEST )
Step 5: Configure URLs
# app level urls.py (e.g., myapp/urls.py) from django.urls import path from . import views urlpatterns = [ path('dashboard/', views.DashboardAPIView.as_view(), name='dashboard'), path('logout/', views.LogoutAPIView.as_view(), name='logout'), ]
# project level urls.py from django.contrib import admin from django.urls import path, include from rest_framework_simplejwt.views import ( TokenObtainPairView, TokenRefreshView, ) urlpatterns = [ path('admin/', admin.site.urls), # SimpleJWT built-in token endpoints path('api/token/', TokenObtainPairView.as_view(), name='token_obtain_pair'), path('api/token/refresh/', TokenRefreshView.as_view(), name='token_refresh'), # Your app URLs path('api/', include('myapp.urls')), ]
Step 6: Create Test User
python manage.py shell
from django.contrib.auth.models import User # Create test user user = User.objects.create_user( username='student1', email='[email protected]', password='testpass123', first_name='John', last_name='Doe' ) print(f"Created user: {user.username}") exit()
API Testing Examples
1. Login (Get JWT Token)
Endpoint: POST /api/token/
{ "username": "student1", "password": "testpass123" }
Response (Success):
{ "refresh": "eyJ0eXAiOiJKV1QiLCJhbGciOiJIUzI1NiJ9...", "access": "eyJ0eXAiOiJKV1QiLCJhbGciOiJIUzI1NiJ9..." }
Response (Invalid credentials):
{ "detail": "No active account found with the given credentials" }
2. Access Protected Dashboard
Endpoint: GET /api/dashboard/
Headers:
Authorization: Bearer eyJ0eXAiOiJKV1QiLCJhbGciOiJIUzI1NiJ9...
Response:
{ "message": "Welcome student1!", "user": { "id": 1, "username": "student1", "email": "[email protected]", "first_name": "John", "last_name": "Doe" } }
Response (No token or invalid token):
{ "detail": "Authentication credentials were not provided." }
3. Refresh Token
Endpoint: POST /api/token/refresh/
{ "refresh": "eyJ0eXAiOiJKV1QiLCJhbGciOiJIUzI1NiJ9..." }
Response:
{ "access": "eyJ0eXAiOiJKV1QiLCJhbGciOiJIUzI1NiJ9..." }
4. Logout (Blacklist Refresh Token)
Endpoint: POST /api/logout/
Headers:
Authorization: Bearer eyJ0eXAiOiJKV1QiLCJhbGciOiJIUzI1NiJ9...
Body:
{ "refresh": "eyJ0eXAiOiJKV1QiLCJhbGciOiJIUzI1NiJ9..." }
Response:
{ "message": "Logout successful" }
Error Response:
{ "error": "Invalid token" }
Testing API with Postman
-
Login:
- Method: POST
- URL:
http://localhost:8000/api/token/ - Body (JSON):
{ "username": "student1", "password": "testpass123" } - Copy the
accesstoken from response
-
Access Protected Endpoint:
- Method: GET
- URL:
http://localhost:8000/api/dashboard/ - Headers:
- Key:
Authorization - Value:
Bearer <paste_your_access_token>
- Key:
-
Logout:
- Method: POST
- URL:
http://localhost:8000/api/logout/ - Headers:
- Key:
Authorization - Value:
Bearer <paste_your_access_token>
- Key:
- Body (JSON):
{ "refresh": "<paste_your_refresh_token>" }
More Questions
Write server side API to create and validate patient data with following rule and store given data into 'patients' table with details (name, patient_id, mobile, gender, address, dob, doctor name):
- Name, Mobile, Doctor Name, Gender, DOB: Required
- Mobile: 10 digit start with 98, 97 or 96
- DOB: YYYY-MM-DD format
Step 1: Create Patient Model
# models.py from django.db import models class Patient(models.Model): GENDER_CHOICES = [ ('M', 'Male'), ('F', 'Female'), ('O', 'Other'), ] name = models.CharField(max_length=200) patient_id = models.CharField(max_length=50, unique=True) mobile = models.CharField(max_length=10) gender = models.CharField(max_length=1, choices=GENDER_CHOICES) address = models.TextField(blank=True, null=True) dob = models.DateField() doctor_name = models.CharField(max_length=200) created_at = models.DateTimeField(auto_now_add=True) def __str__(self): return f"{self.name} ({self.patient_id})"
Step 2: Run Migrations
python manage.py makemigrations python manage.py migrate
Step 3: Create DRF Serializer with Validation
# serializers.py from rest_framework import serializers from .models import Patient from datetime import datetime import re import uuid class PatientSerializer(serializers.Serializer): id = serializers.IntegerField(read_only=True) name = serializers.CharField( max_length=200, error_messages={'required': 'Name is required', 'blank': 'Name is required'} ) patient_id = serializers.CharField( max_length=50, required=False, allow_blank=True ) mobile = serializers.CharField( max_length=10, error_messages={'required': 'Mobile number is required', 'blank': 'Mobile number is required'} ) gender = serializers.ChoiceField( choices=[('M', 'Male'), ('F', 'Female'), ('O', 'Other')], error_messages={'required': 'Gender is required'} ) address = serializers.CharField( required=False, allow_blank=True ) dob = serializers.DateField( error_messages={'required': 'Date of Birth is required', 'invalid': 'Enter a valid date (YYYY-MM-DD)'} ) doctor_name = serializers.CharField( max_length=200, error_messages={'required': 'Doctor Name is required', 'blank': 'Doctor Name is required'} ) created_at = serializers.DateTimeField(read_only=True) def validate_mobile(self, value): """Mobile must be 10 digits and start with 98, 97 or 96""" mobile_regex = r'^(98|97|96)\d{8}$' if not re.match(mobile_regex, value): raise serializers.ValidationError( 'Mobile must be 10 digits and start with 98, 97 or 96' ) return value def validate_dob(self, value): """Validate DOB is a valid date""" if value > datetime.now().date(): raise serializers.ValidationError( 'Date of Birth cannot be in the future' ) return value def create(self, validated_data): """Generate patient_id if not provided""" if not validated_data.get('patient_id'): validated_data['patient_id'] = 'PAT-' + str(uuid.uuid4())[:8].upper() return Patient.objects.create(**validated_data) def update(self, instance, validated_data): """Update patient instance""" for attr, value in validated_data.items(): setattr(instance, attr, value) instance.save() return instance
Step 4: Create API Views (Class-Based)
# views.py from rest_framework import status from rest_framework.views import APIView from rest_framework.response import Response from .serializers import PatientSerializer from .models import Patient class PatientListAPIView(APIView): """List all patients or create new patient""" def get(self, request): patients = Patient.objects.all() serializer = PatientSerializer(patients, many=True) return Response(serializer.data) def post(self, request): serializer = PatientSerializer(data=request.data) if serializer.is_valid(): serializer.save() return Response({ 'message': 'Patient registered successfully!', 'data': serializer.data }, status=status.HTTP_201_CREATED) return Response(serializer.errors, status=status.HTTP_400_BAD_REQUEST) class PatientDetailAPIView(APIView): """Get, update or delete a patient""" def get_object(self, pk): try: return Patient.objects.get(pk=pk) except Patient.DoesNotExist: return None def get(self, request, pk): patient = self.get_object(pk) if not patient: return Response( {'error': 'Patient not found'}, status=status.HTTP_404_NOT_FOUND ) serializer = PatientSerializer(patient) return Response(serializer.data) def put(self, request, pk): patient = self.get_object(pk) if not patient: return Response( {'error': 'Patient not found'}, status=status.HTTP_404_NOT_FOUND ) serializer = PatientSerializer(patient, data=request.data) if serializer.is_valid(): serializer.save() return Response({ 'message': 'Patient updated successfully!', 'data': serializer.data }) return Response(serializer.errors, status=status.HTTP_400_BAD_REQUEST) def delete(self, request, pk): patient = self.get_object(pk) if not patient: return Response( {'error': 'Patient not found'}, status=status.HTTP_404_NOT_FOUND ) patient.delete() return Response( {'message': 'Patient deleted successfully!'}, status=status.HTTP_204_NO_CONTENT )
Step 5: Configure URLs
# urls.py from django.urls import path from . import views urlpatterns = [ path('', views.PatientListAPIView.as_view(), name='patient-list'), path('<int:pk>/', views.PatientDetailAPIView.as_view(), name='patient-detail'), ]
from django.contrib import admin from django.urls import path, include urlpatterns = [ path('admin/', admin.site.urls), path('api/patients/', include('patient.urls')) ]
Design REST API to store user data and perform following validation rules:
- Length of Full name up to 40 characters
- Email address must be valid email address
- Username must start with string and followed by number
- Password length must be more than 8 characters
Step 1: Create User Model
# models.py from django.db import models class User(models.Model): full_name = models.CharField(max_length=40) email = models.EmailField(unique=True) username = models.CharField(max_length=100, unique=True) password = models.CharField(max_length=128) created_at = models.DateTimeField(auto_now_add=True) def __str__(self): return self.username
Step 2: Run Migrations
python manage.py makemigrations python manage.py migrate
Step 3: Create DRF Serializer with Validation
# serializers.py from rest_framework import serializers from django.contrib.auth.hashers import make_password from .models import User import re class UserSerializer(serializers.Serializer): id = serializers.IntegerField(read_only=True) full_name = serializers.CharField( max_length=40, error_messages={'required': 'Full Name is required', 'blank': 'Full Name is required'} ) email = serializers.EmailField( error_messages={'required': 'Email is required', 'invalid': 'Enter a valid email address'} ) username = serializers.CharField( max_length=100, error_messages={'required': 'Username is required', 'blank': 'Username is required'} ) password = serializers.CharField( write_only=True, error_messages={'required': 'Password is required', 'blank': 'Password is required'} ) created_at = serializers.DateTimeField(read_only=True) def validate_full_name(self, value): """Full name must be up to 40 characters""" if len(value) > 40: raise serializers.ValidationError( 'Full name must be up to 40 characters' ) return value def validate_username(self, value): """Username must start with letters and followed by numbers""" username_regex = r'^[a-zA-Z]+\d+$' if not re.match(username_regex, value): raise serializers.ValidationError( 'Username must start with letters and end with numbers' ) if User.objects.filter(username=value).exists(): raise serializers.ValidationError('Username already taken') return value def validate_email(self, value): """Check if email already exists""" if User.objects.filter(email=value).exists(): raise serializers.ValidationError('Email already registered') return value def validate_password(self, value): """Password must be more than 8 characters""" if len(value) <= 8: raise serializers.ValidationError( 'Password must be more than 8 characters' ) return value def create(self, validated_data): """Hash password before saving""" validated_data['password'] = make_password(validated_data['password']) return User.objects.create(**validated_data) def update(self, instance, validated_data): """Update user instance""" if 'password' in validated_data: validated_data['password'] = make_password(validated_data['password']) for attr, value in validated_data.items(): setattr(instance, attr, value) instance.save() return instance
Step 4: Create API Views (Class-Based)
# views.py from rest_framework import status from rest_framework.views import APIView from rest_framework.response import Response from .serializers import UserSerializer from .models import User class UserListAPIView(APIView): """List all users or create new user""" def get(self, request): users = User.objects.all() serializer = UserSerializer(users, many=True) return Response(serializer.data) def post(self, request): serializer = UserSerializer(data=request.data) if serializer.is_valid(): serializer.save() return Response({ 'message': 'User registered successfully!', 'data': serializer.data }, status=status.HTTP_201_CREATED) return Response(serializer.errors, status=status.HTTP_400_BAD_REQUEST) class UserDetailAPIView(APIView): """Get, update or delete a user""" def get_object(self, pk): try: return User.objects.get(pk=pk) except User.DoesNotExist: return None def get(self, request, pk): user = self.get_object(pk) if not user: return Response( {'error': 'User not found'}, status=status.HTTP_404_NOT_FOUND ) serializer = UserSerializer(user) return Response(serializer.data) def put(self, request, pk): user = self.get_object(pk) if not user: return Response( {'error': 'User not found'}, status=status.HTTP_404_NOT_FOUND ) serializer = UserSerializer(user, data=request.data) if serializer.is_valid(): serializer.save() return Response({ 'message': 'User updated successfully!', 'data': serializer.data }) return Response(serializer.errors, status=status.HTTP_400_BAD_REQUEST) def delete(self, request, pk): user = self.get_object(pk) if not user: return Response( {'error': 'User not found'}, status=status.HTTP_404_NOT_FOUND ) user.delete() return Response( {'message': 'User deleted successfully!'}, status=status.HTTP_204_NO_CONTENT )
Step 5: Configure URLs
# urls.py from django.urls import path from . import views urlpatterns = [ path('', views.UserListAPIView.as_view(), name='user-list'), path('<int:pk>/', views.UserDetailAPIView.as_view(), name='user-detail'), ]
# project level urls.py from django.contrib import admin from django.urls import path, include urlpatterns = [ path('admin/', admin.site.urls), path('api/users/', include('user.urls')), ]
Write a Django REST API to upload a file and validate:
- File extension (only allow image files: jpg, jpeg, png, gif)
- File size (must be less than 2MB)
Step 1: Create Model
# models.py from django.db import models class UploadedFile(models.Model): file = models.FileField(upload_to='uploads/') uploaded_at = models.DateTimeField(auto_now_add=True) def __str__(self): return self.file.name
Step 2: Create Serializer with Validation
# serializers.py from rest_framework import serializers from .models import UploadedFile class FileUploadSerializer(serializers.Serializer): id = serializers.IntegerField(read_only=True) file = serializers.FileField( error_messages={'required': 'File is required', 'empty': 'The submitted file is empty'} ) uploaded_at = serializers.DateTimeField(read_only=True) def validate_file(self, value): """Validate file extension and size""" allowed_extensions = ['jpg', 'jpeg', 'png', 'gif'] file_extension = value.name.split('.')[-1].lower() if file_extension not in allowed_extensions: raise serializers.ValidationError( f'Invalid file type. Allowed: {", ".join(allowed_extensions)}' ) max_size = 2 * 1024 * 1024 # 2MB in bytes if value.size > max_size: raise serializers.ValidationError( 'File size must be less than 2MB' ) return value def create(self, validated_data): """Create uploaded file instance""" return UploadedFile.objects.create(**validated_data)
Step 3: Create API Views (Class-Based)
# views.py from rest_framework import status from rest_framework.views import APIView from rest_framework.parsers import MultiPartParser, FormParser from rest_framework.response import Response from .serializers import FileUploadSerializer from .models import UploadedFile class FileUploadAPIView(APIView): """List all files or upload new file""" parser_classes = [MultiPartParser, FormParser] def get(self, request): files = UploadedFile.objects.all().order_by('-uploaded_at') serializer = FileUploadSerializer(files, many=True) return Response(serializer.data) def post(self, request): serializer = FileUploadSerializer(data=request.data) if serializer.is_valid(): serializer.save() return Response({ 'message': 'File uploaded successfully!', 'data': serializer.data }, status=status.HTTP_201_CREATED) return Response(serializer.errors, status=status.HTTP_400_BAD_REQUEST) class FileDetailAPIView(APIView): """Get or delete a file""" def get_object(self, pk): try: return UploadedFile.objects.get(pk=pk) except UploadedFile.DoesNotExist: return None def get(self, request, pk): file_obj = self.get_object(pk) if not file_obj: return Response( {'error': 'File not found'}, status=status.HTTP_404_NOT_FOUND ) serializer = FileUploadSerializer(file_obj) return Response(serializer.data) def delete(self, request, pk): file_obj = self.get_object(pk) if not file_obj: return Response( {'error': 'File not found'}, status=status.HTTP_404_NOT_FOUND ) # Delete file from storage file_obj.file.delete() file_obj.delete() return Response( {'message': 'File deleted successfully!'}, status=status.HTTP_204_NO_CONTENT )
Step 4: Configure URLs
# urls.py from django.urls import path from . import views urlpatterns = [ path('', views.FileUploadAPIView.as_view(), name='file-upload'), path('<int:pk>/', views.FileDetailAPIView.as_view(), name='file-detail'), ]
# project level urls.py from django.contrib import admin from django.urls import path, include from django.conf import settings from django.conf.urls.static import static urlpatterns = [ path('admin/', admin.site.urls), path('api/files/', include('fileupload.urls')), ] if settings.DEBUG: urlpatterns += static(settings.MEDIA_URL, document_root=settings.MEDIA_ROOT)
Step 5: Configure Media Settings
# settings.py import os MEDIA_URL = '/media/' MEDIA_ROOT = os.path.join(BASE_DIR, 'media')
Design REST API to accept TU Registration Number, Email Address, and Upload Project File with following validation rules:
- Registration number, email and upload file are mandatory field
- Email address should be a proper email format
- Upload file format must include pdf, doc, docx, ppt, pptx, jpeg file format
- File size must be less than 5MB
Step 1: Create Project Submission Model
# models.py from django.db import models class ProjectSubmission(models.Model): tu_registration_number = models.CharField(max_length=50, unique=True) email = models.EmailField() project_file = models.FileField(upload_to='projects/') uploaded_at = models.DateTimeField(auto_now_add=True) def __str__(self): return f"{self.tu_registration_number} - {self.email}"
Step 2: Configure Media Settings
# settings.py (add at bottom) import os MEDIA_URL = '/media/' MEDIA_ROOT = os.path.join(BASE_DIR, 'media')
Step 3: Run Migrations
python manage.py makemigrations python manage.py migrate
Step 4: Create DRF Serializer with Validation
# serializers.py from rest_framework import serializers from .models import ProjectSubmission class ProjectSubmissionSerializer(serializers.Serializer): id = serializers.IntegerField(read_only=True) tu_registration_number = serializers.CharField( max_length=50, error_messages={'required': 'TU Registration Number is required', 'blank': 'TU Registration Number is required'} ) email = serializers.EmailField( error_messages={'required': 'Email Address is required', 'invalid': 'Please enter a valid email address'} ) project_file = serializers.FileField( error_messages={'required': 'Project File is required'} ) uploaded_at = serializers.DateTimeField(read_only=True) def validate_tu_registration_number(self, value): """Check if registration number already exists""" if ProjectSubmission.objects.filter(tu_registration_number=value).exists(): raise serializers.ValidationError('This registration number already submitted') return value def validate_project_file(self, value): """Validate file type and size""" allowed_extensions = ['pdf', 'doc', 'docx', 'ppt', 'pptx', 'jpeg', 'jpg'] file_extension = value.name.split('.')[-1].lower() if file_extension not in allowed_extensions: raise serializers.ValidationError( 'File format must be pdf, doc, docx, ppt, pptx, or jpeg' ) # Check file size (max 5MB) max_size = 5 * 1024 * 1024 # 5MB in bytes if value.size > max_size: raise serializers.ValidationError( 'File size must be less than 5MB' ) return value def create(self, validated_data): """Create project submission instance""" return ProjectSubmission.objects.create(**validated_data)
Step 5: Create API Views (Class-Based)
# views.py from rest_framework import status from rest_framework.views import APIView from rest_framework.parsers import MultiPartParser, FormParser from rest_framework.response import Response from .serializers import ProjectSubmissionSerializer from .models import ProjectSubmission class ProjectSubmissionListAPIView(APIView): """List all submissions or create new submission""" parser_classes = [MultiPartParser, FormParser] def get(self, request): submissions = ProjectSubmission.objects.all().order_by('-uploaded_at') serializer = ProjectSubmissionSerializer(submissions, many=True) return Response(serializer.data) def post(self, request): serializer = ProjectSubmissionSerializer(data=request.data) if serializer.is_valid(): serializer.save() return Response({ 'message': 'Project submitted successfully!', 'data': serializer.data }, status=status.HTTP_201_CREATED) return Response(serializer.errors, status=status.HTTP_400_BAD_REQUEST) class ProjectSubmissionDetailAPIView(APIView): """Get or delete a submission""" def get_object(self, pk): try: return ProjectSubmission.objects.get(pk=pk) except ProjectSubmission.DoesNotExist: return None def get(self, request, pk): submission = self.get_object(pk) if not submission: return Response( {'error': 'Submission not found'}, status=status.HTTP_404_NOT_FOUND ) serializer = ProjectSubmissionSerializer(submission) return Response(serializer.data) def delete(self, request, pk): submission = self.get_object(pk) if not submission: return Response( {'error': 'Submission not found'}, status=status.HTTP_404_NOT_FOUND ) # Delete file from storage submission.project_file.delete() submission.delete() return Response( {'message': 'Submission deleted successfully!'}, status=status.HTTP_204_NO_CONTENT )
Step 6: Configure URLs
# urls.py from django.urls import path from . import views urlpatterns = [ path('', views.ProjectSubmissionListAPIView.as_view(), name='submission-list'), path('<int:pk>/', views.ProjectSubmissionDetailAPIView.as_view(), name='submission-detail'), ]
# project level urls.py from django.contrib import admin from django.urls import path, include from django.conf import settings from django.conf.urls.static import static urlpatterns = [ path('admin/', admin.site.urls), path('api/submissions/', include('projectsubmission.urls')), ] if settings.DEBUG: urlpatterns += static(settings.MEDIA_URL, document_root=settings.MEDIA_ROOT)
Lab: CRUD with DRF
Notes API
Build a Notes CRUD API using Django Rest Framework.
Step 1: Create Note Model
# models.py from django.db import models class Note(models.Model): title = models.CharField(max_length=100) description = models.TextField() created_at = models.DateTimeField(auto_now_add=True) def __str__(self): return self.title class Meta: ordering = ['-id'] # Latest first
Step 2: Run Migrations
python manage.py makemigrations python manage.py migrate
Step 3: Create DRF Serializer with Validation
# serializers.py from rest_framework import serializers from .models import Note class NoteSerializer(serializers.Serializer): id = serializers.IntegerField(read_only=True) title = serializers.CharField( max_length=100, error_messages={'required': 'Title is required', 'blank': 'Title is required'} ) description = serializers.CharField( error_messages={'required': 'Description is required', 'blank': 'Description is required'} ) created_at = serializers.DateTimeField(read_only=True) def create(self, validated_data): """Create note instance""" return Note.objects.create(**validated_data) def update(self, instance, validated_data): """Update note instance""" instance.title = validated_data.get('title', instance.title) instance.description = validated_data.get('description', instance.description) instance.save() return instance
Step 4: Create API Views (Class-Based)
# views.py from rest_framework import status from rest_framework.views import APIView from rest_framework.response import Response from .serializers import NoteSerializer from .models import Note class NoteListAPIView(APIView): """List all notes or create new note""" def get(self, request): notes = Note.objects.all() serializer = NoteSerializer(notes, many=True) return Response(serializer.data) def post(self, request): serializer = NoteSerializer(data=request.data) if serializer.is_valid(): serializer.save() return Response({ 'message': 'Note added successfully!', 'data': serializer.data }, status=status.HTTP_201_CREATED) return Response(serializer.errors, status=status.HTTP_400_BAD_REQUEST) class NoteDetailAPIView(APIView): """Get, update or delete a note""" def get_object(self, pk): try: return Note.objects.get(pk=pk) except Note.DoesNotExist: return None def get(self, request, pk): note = self.get_object(pk) if not note: return Response( {'error': 'Note not found'}, status=status.HTTP_404_NOT_FOUND ) serializer = NoteSerializer(note) return Response(serializer.data) def put(self, request, pk): note = self.get_object(pk) if not note: return Response( {'error': 'Note not found'}, status=status.HTTP_404_NOT_FOUND ) serializer = NoteSerializer(note, data=request.data) if serializer.is_valid(): serializer.save() return Response({ 'message': 'Note updated successfully!', 'data': serializer.data }) return Response(serializer.errors, status=status.HTTP_400_BAD_REQUEST) def delete(self, request, pk): note = self.get_object(pk) if not note: return Response( {'error': 'Note not found'}, status=status.HTTP_404_NOT_FOUND ) note.delete() return Response( {'message': 'Note deleted successfully!'}, status=status.HTTP_204_NO_CONTENT )
Step 5: Configure URLs
# urls.py from django.urls import path from . import views app_name = 'notes' urlpatterns = [ path('', views.NoteListAPIView.as_view(), name='note-list'), path('<int:pk>/', views.NoteDetailAPIView.as_view(), name='note-detail'), ]
# project level urls.py from django.contrib import admin from django.urls import path, include urlpatterns = [ path('admin/', admin.site.urls), path('api/notes/', include('notes.urls')), ]
Grocery Bud API
Build a Grocery List CRUD API using Django Rest Framework.
Step 1: Create GroceryItem Model
# models.py from django.db import models class GroceryItem(models.Model): name = models.CharField(max_length=200) completed = models.BooleanField(default=False) created_at = models.DateTimeField(auto_now_add=True) def __str__(self): return self.name class Meta: ordering = ['-created_at']
Step 2: Run Migrations
python manage.py makemigrations python manage.py migrate
Step 3: Create DRF Serializer with Validation
# serializers.py from rest_framework import serializers from .models import GroceryItem class GroceryItemSerializer(serializers.Serializer): id = serializers.IntegerField(read_only=True) name = serializers.CharField( max_length=200, error_messages={'required': 'Name is required', 'blank': 'Name is required'} ) completed = serializers.BooleanField(default=False, required=False) created_at = serializers.DateTimeField(read_only=True) def create(self, validated_data): """Create grocery item instance""" return GroceryItem.objects.create(**validated_data) def update(self, instance, validated_data): """Update grocery item instance""" instance.name = validated_data.get('name', instance.name) instance.completed = validated_data.get('completed', instance.completed) instance.save() return instance
Step 4: Create API Views (Class-Based)
# views.py from rest_framework import status from rest_framework.views import APIView from rest_framework.response import Response from .serializers import GroceryItemSerializer from .models import GroceryItem class GroceryListAPIView(APIView): """List all grocery items or create new item""" def get(self, request): items = GroceryItem.objects.all() serializer = GroceryItemSerializer(items, many=True) return Response(serializer.data) def post(self, request): serializer = GroceryItemSerializer(data=request.data) if serializer.is_valid(): serializer.save() return Response({ 'message': 'Item added successfully!', 'data': serializer.data }, status=status.HTTP_201_CREATED) return Response(serializer.errors, status=status.HTTP_400_BAD_REQUEST) class GroceryDetailAPIView(APIView): """Get, update or delete a grocery item""" def get_object(self, pk): try: return GroceryItem.objects.get(pk=pk) except GroceryItem.DoesNotExist: return None def get(self, request, pk): item = self.get_object(pk) if not item: return Response( {'error': 'Item not found'}, status=status.HTTP_404_NOT_FOUND ) serializer = GroceryItemSerializer(item) return Response(serializer.data) def put(self, request, pk): """Full update""" item = self.get_object(pk) if not item: return Response( {'error': 'Item not found'}, status=status.HTTP_404_NOT_FOUND ) serializer = GroceryItemSerializer(item, data=request.data) if serializer.is_valid(): serializer.save() return Response({ 'message': 'Item updated successfully!', 'data': serializer.data }) return Response(serializer.errors, status=status.HTTP_400_BAD_REQUEST) def patch(self, request, pk): """Partial update - can be used for toggling completed status""" item = self.get_object(pk) if not item: return Response( {'error': 'Item not found'}, status=status.HTTP_404_NOT_FOUND ) serializer = GroceryItemSerializer(item, data=request.data, partial=True) if serializer.is_valid(): serializer.save() return Response({ 'message': 'Item updated successfully!', 'data': serializer.data }) return Response(serializer.errors, status=status.HTTP_400_BAD_REQUEST) def delete(self, request, pk): item = self.get_object(pk) if not item: return Response( {'error': 'Item not found'}, status=status.HTTP_404_NOT_FOUND ) item.delete() return Response( {'message': 'Item deleted successfully!'}, status=status.HTTP_204_NO_CONTENT ) class GroceryToggleAPIView(APIView): """Toggle completed status of a grocery item""" def post(self, request, pk): try: item = GroceryItem.objects.get(pk=pk) item.completed = not item.completed item.save() serializer = GroceryItemSerializer(item) return Response({ 'message': 'Item toggled successfully!', 'data': serializer.data }) except GroceryItem.DoesNotExist: return Response( {'error': 'Item not found'}, status=status.HTTP_404_NOT_FOUND )
Step 5: Configure URLs
# urls.py from django.urls import path from . import views app_name = 'grocery' urlpatterns = [ path('', views.GroceryListAPIView.as_view(), name='grocery-list'), path('<int:pk>/', views.GroceryDetailAPIView.as_view(), name='grocery-detail'), path('<int:pk>/toggle/', views.GroceryToggleAPIView.as_view(), name='grocery-toggle'), ]
# project level urls.py from django.contrib import admin from django.urls import path, include urlpatterns = [ path('admin/', admin.site.urls), path('api/grocery/', include('grocery.urls')), ]
API Endpoints:
GET /api/grocery/- List all grocery itemsPOST /api/grocery/- Create new grocery itemGET /api/grocery/<id>/- Get single grocery itemPUT /api/grocery/<id>/- Update grocery item (full update)PATCH /api/grocery/<id>/- Partial update grocery itemDELETE /api/grocery/<id>/- Delete grocery itemPOST /api/grocery/<id>/toggle/- Toggle completed status
Create Test Data
python manage.py shell
from grocery.models import GroceryItem GroceryItem.objects.create(name="milk", completed=True) GroceryItem.objects.create(name="bread", completed=True) GroceryItem.objects.create(name="eggs", completed=False) GroceryItem.objects.create(name="butter", completed=False) exit()
Integrating React
First, update django backend api to resolve CORS error
You need to install django-cors-headers:
pip install django-cors-headers
Then in your settings.py:
INSTALLED_APPS = [ ... "corsheaders", ] MIDDLEWARE = [ "corsheaders.middleware.CorsMiddleware", # must be as high as possible "django.middleware.common.CommonMiddleware", ... ] # Allow your Vite dev server CORS_ALLOWED_ORIGINS = [ "http://localhost:5173", ]
Now, Complete the Frontend with React for Grocery Bud from Unit 2: React.js
Update App.jsx
-
Remove functions getLocalStorage and setLocalStorage
-
Remove Variable initialList
Update initial items state to be empty list
const [items, setItems] = useState([]);
Add server url
Can be added above App component
const BASE_URL = "http://127.0.0.1:8000/api/grocery";
Add useEffect to load initial data list from server
Add following code inside App component
useEffect(() => { const fetchItems = async () => { try { const res = await fetch(`${BASE_URL}/`); if (!res.ok) throw new Error("Failed to fetch items"); const data = await res.json(); setItems(data); } catch (err) { toast.error("Could not load grocery list"); } }; fetchItems(); }, []);
Update addItem function
const addItem = async (itemName) => { try { const res = await fetch(`${BASE_URL}/`, { method: "POST", headers: { "Content-Type": "application/json" }, body: JSON.stringify({ name: itemName, completed: false }), }); if (!res.ok) throw new Error(); const newItem = await res.json(); setItems((prev) => [...prev, newItem.data]); toast.success("Grocery item added"); } catch { toast.error("Could not add item"); } };
Update editCompleted function
const editCompleted = async (itemId) => { try { const res = await fetch(`${BASE_URL}/${itemId}/toggle/`, { method: "POST", }); if (!res.ok) throw new Error(); const updated = await res.json(); setItems((prev) => prev.map((item) => (item.id === itemId ? updated.data : item)), ); } catch { toast.error("Could not update item"); } };
Update removeItem function
const removeItem = async (itemId) => { try { const res = await fetch(`${BASE_URL}/${itemId}/`, { method: "DELETE" }); if (!res.ok) throw new Error(); setItems((prev) => prev.filter((item) => item.id !== itemId)); toast.success("Item deleted"); } catch { toast.error("Could not delete item"); } };
Update updateItemName function
const updateItemName = async (newName) => { try { const res = await fetch(`${BASE_URL}/${editId}/`, { method: "PATCH", headers: { "Content-Type": "application/json" }, body: JSON.stringify({ name: newName }), }); if (!res.ok) throw new Error(); const updated = await res.json(); setItems((prev) => prev.map((item) => (item.id === editId ? updated.data : item)), ); setEditId(null); toast.success("Item updated"); } catch { toast.error("Could not update item"); } };
All set. You should now see your Grocery Bud in action integrated with Django Rest APIs.